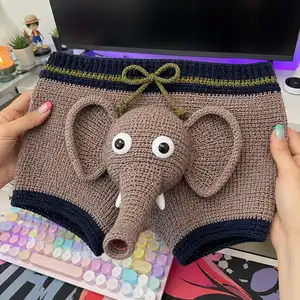
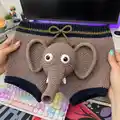
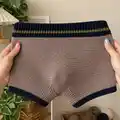
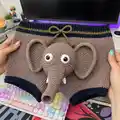
A playful pair of men’s crochet underwear featuring a 3D elephant face with floppy ears, protruding trunk and tiny tusks. The shorts are worked in a textured single crochet fabric with contrasting navy ribbed waistband and cuff trims, plus an olive drawstring. This pattern includes step-by-step shaping for the shorts and a fully three-dimensional elephant applique that’s sewn to the front center for a hilarious, wearable statement piece.
Progress Tracker
0% Complete
— Head (Elephant Skull) :
Round 1 :
6 sc in magic ring (6)
Round 3 :
(1 sc, inc) x 6 (18)
Round 4 :
(2 sc, inc) x 6 (24)
Round 5 :
(3 sc, inc) x 6 (30)
Round 6 :
(4 sc, inc) x 6 (36)
Round 7 :
(5 sc, inc) x 6 (42)
Round 8 :
(6 sc, inc) x 6 (48)
Round 9-12 :
1 sc in each st around (48)
Info :
Place safety-eye discs between Rounds 11-12. Mark the round for the top of head so you attach eyes symmetrically. For the look in the photo, space eyes about 8-10 stitches apart center-to-center on Round 12. If using 20mm discs, measure gap visually to center the trunk base between them.
Round 13-16 :
1 sc in each st around (48)
Info :
If you prefer embroidered eyes instead, leave eye placement markers and embroider after stuffing. Otherwise secure safety eyes with washers now and test placement before further stuffing.
Round 17 :
(6 sc, dec) x 6 (42)
Round 18 :
(5 sc, dec) x 6 (36)
Round 19 :
(4 sc, dec) x 6 (30)
Info :
Begin stuffing the head firmly but not overstuffed. Use small bits of fiberfill to avoid lumps — push into the eye sockets area and around the upper curvature of the skull before closing further.
Round 20 :
(3 sc, dec) x 6 (24)
Round 21 :
(2 sc, dec) x 6 (18)
Round 22 :
(1 sc, dec) x 6 (12)
Info :
Fasten off leaving a long tail for sewing. Finish stuffing the head so it maintains a rounded, slightly flattened front where the trunk will be sewn. Set head aside ready for trunk attachment.
— Trunk (Make 1) :
Round 1 :
6 sc in magic ring (6)
Round 3 :
(1 sc, inc) x 6 (18)
Round 4 :
(2 sc, inc) x 6 (24)
Round 5 :
1 sc in each st around (24)
Round 6 :
1 sc in each st around (24)
Info :
The trunk is a long tapered tube. Maintain tight tension to avoid a floppy trunk. If you want the trunk to be slightly poseable, we recommend inserting a slim wire or flexible pipe cleaner before you finish closing the tip.
Round 7 :
(3 sc, dec) x 6 (18)
Round 8-10 :
1 sc in each st around (18)
Round 11 :
(2 sc, dec) x 6 (12)
Info :
Start stuffing the trunk lightly from the base upward so it keeps a rounded profile and the tip remains hollow enough if you want to leave an opening for a poseable wire later.
Round 12-14 :
1 sc in each st around (12)
Round 15 :
(1 sc, dec) x 4, 1 sc x 0 (8) — adjust decreases to reach (8)
Round 16-18 :
1 sc in each st around (8)
Round 20 :
1 sc in each st around (4)
Info :
Fasten off leaving long tail to sew the trunk to the head. If inserting wire, feed wire up from the tip now before final closing. Slightly stuff the wider base so it can be sewn flat against the head and sit securely.
Round 21 :
Do not close fully yet — leave the last 4 sts open so you can whip stitch to the head. Optional: crochet 2 extra rounds of BLO to create a slight ridge where trunk meets head
— Ears (Make 2) :
Round 1 :
6 sc in magic ring (6)
Round 3 :
(1 sc, inc) x 6 (18)
Round 4 :
(2 sc, inc) x 6 (24)
Round 5 :
(3 sc, inc) x 6 (30)
Round 6 :
1 sc in each st around (30)
Round 7 :
1 sc in each st around (30)
Info :
These are worked flat into a rounded oval shape. After Round 7, fold the circle slightly and work in rows if you prefer a flatter ear. The outer ear edge uses a tighter finishing round to create the floppy rim.
Round 8 :
BLO 1 sc in each st around (30)
Round 9 :
1 sc in each st around (30)
Round 10 :
(4 sc, dec) x 5 (25)
Round 11 :
(3 sc, dec) x 5 (20)
Round 12 :
1 sc in each st around (20) — Fasten off leaving long tail for sewing
Info :
Pin ears to the head and check the orientation before sewing. The ears in the photo are slightly cupped towards the front — when sewing, position them so the inner edge curves forward over the cheek area. You can add a small running stitch on the inner ear to create that cupped shape.
— Tusks (Make 2) :
Round 1 :
4 sc in magic ring (4)
Round 2 :
1 sc in each st around (4)
Round 3 :
(1 sc, inc) x 2 (6)
Round 4-5 :
1 sc in each st around (6)
Round 6 :
(1 sc, dec) x 2 (4) — Shape into a tapered point and fasten off leaving long tail for sewing
Info :
Stuff tusks lightly to keep shape. Sew tusks beneath the trunk base projecting slightly downwards to mimic small elephant tusks as in the photo.
— Waistband (Ribbed, Navy) :
Info :
Work waistband in navy using alternating FLO/BLO rounds to create ribbing. The waistband is worked as a tube and joined to the main shorts body. The pictured waistband measures approximately 4.5cm (1.75") in finished height; adjust rounds for desired height.
Round 1 (start) :
Ch 80, join to form round carefully with no twist (80) — adjust ch count for size. Mark the join
Round 2 :
1 sc in each st around (80)
Round 3 :
1 sc in each st FLO (80)
Round 4 :
1 sc in each st BLO (80)
Round 5-8 :
Repeat Rounds 3-4 to desired rib height (80)
Info :
Before finishing the waistband, weave in an olive contrast stripe row: change to olive and sc in each st for one round, then return to navy. Leave opening to thread drawstring through two adjacent chain spaces or create small eyelets by making ch1, skip 1 st, sc next to form tidy eyelet row.
Round 9 :
1 sc in each st (80) — Fasten off and leave tail for seaming to body
— Body / Shorts (Main Tubular Body) :
Round 1 :
Join main color to the bottom of the waistband seam edge, crochet evenly down to create a top row that will become the shorts tube — 80 sc around (80)
Round 2-6 :
1 sc in each st around (80) — These form the upper hip section
Info :
Measure desired rise from waistband to crotch. The pictured shorts have a mid-rise fit with approximately 12 rounds from waistband to top of crotch shaping. Keep even stitch tension to form a stable, non-stretchy fabric.
Round 7 :
Place markers to indicate crotch front center and back center. Decide where you will place the elephant head — center the head on front center and mark for later attachment.
Round 8-14 :
1 sc in each st around (80) — Work these rounds to build front and back panels
Info :
To fit leg openings, you will divide the tube into two leg panels and create decreases for inner thigh shaping and increase along outer leg for roomy thigh. Mark the beginning of each leg panel: for an 80-st tube, the leg openings begin at approx st 1 and st 41 (adjust if your tube has a different stitch count).
Round 15 :
Start left leg opening: sc in next 20 sts, leave next 40 sts unworked (these will be the inner rise), sc in last 20 sts — if working in the round, place a removable marker at the end of the first 20 sts (20) and start second cuff after finishing first leg part
Round 16-24 (Left Leg) :
Work the first leg in the round: 1 sc in each of 20 sts for 9 rounds (20) — this creates a short tube for the left leg
Info :
After the left leg tube is worked, rejoin at the inner thigh and work the crotch join: using tapestry needle, seam the inner leg opening closed from bottom to top about 3 rounds deep to form a gusset. Then rejoin to continue body.
Round 25 :
Rejoin to main body loop. After closing inner seam of left leg, sc across remaining 40 sts to connect left and right leg areas (80)
Round 26-34 :
1 sc in each st around (80) — Continue main body shaping; these rounds will determine the final hip circumference and where the elephant head will be sewn on
Info :
Position the elephant head at front center between Rounds 26-30 for a natural placement aligned with the cloth front. Pin head in place and check that trunk projects downward centered over the crotch seam before sewing. Sew head through several rounds of the shorts to secure thoroughly.
Round 35 :
Optional: For decorative navy lower band, change to navy and sc in each st around for 2-3 rounds (80)
Round 36-40 :
If shaping for fullness, use (9 sc, inc) x 8 to add 8 sts per round until desired fit is achieved; otherwise maintain 1 sc in each st around (80)
Info :
Try the shorts on (or measure on intended wearer) before finishing leg cuffs: adjust rounds here to lengthen or shorten. The pictured pair is short and boxy, so the legs are approx 9-11 rounds from crotch seam to cuff.
— Leg Cuffs (Make 2, Navy Trim) :
Round 1 :
Attach navy yarn at the leg opening edge, sc around the leg edge evenly — if leg tube was 20 sts, sc 20 around (20)
Round 2 :
1 sc in each st around (20)
Round 3 :
1 sc in each st BLO (20)
Round 4-6 :
Repeat Rounds 2-3 to reach cuff height (20)
Round 7 :
Optional decorative picot or reverse sc: *sc, ch1, sl st into same st* around for finish — Fasten off
Info :
Make sure cuffs are neat and match both legs. Block lightly with steam if your yarn allows to even out ribbed texture before final sewing.
— Drawstring (Olive) :
Round 1 :
Ch 90 using a smaller hook or cord maker for a tight twisted cord (approximately length to go through waistband plus tie length)
Round 2 :
Slip stitch through each chain to tighten and form a neat cord OR use i-cord technique on 3.0mm hook: pick up 3 sts, work i-cord for required length (90)
Info :
Finish each end with a small knot and cover with a small round: 6 sc in magic ring, 1-2 rounds of sc to create a small bulb. This makes the ends look finished as in the photo.
Round 3 :
Fasten off and weave into waistband eyelet row. Tie a bow centered at front.
— Additional Decorative Stripe (Olive) :
Info :
Before joining waistband to main body, work one round of olive contrast: join olive yarn and sc in each st around for a single stripe. Secure ends and return to navy or main color.
— Finishing & Assembly Tips :
Info :
Use mattress stitch or whip stitch to sew the elephant head to the shorts. Align the trunk center with the front center seam. Sew through multiple rounds at the back of the head and several rounds of the shorts to distribute weight and prevent sagging. Reinforce the seam with several passes.
Info :
Sew ears to the top sides of the skull aligning inner ear edge approximately between Rounds 8-12 of the head — check on the mounted head once pinned. Sew tusks into position beneath the trunk base and secure with several small stitches inside the shorts to prevent pulling away during use.
Info :
Weave all tails through several layers and tie off securely on the interior of the shorts. If using safety eyes, verify the washer is firmly in place before final closing and add a tiny dot of fabric glue if you like extra security (not necessary with locking backs).
Info :
Optional: add a small internal reinforcement patch (a small rectangle of spare crocheted fabric) behind the head attachment inside the shorts and sew through it to disperse stress across a larger area for durability.
This fun, cheeky project combines practical crochet wearable construction with an amusing 3D amigurumi applique for a guaranteed conversation starter. The step-by-step approach helps you build the shorts, sculpt the elephant head, and assemble everything securely for lasting wear. I hope you enjoy stitching this whimsical piece as much as I enjoyed writing the pattern! 🧶😂💫