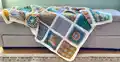
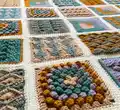
Make a stunning Gallery Throw that blends texture, color and modern design into a cozy afghan you will reach for again and again. This pattern uses six unique square stitch patterns worked in five coordinating colorways to create 30 one-of-a-kind squares. Youll learn bobbles, cables, puffs, popcorns and cluster stitches while assembling a framed, edged blanket that looks polished and professional.
Progress Tracker
0% Complete
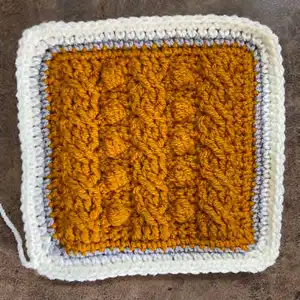
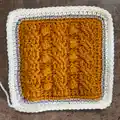
— Bobble-Cable Square :
Info :
Turning chains do not count as a stitch. Square is made in turned rows, then edgings are added in the round. Set-up rnd is made in MC around 3 sides to finish edges nicely before contrast border and edging rnds are worked.
Info :
Special sts: FPDC (front post double crochet): YO, insert hook from RS to WS to RS around the back (to the front) of post of the indicated st, YO and pull loop back around post to the RS, [YO pull through 2 loops on hook] twice. FPtr (front post treble crochet): YO twice, insert hook from RS to WS to RS around the back (to the front) of post of the indicated st, YO and pull loop back around post to the RS, [YO pull through 2 loops on hook] three times. MB (make bobble): [YO insert hook into stitch, YO and pull up loop, YO and pull through 2 loops on hook] 5 times, YO and pull through all 6 loops on hook. 1 bobble made.
Info :
3 st markers needed. Make 5 squares with the following color combinations (all Bobble Cable squares are labeled as "BC" in Placement Chart): 1) MC=A, CC=E, EC=F 2) MC=B, CC=C , EC=F 3) MC=C, CC=B, EC=F 4) MC=D, CC=A, EC=F 5) MC=E, CC=D, EC=F
Row 1 (RS) :
With MC, ch 21. Beginning with the second ch from hook and working into the bottom of the chain, 1 SC into each st. Place one stitch marker in bottom (or side edge) of first st and leave in place until Edging Set-up Rnd is worked. Place 2 stitch markers into the last foundation ch worked in this row. Leave these 2 markers in place until Contrast Border is worked. 20 sts.
Row 2 (WS) :
Ch 1, turn, 1 SC into each st.
Row 3 (RS) :
Ch 1, turn, 1 SC into next st, locate post of stitch from Row 1, that is directly below the next st of the working row. FPDC around this post, FPDC around each of the next 3 posts from Row 1, [skip next 4 sts in working row (behind the post sts just made), SC in each of next 3 sts of working row, skip next 3 posts of Row 1, FPDC around each of the next 4 posts in Row 1] twice, skip next 4 sts in working row, SC in last st of working row.
Row 4 (WS) :
Ch 1, turn, 1 SC into each st.
Row 5 (RS) :
Ch 1, turn, 1 SC into next st, [skip each of next 2 post sts from previous RS row, FPtr around each of the next 2 post sts, working in front of sts just made, FPtr in each of the skipped post sts (from previous RS row), skip each of the next 4 sts in working row (the 4 sts behind the post sts just made), SC in next st of working row, MB in next st, SC in next st], twice, skip each of next 2 post sts from previous RS row, FPtr around each of the next 2 post sts, working in front of sts just made, FPtr in each of the skipped post sts (from previous RS row), skip each of the next 4 sts in working row (the 4 sts behind the post sts just made), SC in next st of working row.
Row 6 (WS) :
Ch 1, turn, 1 SC into each st.
Row 7 (RS) :
Ch 1, turn, 1 SC into next st, [FPDC in each of the next 4 post sts from previous RS row, skip each of the next 4 sts in working row (the 4 sts behind the post sts just made), SC in each of the next 3 sts of working row] twice, FPDC in each of the next 4 post sts from previous RS row, skip each of the next 4 sts in working row (the 4 sts behind the post sts just made), SC in last st of working row.
Rows 8-23 :
Repeat Rows 4-7 four more times. Fasten off.
Edging Set-up Rnd :
Use a stitch marker to divide each side edge of square into two equal sections. Hold square sideways, ready to work along the side-edge of piece beginning at marked corner (this corner was marked with one marker after working Row 1). Join MC at marked corner by pulling up a loop and ch 1 (chain does not count as a stitch. Work across edge (toward top of square) making 10 SC into each of the two sections along the side of square. Rotate work 90 degrees and SC in each of the next 20 sts across top edge of square, rotate work 90 degrees and make 10 SC in each of the two marked sections along second side edge. Fasten off. 20 SC were worked along first side, 20 SC across top edge, the 20 SC were worked across second side.
CC Border :
Pull up loop of CC in stitch marked with 2 markers. SC across each edge of square making 1 SC into each of the 20 sts along each side. Sl st in first SC to join. Fasten off. 80 sts.
Edging Rnd 1 :
Pull up loop of EC in first st of last rnd, ch 1 (does not count as a st), 2 SC in same st, [SC in each of next 18 sts, 2 SC in each of next 2 sts] three times, SC in each of next 18 sts, 2 SC in last st, sl st to first SC of rnd to join. 88 sts.
Edging Rnd 2 :
Ch 1 (does not count as a st), 2 SC in same st, [SC in each of next 20 sts, 2 SC in each of next 2 sts] three times, SC in each of next 20 sts, 2 SC in last st, sl st to first SC of rnd to join. 96 sts. Fasten off leaving long tail for sewing.
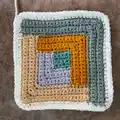
— Log Cabin Square :
Info :
Turning chains do not count as a stitch. Square is made in turned short rows from the center out, then edging is added in the round.
Info :
Make 5 squares with the following color sequence; the color listed first is the color for beginning (center of square) and the last color listed is the edging color. (All Log Cabin squares are labeled as "LC" in Placement Chart): 1) A, B, C, D, E, F 2) B, C, D, E, A, F 3) C, D, E, A, B, F 4) D, E, A, B, C, F 5) E, A, B, C, D, F
First Color Row 1 (RS) :
With first color, ch 5. Row 1 (RS): Beginning with the second ch from hook and working into the bottom of the chain, 1 SC into each st. 4 sts.
Rows 2-5 :
Ch 1, turn, 1 SC into each st. Fasten off.
Second Color Row 1 (RS) :
With RS facing, pull up loop of second color next to last st made (at corner) and prepare to work along the side of the square (along the row-ends). Ch 1 (does not count as a stitch now, and throughout), SC 5 times evenly along row ends, rotate work 90 degrees and work 2 SC in next st, 1 SC in each of the next 3 sts. 10 sts made.
Row 2 (WS) :
Ch 1 turn, 1 SC in each of next 4 sts, [1 SC and 1 HDC] in next st, [1 HDC and 1 SC] in next st, 1 SC in each of next 4 sts. 12 sts.
Row 3 (RS) :
Ch 1 turn, 1 SC in each of next 5 sts, [1 SC and 1 HDC] in next st, [1 HDC and 1 SC] in next st, 1 SC in each of next 5 sts. 14 sts.
Row 4 (WS) :
Ch 1 turn, 1 SC in each of next 6 sts, [1 SC and 1 HDC] in next st, [1 HDC and 1 SC] in next st, 1 SC in each of next 6 sts. 16 sts.
Row 5 (RS) :
Ch 1 turn, 1 SC in each of next 7 sts, [1 SC and 1 HDC] in next st, [1 HDC and 1 SC] in next st, 1 SC in each of next 7 sts. 18 sts. Fasten off.
Third Color Row 1 (RS) :
With RS facing, pull up loop of third color next to last st made (at corner) and prepare to work along the side of the square (along the row-ends). Ch 1, 5 SC evenly along row ends of second color, 5 SC evenly along row ends of first color, rotate work 90 degrees, and work 2 SC in next st, 1 SC in each of the next 3 sts, 5 SC evenly along row ends of second color. 20 sts.
Row 2 (WS) :
Ch 1 turn, 1 SC in each of next 9 sts, [1 SC and 1 HDC] in next st, [1 HDC and 1 SC] in next st, 1 SC in each of next 9 sts. 22 sts.
Row 3 (RS) :
Ch 1 turn, 1 SC in each of next 10 sts, [1 SC and 1 HDC] in next st, [1 HDC and 1 SC] in next st, 1 SC in each of next 10 sts. 24 sts.
Row 4 (WS) :
Ch 1 turn, 1 SC in each of next 11 sts, [1 SC and 1 HDC] in next st, [1 HDC and 1 SC] in next st, 1 SC in each of next 11 sts. 26 sts.
Row 5 (RS) :
Ch 1 turn, 1 SC in each of next 12 sts, [1 SC and 1 HDC] in next st, [1 HDC and 1 SC] in next st, 1 SC in each of next 12 sts. 28 sts. Fasten off.
Fourth Color Row 1 (RS) :
With RS facing, pull up loop of fourth color next to last st made (at corner) and prepare to work along the side of the square (along the row-ends). Ch 1, 5 SC evenly along row ends of third color, 1 SC in each of the next 8 sts, [1 SC and 1 HDC] in next st, [1 HDC and 1 SC] in next st, 1 SC in each of the next 8 sts, 5 SC evenly along row ends of third color. 30 sts.
Row 2 (WS) :
Ch 1 turn, 1 SC in each of next 14 sts, [1 SC and 1 HDC] in next st, [1 HDC and 1 SC] in next st, 1 SC in each of next 14 sts. 32 sts.
Row 3 (RS) :
Ch 1 turn, 1 SC in each of next 15 sts, [1 SC and 1 HDC] in next st, [1 HDC and 1 SC] in next st, 1 SC in each of next 15 sts. 34 sts.
Row 4 (WS) :
Ch 1 turn, 1 SC in each of next 16 sts, [1 SC and 1 HDC] in next st, [1 HDC and 1 SC] in next st, 1 SC in each of next 16 sts. 36 sts.
Row 5 (RS) :
Ch 1 turn, 1 SC in each of next 17 sts, [1 SC and 1 HDC] in next st, [1 HDC and 1 SC] in next st, 1 SC in each of next 17 sts. 38 sts. Fasten off.
Fifth Color Row 1 (RS) :
With RS facing, pull up loop of fifth color next to last st made (at corner) and prepare to work along the side of the square (along the row-ends). Ch 1, 5 SC evenly along row ends of fourth color, 1 SC in each of the next 13 sts, [1 SC and 1 HDC] in next st, [1 HDC and 1 SC] in next st, 1 SC in each of the next 13 sts, 5 SC evenly along row ends of fourth color. 40 sts.
Row 2 (WS) :
Ch 1 turn, 1 SC in each of next 19 sts, [1 SC and 1 HDC] in next st, [1 HDC and 1 SC] in next st, 1 SC in each of next 19 sts. 42 sts.
Row 3 (RS) :
Ch 1 turn, 1 SC in each of next 20 sts, [1 SC and 1 HDC] in next st, [1 HDC and 1 SC] in next st, 1 SC in each of next 20 sts. 44 sts.
Row 4 (WS) :
Ch 1 turn, 1 SC in each of next 21 sts, 1 HDC in each of the next 2 sts, 1 SC in each of next 21 sts. 44 sts. Note- there is no increase on this row!
Row 5 (RS) :
Ch 1 turn, 1 SC in each of next 21 sts, [1 SC and 1 HDC] in next st, [1 HDC and 1 SC] in next st, 1 SC in each of next 21 sts. 46 sts. Fasten off.
Edging (Sixth Color) Rnd 1 (RS) :
With RS facing, pull up loop of sixth color next to last st made (at corner) and prepare to work along the side of the square (along the row-ends). Ch 1, 4 SC evenly along row ends of fifth color, 1 SC in each of the next 38 sts, 4 SC evenly along row ends of fourth color, (rotate to continue in the round), 1 SC in each of the next 46 sts, sl st to first SC to join. 92 sts.
Edging Rnd 2 (RS) :
Ch 1, [1 SC in each of the next 22 sts, 2 SC in next st] 4 times, sl st to top of first SC of rnd to join. 96 sts. Fasten off leaving long tail for sewing. Weave in all ends except for long tail.
— Grain Square :
Info :
Turning chains do not count as a stitch. Square is made in turned rows, then edging is added in the round.
Info :
Make 5 squares with the following color combinations (all Grain squares are labeled as "G" in Placement Chart): 1) MC = A, EC = F 2) MC = B, EC = F 3) MC = C, EC = F 4) MC = D, EC = F 5) MC = E, EC = F
Info :
LPuffC (long puff stitch combination): This stitch combination is worked over the next 6 sts. Stitch count remains the same (no increasing or decreasing). Count 4 sts to the left (or to the right if crocheting left-handed), then count 2 rounds down from working row. This will be the location where you will pull up all of the loops for the puff sts in this combination. When pulling up loops for the long puff sts, be sure to pull them up long enough so that they do not constrict your work. *[YO, insert hook into indicated space below, YO and pull up loop] twice (working into the same space each time), YO and pull through all 5 loops on hook to complete first puff, skip next st in working row (this will be covered/hidden by the puff st just made)**, SC into each of the next 4 sts of working row (be very careful to find the first of these locations for the SC sts- it is covered/hidden by the puff st as well), working into the same location below, work from * to ** to complete the next puff st (and skip the next st in working row. 6 sts worked. Tip: it is very easy to miss the location of the first SC (of the 4 SC) in the middle of this stitch combination! You have to move the puff st to the side to find it. Make extra certain you are working into the correct place- be sure to watch the tutorial on the Creative Crochet Corner for tips!
Row 1 (RS) :
With MC, ch 24. Row 1 (RS): Beginning with the second ch from hook and working into the bottom of the chain, 1 SC into each st. 23 sts.
Rows 2-4 :
Ch 1, turn, 1 SC into each st.
Row 5 :
Ch 1, turn [SC in next st, LPuffC] 3 times, SC in each of the next 2 sts.
Row 6 :
Ch 1, turn, 1 SC into each st.
Rows 7-22 :
Repeat Rows 5 and 6 another 8 times. There are a total of 9 Puff combinations in each of the 3 columns.
Row 23 :
Ch 1, turn, 1 SC into each st. Do not fasten off.
Edging set-up row 1 :
Rotate piece 90 degrees to work along the row-ends (side edge of square). Use a stitch marker to divide edge in half. Continuing with MC, work 10 sl sts evenly along each of the two sections of the side edge ending at bottom corner. Fasten off. 20 sl sts worked.
Edging set-up row 2 :
Hold square so that opposite side-edge is ready to be worked into. Divide side into two equal sections with stitch marker. Pull up loop of MC at bottom corner of square, work 10 sl sts evenly along each of the two sections of the side edge ending at top corner. Fasten off. 20 sl sts worked.
Edging Rnd 1 :
Hold square so that top edge is ready to be worked across. Pull up loop of color F in first st, ch 1 (does not count as a st now and throughout), SC in same st and each of the next 22 sts across, rotate 90-degrees to continue along the side edge, 2 SC into next sl st, SC into each of the 18 sl sts, 2 SC in next sl st, rotate 90-degrees to work across bottom edge, 1 SC into each of the 23 sts across bottom edge, rotate 90-degrees to continue up next side edge, 2 SC in next sl st, 1 SC into each of the 18 sl sts along the side edge, 2 SC in next sl st, sl st into first SC of rnd to join.
Edging Rnd 2 :
Ch 1, [1 SC in each of the next 22 sts, 2 SC in next st] 4 times, sl st in first st to join. Fasten off leaving long tail for sewing.
— Popcorn Granny Square :
Info :
Beginning chains count as part of the first stitch for the popcorn portion. Beginning chains in edging rounds do not count as a stitch. Square is worked from the center out including edging.
Info :
Make 5 squares with the following color sequence; the color listed first is the color for beginning (center of square) and the last color listed is the edging color. (All Popcorn Granny squares are labeled as "PG" in Placement Chart): 1) A, B, C, D, E, F 2) B, C, D, E, A, F 3) C, D, E, A, B, F 4) D, E, A, B, C, F 5) E, A, B, C, D, F
Special sts :
Beginning Popcorn (BPC): Ch 3, 4 DC into ch-sp, elongate loop on hook slightly, remove hook from loop, from front to back insert hook through third ch (of beg-ch-3) then insert hook back through working loop (tightening the loop in place around hook), pull working loop through loop on hook. 1 BPC made. Popcorn (PC): 5 DC into ch-sp, elongate loop on hook slightly, remove hook from loop, from front to back insert hook through first DC (of the 5 DC) then insert hook back through working loop (tightening the loop in place around hook), pull working loop through loop on hook. 1 PC made.
Row 1 (Rnd 1) :
With first color, ch 3, sl st in first ch to join into a small circle. Rnd 1: Work the following group of sts into the small circle: BPC, ch 5, [PC, ch 5] 3 times, sl st into the first chain after BPC was made to join. Fasten off. 4 PC, 4 ch-5 lps.
Rnd 2 :
With second color, place slip knot on hook, then join to any of the ch-5 lps as follows: insert hook through ch-5 lp, yo and pull up lp, pull lp through lp on hook. BPC, ch 2, *[PC, ch 5, PC] in next ch-5 lp, ch 2, rep from * two more times, PC in first ch-5 lp that was worked into in this rnd, ch 5, sl st to first ch after BPC was made to join. Fasten off. 8 PC, 4 ch-5 lps, 4 ch-2 lps.
Rnd 3 :
With third color, place slip knot on hook, then join to any of the ch-5 lps as follows: insert hook through ch-5 lp, yo and pull up lp, pull lp through lp on hook. BPC, ch 2, *PC in next ch-2 sp, ch 2, [PC, ch 5, PC] in next ch-5 lp, ch 2, rep from * another 2 times, PC in next ch-2 sp, ch 2, PC in first ch-5 lp that was worked into in this rnd, ch 5, sl st to first ch after BPC was made to join. Fasten off. 12 PC, 4 ch-5 lps, 8 ch-2 lps.
Rnd 4 :
With fourth color, place slip knot on hook, then join to any of the ch-5 lps as follows: insert hook through ch-5 lp, yo and pull up lp, pull lp through lp on hook. BPC, ch 2, *[PC in next ch-2 sp, ch 2] twice, [PC, ch 5, PC] in next ch-5 lp, ch 2, rep from * another 2 times, [PC in next ch-2 sp, ch 2] twice, PC in first ch-5 lp that was worked into in this rnd, ch 5, sl st to first ch after BPC was made to join. Fasten off. 16 PC, 4 ch-5 lps, 12 ch-2 lps.
Rnd 5 :
With fifth color, place slip knot on hook, then join to any of the ch-5 lps as follows: insert hook through ch-5 lp, yo and pull up lp, pull lp through lp on hook. BPC, ch 2, *[PC in next ch-2 sp, ch 2] three times, [PC, ch 5, PC] in next ch-5 lp, ch 2, rep from * another 2 times, [PC in next ch-2 sp, ch 2] three times, PC in first ch-5 lp that was worked into in this rnd, ch 5, sl st to first ch after BPC was made to join. Fasten off. 20 PC, 4 ch-5 lps, 16 ch-2 lps.
Rnd 6 :
With first color, place slip knot on hook, then join to any of the ch-5 lps as follows: insert hook through ch-5 lp, yo and pull up lp, pull lp through lp on hook. Ch 3 (counts as first DC of rnd) 2 DC in same ch-5 lp, *3 DC in each of the next 4 ch-2 lps, [3 DC, ch 2, 3 DC] in next ch-5 lp, repeat from * another 2 times, 3 DC in each of the next 4 ch-2 lps, 3 DC in first ch-5 lp that was worked at beg of rnd, ch 2, sl st to top of beg ch-3 to join. Fasten off. 72 DC, 4 ch-2 lps.
Edging Rnd 1 :
With sixth color (F), place slip knot on hook, then join to any of the ch-2 corner lps as follows: insert hook through ch-2 lp, yo and pull up lp, pull lp through lp on hook. Ch 1 (does not count as a st), 2 SC in same ch lp, [SC into each st across to next ch-2 corner lp, 4 SC in next corner ch-2 lp] three times, SC into each st across to first ch-2 corner lp, 2 SC in corner ch-2 lp, sl st into top of first SC of rnd to join. 88 SC.
Edging Rnd 2 :
Ch 1 (does not count as a st), beginning with same st as join, [2 SC in next st, SC into each of next 20 sts, 2 SC in next st] 2 times, sl st to first SC to join, fasten off leaving long tail for sewing. 96 SC.
Info :
Weave in all ends except for long tail.
— Catherine Wheel Square :
Info :
Turning chains do not count as a stitch. Square is made in turned rows, then edgings are added in the round. Set-up rnd is made in MC around 3 sides to finish edges nicely before edging rnds are worked. As you change back and forth between colors, do not cut yarn, but let it hang alongside your work. Make sure that it is not too loose nor too tight (do not let it constrict the edge). Later, the floats will be crocheted over to hide from view.
Info :
Special sts: 4-DC cl (4 double crochet cluster): Worked over the next 4 sts. YO, insert hook into next st, YO and pull up loop, YO and pull through two (two lps left on hook) [YO insert hook into following st, YO and pull up lp, YO and pull through two loops] 3 times (each time inserting hook through a new stitch). There are now 5 lps on hook. YO and pull through all 5 lps. 3-DC cl (3 double crochet cluster): Worked over the next 3 sts. YO, insert hook into next st, YO and pull up loop, YO and pull through two (two lps left on hook) [YO insert hook into following st, YO and pull up lp, YO and pull through two loops] 2 times (each time inserting hook through a new stitch). There are now 4 lps on hook. YO and pull through all 4 lps. 7-DC cl (7 double crochet cluster): Worked over the next 7 sts. YO, insert hook into next st, YO and pull up loop, YO and pull through two (two lps left on hook) [YO insert hook into following st, YO and pull up lp, YO and pull through two loops] 6 times (each time inserting hook through a new stitch). There are now 8 lps on hook. YO and pull through all 8 lps. SC2tog (single crochet 2 sts together- decrease): For a less visible decrease, try this method. Insert hook under the front lp of the next st, then insert hook under both lps of the following st, yo and pull up a loop (pulling through both stitches where hook was inserted), yo and pull through two lps on hook. 1 decrease made.
Info :
Make 5 squares with the following color combinations. All Catherine Wheel squares are labeled as "CW" in Placement Chart: 1) MC=A, CC=E, EC=F 2) MC=B, CC=C , EC=F 3) MC=C, CC=A, EC=F 4) MC=D, CC=B, EC=F 5) MC=E, CC=D, EC=F
Instructions Row 1 (RS) :
With MC, ch 27. Row 1 (RS): Beginning with the second ch from hook and working into the bottom of the chain, 1 SC into each st. 26 sts.
Row 2 (WS) :
Ch 2 (does not count as a st), turn, 4 DC in first st, [skip next 3 sts, SC in each of next 3 sts, skip next 3 sts, 7 DC in next st] twice, skip next 3 sts, SC in each of next 2 sts. Two 7-DC fans, one 4-DC fan, and 8 SC.
Row 3 (RS) :
YO and pull up loop of CC, pull on yarn tail of old color until last loop of old color disappears. Leave old color hanging on edge of work (do not cut it). Continuing with new color, ch 2 (does not count as a st), 4-DC cl, [ch 3, SC in each of next 3 sts, ch 3, 7-DC cl] twice, ch 3, SC in each of next 2 sts. One 4-DC cl, two 7-DC clusters, 5 ch-3 lps, 8 SC. Note: watch as you make the first ch right after making a cluster stitch. This chain creates the "eye" that sits right at the top of the cluster; it is in this "eye" that you will be placing the fans on the next row.
Row 4 (WS) :
Ch 1 (does not count as a st), turn, 1 SC into each of the next 2 sts, [skip next 2 chs, 7-DC fan in next "eye", skip next 3 chs, SC in each of next 3 sts] twice, skip next 2 chs, 3-DC fan in next eye, DC in last st. Two 7-DC fans, 8 SC, one 3-DC fan, 1 DC.
Row 5 (RS) :
YO and pull up loop of MC, pull on yarn tail of old color until last loop of old color disappears. Leave old color hanging on edge of work (do not cut it). Continuing with new color, ch 1 (does not count as a st), 1 SC in each of next 2 sts, [ch 3, 7-DC cl, ch 3, SC in each of next 3 sts] twice, ch 2, 3-DC cl, 1 DC in last st. Two 7-DC cl, 8 SC, 4 ch-3 lps, 1 ch-2 lp, one 3-DC cl, 1 DC.
Row 6 (WS) :
Ch 2 (does not count as a st), turn, 4 DC in first st, [skip cluster, skip ch-lp, SC in each of next 3 sts, skip 2 chs, 7 DC in next "eye"] twice, skip next 3 chs, SC in each of next 2 sts. Two 7-DC fans, one 4-DC fan, and 8 SC.
Rows 7-10 :
Repeat Rows 3-6.
Rows 11-13 :
Repeat Rows 3-5. Fasten off.
Set-Up for edging (partial round) :
With MC pull up loop at bottom right corner (bottom left if crocheting left-handed). Hold square sideways and prepare to work along the side edge (row-ends). Use a stitch marker to divide the side into two equal sections. When working alongside edge, be sure to crochet around (encase) the long floats along edge to hide them. Ch 1 (does not count as a stitch), SC along the side edge, making 10 SC into each section and ending at top corner. Continuing across top edge, 1 SC in each of the 26 sts across top edge, rotate to work along other side edge toward bottom. Using stitch marker, divide other side edge into two equal sections, 10 SC into each section ending at the bottom corner of the square. Fasten off.
Edging Rnd 1 :
Hold square so that bottom edge is ready to be worked across. Pull up loop of edging color (F) in first st, ch 1 (does not count as a st), beginning with same st SC in next 10 sts, SC2tog, SC in next 8 sts, SC2tog, SC in next 4 sts, rotate in order to continue along the side edge, 2 SC in next st, SC in each of the next 18 sts, 2 SC in the next st, rotate in order to work across top edge. SC in next 5 sts, SC2tog, SC in next 8 sts, SC2tog, SC in next 9 sts, rotate in order to continue along the side edge, 2 SC in next st, SC in each of the next 18 sts, 2 SC in the next st, sl st into first SC of rnd to join. 2 sts were decreased on the top edge and the bottom edge, whereas 2 sts were increased along each of the side edges. 92 sts.
Edging Rnd 2 :
Ch 1, beginning with same st as join, [1 SC in each of the next 24 sts, 2 SC in next st, SC in next 20 sts, 2 SC in next st] 2 times, sl st in first st to join. Fasten off leaving long tail for sewing.
This Gallery Throw pattern brings together beautiful textures and thoughtful colorwork into one cozy blanket youll love to make and display. Every square is a little piece of art — mix and match colors to make it truly yours. Enjoy the process, savor the texture, and snuggle under your handmade creation when its finished. 🧶✨