🧢 Beautiful ✨ Detailed πŸ’ Adorable

Gatitos Amigurumi Pattern

Gatitos Amigurumi Pattern
4.1β˜… Rating
2-3 Hours Time Needed
2.9K Made This
βœ‚οΈ

Beginner Friendly Level

Perfect for those just starting their crochet journey, with clear instructions and simple techniques

⏱️

Bite-Sized Project

Finishes in 2-4 hoursβ€”perfect for an afternoon of creative relaxation.

🧸

Cute Companion

An adorable friend to cherish, handcrafted with love to bring comfort and joy for years to come.

About This Gatitos Amigurumi Pattern

This pattern teaches you how to crochet small, adorable kittens (gatitos) using fine cotton yarn and simple single crochet rounds. It includes step-by-step round instructions for the head, body, ears, legs and tail, plus photo guidance for facial embroidery. You will finish each piece with clear notes on sewing and assembly.

Gatitos Amigurumi Pattern crochet pattern - detailed view of completed project

Perfect for beginners who know basic single crochet and increases/decreases. Make one in different colors to create a mini collection or gift set.

Why You'll Love This Gatitos Amigurumi Pattern

I absolutely love this pattern because it transforms simple stitches into a tiny personality-filled kitten. I enjoy how quickly a complete toy comes together, making it a satisfying project to finish in an afternoon. The embroidery steps let me add expressive details that make each cat unique. Sharing these little handmade companions always brings a smile to my face and to anyone who receives one.

Gatitos Amigurumi Pattern step 1 - construction progress Gatitos Amigurumi Pattern step 2 - assembly progress Gatitos Amigurumi Pattern step 3 - details and accessories Gatitos Amigurumi Pattern step 4 - final assembly and finishing

Switch Things Up

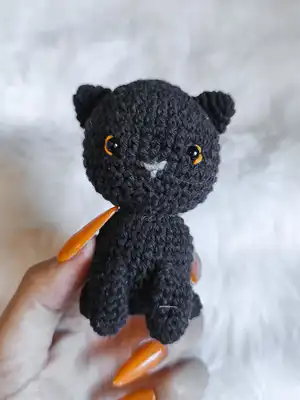
I love customizing these little kittens by switching yarn colors to create different personalities, from calico to solid black.

I sometimes change the yarn weight and use a larger hook to make a chunkier, cuddlier version of the same pattern.

I add tiny embroidered eyebrows or whiskers to alter the expression and make each cat look unique.

I like to experiment with different eye sizes; a slightly larger safety eye gives a more playful look.

I often make matching accessories like tiny scarves or bows to personalize them as gifts.

I sometimes stuff more firmly for a sturdier toy or lightly for a softer, more plush feel.

I recommend trying variegated yarn for a textured coat effect that looks interesting without additional stitches.

I also try using contrasting color for inner ears or nose to add focal details that stand out.

I occasionally add a small bell or loop to turn the mini cat into a keychain or bag charm.

I enjoy combining embroidery techniques with felt pieces for different noses and mouths to find the look I prefer.

Common Mistakes & How to Fix Them

βœ— Placing safety eyes too late can misposition the face; place and check eye spacing before you embroider or stuff the head. βœ— Skipping stuffing until the end makes shaping difficult; stuff gradually and shape as you go to maintain smooth contours. βœ— Not leaving a long tail to sew parts together causes extra work; leave enough yarn to sew the piece securely during finishing. βœ— Forgetting to count stitches during increases or decreases leads to wrong stitch counts; count after each round to stay accurate.

Gatitos Amigurumi Pattern

Make your own tiny crocheted kitten with this charming Gatitos amigurumi pattern. You will follow clear, photo-supported steps to create a cuddly toy with embroidered details and safety eyes. The pattern uses basic crocheting techniques and small pieces, perfect for gifting or collecting. Enjoy a relaxing, creative project that yields a delightful handmade companion.

Beginner Friendly 2-3 Hours

Materials Needed for Gatitos Amigurumi Pattern

β€” Main Fabric

  • 01
    80g fine cotton yarn (or 3-ply cotton) - main color (approx. 80 grams)
  • 02
    Additional colors of choice for eyes and nose details (small amounts)
  • 03
    Safety eyes size 6mm - 2 pieces

β€” Tools Required

  • 01
    Darning needle (Aguja lanera)
  • 02
    Safety eyes size 6mm (Ojos de seguridad del nba6)

Progress Tracker

0% Complete

β€” Cabeza :

Round 1 :

V 1. 6 pb en Anillo Me1gico (6pb)

Round 2 :

V 2. 6 aum seguidos *6 veces (12pb)

Round 3 :

V 3. (1 pb, aum) (18pb)

Round 4 :

V 4. (2 pb, aum) (24pb)

Round 5 :

V 5. (3 pb, aum) (30pb)

Round 6 :

V 6. (4 pb, aum) (36pb)

Round 7 :

V 7. (5 pb, aum) (42pb)

Round 8-14 :

V 8 - 14 (solo pb) (42pb)

Round 15 :

V 15. (5pb, dism) (36pb)

Round 16 :

V 16. (4pb, dism) (30pb)

Info :

*Colocar ojos, bordar detalles y rellenar*

Round 17 :

V 17. (3pb, dism) (24pb)

Round 18 :

V 18. (2pb, dism) (18pb)

Round 19 :

V 19. (1pb, dism) (12pb)

Round 20 :

V 20. (6 dism seguidas) (6pb)

Info :

Terminar con punto deslizado y cortar el hilo con suficiente longitud para pasar con una aguja de coser por los 6pb. Tirar del hilo. Hacer un nudo

β€” Orejas :

Item Name (P1) :

Orejas x2

Round 1 :

V 1. 6 pb en Anillo Me1gico (6pb)

Round 2 :

V 2 (solo pb) (6pb)

Round 3 :

V 2. 6 aum seguidos *6 veces (12pb)

Round 4 :

V 3. (solo pb) (12pb)

Info :

Terminar con punto deslizado y cortar el hilo con suficiente longitud para usar este mismo hilo para coser la oreja a la cabeza

β€” Cuerpo :

Round 1 :

V 1. 6 pb en Anillo Me1gico (6pb)

Round 2 :

V 2. 6 aum seguidos *6 veces (12pb)

Round 3 :

V 3. (1 pb, aum) (18pb)

Round 4 :

V 4. (2 pb, aum) (24pb)

Round 5 :

V 5. (3 pb, aum) (30pb)

Round 6 :

V 6. (4 pb, aum) (36pb)

Round 7-12 :

V 7 - 12 (solo pb) (36pb)

Round 13 :

V 13. (4pb, dism) (30pb)

Round 14 :

V 14. (3pb, dism) (24pb)

Info :

*Colocar ojos, bordar detalles y rellenar*

Info :

Terminar con punto deslizado y cortar el hilo con suficiente longitud para coser el cuerpo a la cabeza

β€” Bordado en la cara :

Infos :

1 calculamos el lugar donde va a ir nuestra nariz. 2 metemos la aguja en un punto un poco alejado de donde va a ir nuestra nariz. 3 sacamos la aguja en uno de los puntos marcados. 4 metemos la aguja en nuestro segundo punto y sacamos la aguja en el primer punto. 5 comenzamos a envolver este hilo hacemos tantas vueltas como nos parezca. 6 pasamos la aguja al centro de la nariz y bordamos una lednea vertical, luego pasamos la aguja hacia donde metimos la aguja la primera vez. Hacemos un nudo con ambos hilos y los escondemos dentro del tejido.

Info :

Bordamos desde uno de los extremos de arriba (πŸ”΄) o abajo (πŸ”΄) hacia el medio (πŸ”΅) y luego desde el medio (πŸ”΅) hacia el extremo de abajo (πŸ”΄) o arriba (πŸ”΄)

β€” Patas de adelante :

Round 1 :

V 1. 5 pb en Anillo Me1gico (5pb)

Round 2 :

V 2. 5 aum seguidos *5 veces (10pb)

Round 3-8 :

V 3 - 8 (solo pb) (10pb)

Info :

Terminar con punto deslizado y cortar el hilo con suficiente longitud para usar este mismo hilo para coser las patas al cuerpo

β€” Patas de atre1s :

Round 1 :

V 1. 5 pb en Anillo Me1gico (5pb)

Round 2 :

V 2. 5 aum seguidos *5 veces (10pb)

Round 3-4 :

V 3 - 4 (solo pb) (10pb)

Info :

Terminar con punto deslizado y cortar el hilo con suficiente longitud para usar este mismo hilo para coser las patas al cuerpo

β€” Cola :

Info :

Hacemos 12 cadenas saltamos la ultima y la antefaltima cadena que realizamos y pasamos a hacer pm desde la cadena que sigue, en la cual vamos a hacer 3pm, pasamos a la cadena siguiente y hacemos 3pm despue9s hacemos 6pm seguidos (uno en cada cadena) para que nos queden libres las ultimas 2cds donde vamos a hacer en cada una nuevamente 3pm.

Info :

Terminamos con pd, y cortamos el hilo Con ese mismo hilo cosemos la cola al cuerpo.

Assembly Instructions

  • Use the long tail from the head finishing to close the hole and make a knot, then position the head on the body and sew securely through the rounds where the body opening sits.
  • Sew each ear to the top of the head using the long tail left when finishing the ear, positioning them symmetrically and securing with hidden stitches.
  • Place and secure the safety eyes before final stuffing and embroider the nose and facial details following the embroidery steps provided.
  • Attach front and back legs to the bottom of the body using the yarn tail left after finishing each leg, spacing them evenly for stability.
  • Sew the tail to the rear of the body using the tail left from the tail piece after finishing with a slip stitch; hide all ends inside the body.

Important Notes

  • πŸ’‘Place and check the position of the safety eyes before stuffing and embroidering details to ensure correct facial placement.
  • πŸ’‘Leave sufficient yarn tail when finishing each piece so you can use the same yarn to sew pieces together cleanly.
  • πŸ’‘Stuff gradually while shaping to avoid lumps and to maintain an even, rounded form for head and body.
  • πŸ’‘Use a darning needle to hide knots and weave tails inside the body for a neat finish.

Thank you for choosing this Gatitos pattern β€” tiny cats made with love and simple stitches. Create a whole gang in different colors to brighten your shelf or gift to a friend. Share your results and tag the designer so others can be inspired. 🧢🐱

You ask,

we answer.

FAQs

What size will the finished piece be?

The finished amigurumi measures approximately 8-12 cm tall depending on your yarn thickness and tension when using fine cotton yarn.

Can I use different yarn weights for this pattern?

Yes, you can use different yarn weights, but this will affect final size and stitch count; adjust your hook and expect a different finished scale.

Do I need prior crochet experience for this pattern?

This pattern is beginner friendly, so basic knowledge of single crochet, increases and decreases is recommended for the best results.

How long does this project typically take to complete?

Most crafters complete this project in 2-3 hours, though time may vary based on experience and how many cats you make.