🧢 Beautiful ✨ Detailed πŸ’ Adorable

Ghost in Pumpkin Amigurumi Pattern

Ghost in Pumpkin Amigurumi Pattern
4.7β˜… Rating
2-4 Hours Time Needed
3.4K Made This
βœ‚οΈ

Intermediate Level

Ideal for those with basic crochet experience, featuring slightly more advanced stitches and techniques to expand your skills.

⏱️

Bite-Sized Project

Finishes in 2-4 hoursβ€”perfect for an afternoon of creative relaxation.

🎁

Tiny Treasure

Small, sweet, and gift-worthy creations that fit perfectly in the palm of your hand with detailed charm.

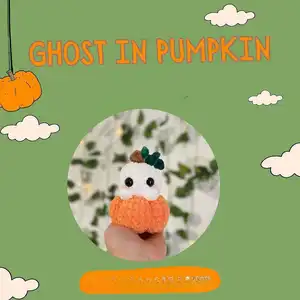
About This Ghost in Pumpkin Amigurumi Pattern

This pattern creates a tiny Ghost in Pumpkin amigurumi featuring a bobble-stem, plush ghost head, and a ribbed pumpkin body. It uses chunky plush yarn for a soft, tactile feel and quick results. The pattern includes step-by-step rounds, notes on color changes, and clear finishing instructions for realistic ribs and a cute tendril.

Ghost in Pumpkin Amigurumi Pattern crochet pattern - detailed view of completed project

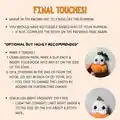
Perfect for intermediate crocheters who enjoy texture and finishing techniques. Includes optional embellishments like blush, a tendril, and placement tips for 12mm safety eyes.

Why You'll Love This Ghost in Pumpkin Amigurumi Pattern

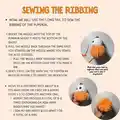
I absolutely love this pattern because it packs so much charm into a tiny, quick project that feels special to make. I enjoy the contrast between the soft plush yarn and the textured bobble and ribs β€” it creates a lot of character with minimal effort. Sewing the ribs is so satisfying; pulling the long tail to create the pumpkin segments always makes me smile. I also love how customizable it is β€” a simple change of color or eye style can give this little piece an entirely new personality.

Ghost in Pumpkin Amigurumi Pattern step 1 - construction progress Ghost in Pumpkin Amigurumi Pattern step 2 - assembly progress Ghost in Pumpkin Amigurumi Pattern step 3 - details and accessories Ghost in Pumpkin Amigurumi Pattern step 4 - final assembly and finishing

Switch Things Up

I love how easy it is to customize this Ghost in Pumpkin by swapping colors β€” use pastels for a softer look or deep autumn tones for a rustic feel.

I often change the yarn weight to make a mini keychain or a larger plush; try fingering yarn with a smaller hook for a tiny keyring-friendly version.

I sometimes replace safety eyes with embroidered French knots or felt circles for a toddler-safe toy.

For extra personality, I embroider different mouth shapes or add tiny felt cheeks instead of sewn blush to vary expressions.

Try using variegated or ombre yarn for the pumpkin to create natural-looking shading without changing colors.

I also enjoy adding tiny accessories like a crocheted scarf, bow, or miniature hat to create seasonal variations or gift themes.

If you want a sturdier toy, I recommend adding a bit of wire inside the stem for poseable embellishments.

To make a matching set, crochet several in coordinating colors and size variations to display as a seasonal garland or table decor.

You can change the number and spacing of ribs to create flatter or more rounded pumpkins β€” fewer ribs spaced wider gives a different silhouette.

I like to experiment with different bobble sizes and counts; adjust the bobble placement to alter where the eyes sit or how the stitches texture the head.

Finally, try switching the tendril into brown and green combinations, or add tiny leaves for a whimsical finishing touch.

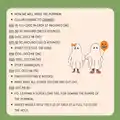
Common Mistakes & How to Fix Them

βœ— Skipping the color change technique can leave a messy edge; when switching colors, leave two loops on the hook, pull through the new color, and tie the small tails together to secure the change. βœ— Placing safety eyes too low will obscure the face; position 12mm eyes between rounds 8 and 9 with 2-3 visible stitches between them so they sit right above the bobble stitches. βœ— Not stuffing evenly leads to a lumpy shape; stuff gradually, especially when instructed to 'start to stuff the head' and then 'stuff generously' for the pumpkin portion to maintain smooth curves. βœ— Missing bobble stitch loop count will alter the stitch count; ensure each bobble stitch uses 6 loops as noted so the stitch count remains accurate for the round. βœ— Sewing ribs too close together can collapse the pumpkin shape; space ribs about 5-6 stitches apart and repeat the sewing process 5-6 times for defined ridges. βœ— Cutting color tails too short during color changes makes finishing difficult; leave tails long enough to weave and tie securely until all sewing and closing is finished.

Ghost in Pumpkin Amigurumi Pattern

Make a sweet, palm-sized Ghost in Pumpkin amigurumi that mixes plush textures with playful details. Follow clear step-by-step rounds to crochet the stem, ghost head, and pumpkin body, then finish with sewn ribs and an optional tendril. Perfect for gifting or seasonal decor, this pattern walks you through color changes, bobble stitches, and placement tips so your tiny creation looks adorable every time.

Intermediate 2-4 Hours

Materials Needed for Ghost in Pumpkin Amigurumi Pattern

β€” Main Fabric

  • 01
    Parfait Chunky (bulky/chunky) yarn - small amounts of Brown for the stem (approx 5-15g)
  • 02
    Parfait Chunky (bulky/chunky) yarn - small amounts of White for the ghost head (approx 10-30g)
  • 03
    Parfait Chunky (bulky/chunky) yarn - small amounts of Orange for the pumpkin body (approx 15-40g)
  • 04
    Optional: Pink yarn - small amount for blush details (approx 1-3g)
  • 05
    Optional: Green yarn - small amount for tendril and leaves (approx 2-5g)

β€” Tools Required

  • 01
    Crochet hook size 4.5mm
  • 02
    Safety eyes 12mm (2 pieces)
  • 03
    Scissors
  • 04
    Polyester stuffing
  • 05
    Stitch marker
  • 06
    Yarn needle for sewing and weaving ends

Progress Tracker

0% Complete

β€” Stem :

Round 1 :

4SC IN A MR (4)

Round 2-3 :

4SC AROUND (4)

Info :

To color change: leave 2 loops on the hook & do not complete the SC. Cut the first color (brown) & pull thru the next color (white) and tie the two small tails together to secure.

β€” Ghost Head :

Round 4 :

IN THE FLO: [3SC IN EACH ST AROUND] (12)

Round 5 :

(SC, INC) X6 (18)

Round 6 :

(2SC, INC) X6 (24)

Round 7-9 :

SC AROUND (24) (3 ROUNDS)

Round 10 :

9SC, BO, 4SC, BO, 9SC (24)

Info :

BOBBLE STITCH = 6 LOOPS

Info :

PLACE 12MM EYES IN R.8 - R.9, 2-3 VISIBLE STS BETWEEN.

Round 11 :

DEC X12 (12)

Info :

Eyes should be placed right above the BO stitches & centered between the arms.

β€” Pumpkin :

Info :

NOW WE WILL MAKE THE PUMPKIN. COLOR CHANGE TO ORANGE.

Round 12 :

IN FLO: [3SC IN EACH ST AROUND] (36)

Round 13-15 :

SC AROUND (36) (3 ROUNDS)

Round 16 :

(4SC, DEC) X6 (30)

Round 17-18 :

SC AROUND (30) (2 ROUNDS)

Info :

START TO STUFF THE HEAD.

Round 19 :

(3SC, DEC) X6 (24)

Round 20 :

(2SC, DEC) X6 (18)

Info :

STUFF GENEROUSLY.

Round 21 :

(SC, DEC) X6 (12)

Info :

FINISH STUFFING IF NEEDED. MAKE SURE ALL OTHER COLORS ARE CUT OFF.

Round 22 :

DEC X6 (6)

Info :

FO, LEAVING A SUPER LONG TAIL FOR SEWING THE BUMPS OF THE PUMPKIN. INSERT NEEDLE INTO THE FLO OF EACH ST & PULL TO CLOSE THE HOLE.

β€” Sewing the Ribbing :

Step 1 :

INSERT THE NEEDLE INTO THE TOP OF THE PUMPKIN WHERE IT MEETS THE BOTTOM OF THE GHOST.

Step 2 :

PULL THE NEEDLE BACK THROUGH THE SAME SPOT YOU STARTED (IN THE MIDDLE WHERE YOU SEWED THE HOLE CLOSED).

Step 2 :

PULL THE NEEDLE BACK THROUGH THIS SAME SPOT ON THE BOTTOM EACH TIME YOU MAKE A RIB.

Step 3 :

GENTLY PULL ON THE YARN TAIL TO TIGHTEN AS MUCH AS POSSIBLE TO CREATE THE INDENTATION.

Info :

MOVE TO A DIFFERENT SPOT ABOUT 5-6 STS AWAY FROM THE FIRST RIB & REPEAT STEPS 1-3 TO COMPLETE ANOTHER ONE.

Info :

REPEAT THIS PROCESS A TOTAL OF 5-6 TIMES (DEPENDING ON HOW MANY RIDGES/RIBS YOU WANT). I SEW MY RIBS ABOUT 6 STS APART FOR A TOTAL OF 5 RIBS.

β€” Final Touches & Optional :

Info :

WEAVE IN THE ENDING TAIL TO FINISH OFF THE PUMPKIN. YOU SHOULD HAVE NOTICEABLE RIDGES/RIBS OF YOUR PUMPKIN. IF NOT, COMPLETE THE STEPS ON THE PREVIOUS PAGE AGAIN.

Optional Item (Tendril) :

MAKE A TENDRIL: USING GREEN YARN, MAKE A SLIP KNOT & INSERT YOUR HOOK INTO ANY ST ON THE SIDE OF THE STEM. CH 8, STARTING IN THE 2ND CH FROM THE HOOK, DO 3SC IN EACH CH (21 TOTAL SC). FEEL FREE TO CHANGE THE LENGTH BY ADDING OR SUBTRACTING CHAINS.

Optional Item (Blush) :

SEW BLUSH RIGHT UNDER/BY THE EYES: I SEW TWO STRAIGHT LINES RIGHT UNDER & TO THE SIDE OF THE EYE ABOUT A STITCH WIDE.

Assembly Instructions

  • Attach the ghost head to the top of the pumpkin by aligning the base of the ghost with the top opening of the pumpkin and sewing securely through the FLO using the long tail left from final rounds.
  • Position the 12mm safety eyes between rounds 8 and 9 of the ghost head with 2-3 visible stitches between them and secure the safety backings firmly before adding blush.
  • Sew the ribbing by inserting the needle at the top center where the ghost meets the pumpkin, pulling through to the bottom, tightening the yarn tail to create an indentation, and repeat around the pumpkin about 5-6 times.
  • Use the long tail left after fastening off the pumpkin to stitch each rib, moving approximately 5-6 stitches between ribs so the pumpkin forms distinct segments.
  • Add the optional tendril by slip-knotting green yarn into a stem stitch, chaining the desired length, and working 3 SC in each chain; then sew the tendril into the side of the stem.

Important Notes

  • πŸ’‘Pattern is crocheted in continuous roundsβ€”use a stitch marker to mark the beginning of each round for accuracy.
  • πŸ’‘Pattern uses US terminology; check abbreviations before starting to ensure consistent stitch interpretation.
  • πŸ’‘Leave long tails when fastening off the pumpkin so you have enough yarn to sew ribs and close holes neatly.
  • πŸ’‘Stuff the head first and stuff the pumpkin generously when instructed to keep the shape smooth and full.
  • πŸ’‘Place safety eyes before final closing and stuffing steps to ensure correct placement and secure attachment.

This tiny Ghost in Pumpkin brings seasonal charm in a pocket-sized package and is perfect for gifts or autumn decor. It combines plush texture with defined ribbing and a cheerful face for instant personality. Have fun customizing colors and detailsβ€”happy crocheting! πŸŽƒπŸ§Ά

You ask,

we answer.

FAQs

What size will the finished piece be?

The finished amigurumi is palm-sized and measures approximately 6-9 cm tall depending on yarn tension and stuffing using the recommended chunky yarn and 4.5mm hook.

Can I use different yarn weights for this pattern?

Yes, you can change yarn weight, but this will affect the final size; use an appropriate hook and adjust stuffing and rib spacing to suit the new gauge.

Do I need prior crochet experience for this pattern?

This pattern is rated intermediate due to bobble stitch usage, continuous rounds, and sewn ribbing, so basic amigurumi experience and familiarity with increases/decreases is recommended.

How long does this project typically take to complete?

Most crocheters complete this project in 2-4 hours, though time may vary based on experience level, customization, and finishing details like ribs and blush.

What size safety eyes should I use?

The pattern recommends 12mm safety eyes; place them between rounds 8 and 9 with 2-3 visible stitches between for the best look.