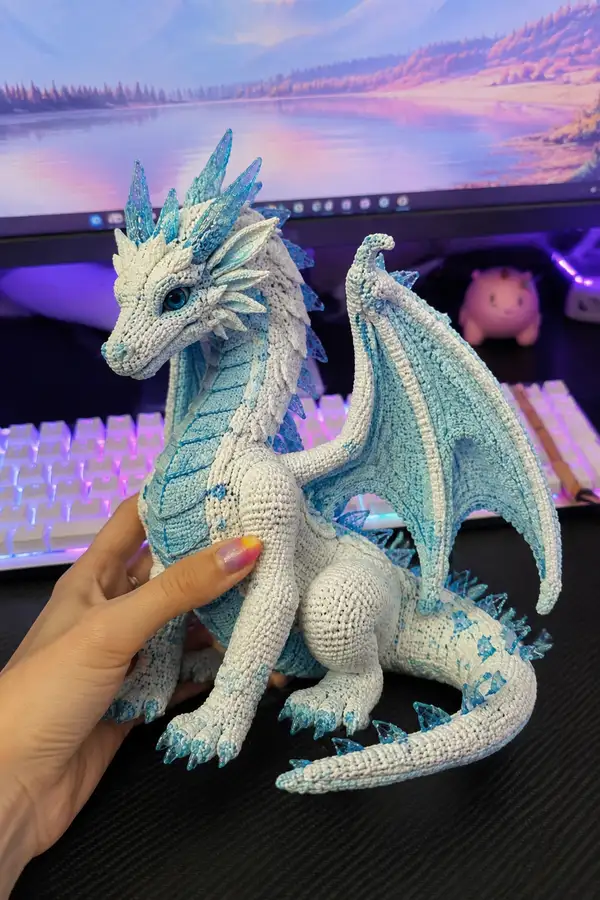
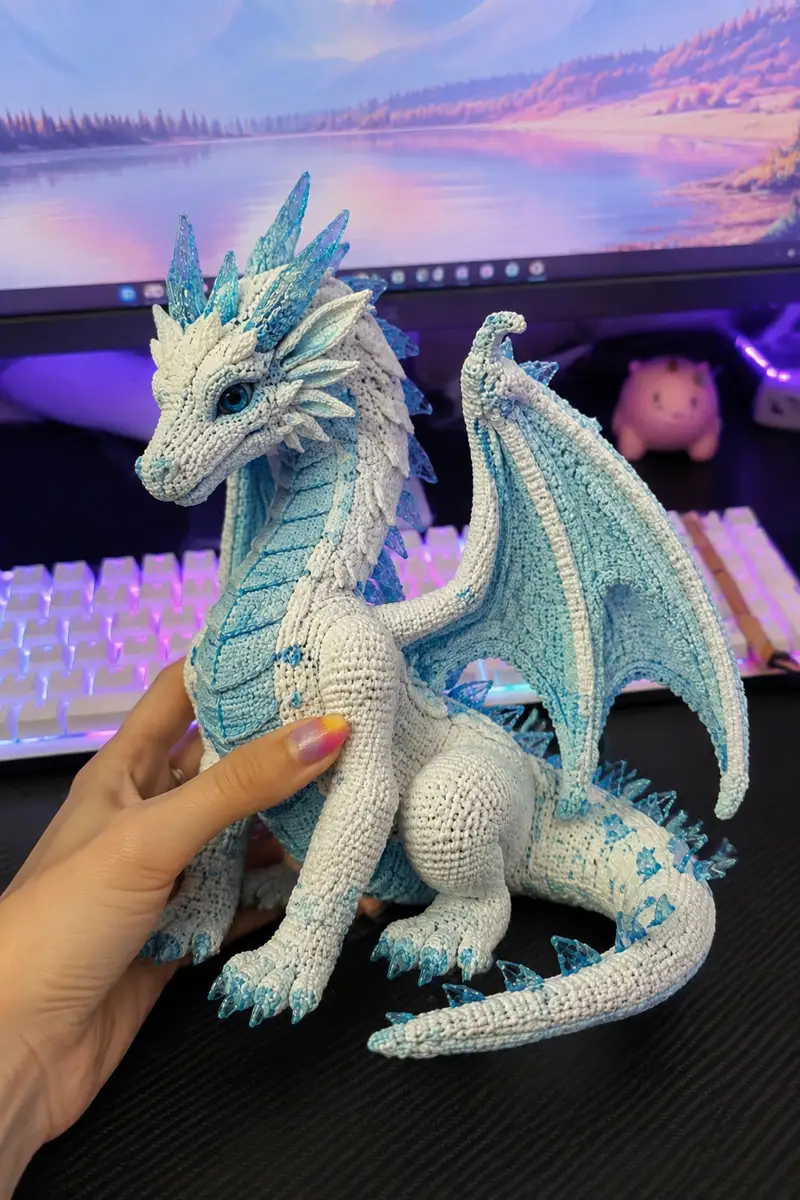
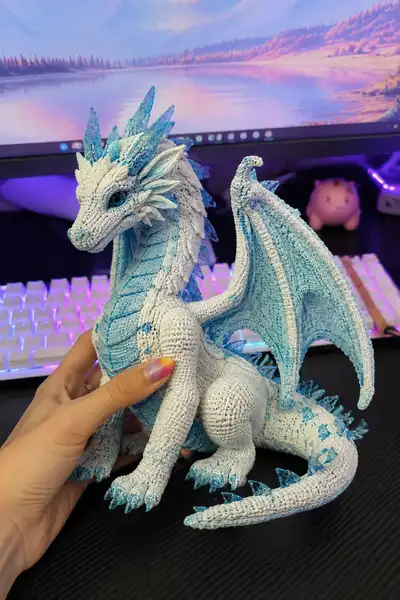
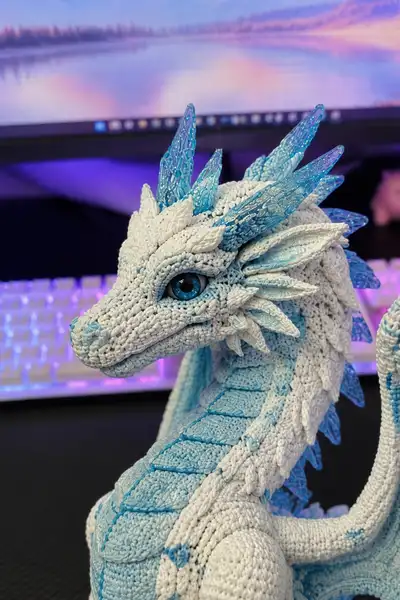
Create a stunning Giant Frost Ice Dragon amigurumi with shimmering crystal-blue spikes and icy shading. This highly detailed pattern guides you through sculpted head shaping, articulated neck and tail, expressive eyes, layered scale plates and poseable wings. Perfect for crocheters who love textured stitches, layered attachments and dramatic colorwork—this dragon sits tall, proud, and full of wintery charm.
Progress Tracker
0% Complete
— Head :
Round 1 :
6 sc in magic ring (6)
Round 3 :
(1 sc, inc) x 6 (18)
Round 4 :
(2 sc, inc) x 6 (24)
Round 5 :
(3 sc, inc) x 6 (30)
Round 6 :
(4 sc, inc) x 6 (36)
Round 7 :
(5 sc, inc) x 6 (42)
Round 8 :
(6 sc, inc) x 6 (48)
Info :
Work tightly with 2.5mm to maintain a sculpted head. This initial dome will form the back of the skull; place a marker at the beginning of each rnd.
Round 9 :
1 sc in each st (48)
Round 10 :
1 sc in each st (48)
Round 11 :
1 sc in each st (48)
Round 12 :
1 sc in each st (48)
Info :
At this stage you will begin shaping the brow and eye sockets. Plan eye placement now: place safety eyes between Rnds 13-14, about 10-12 sts apart depending on the size of eyes. Mark the center front stitch for muzzle alignment.
Round 13 :
(6 sc, dec) x 6 (42)
Round 14 :
(5 sc, dec) x 6 (36)
Info :
Insert safety eyes now if using; secure washers before adding heavy stuffing later. If embroidering eyes, leave space and mark positions with removable markers.
Round 15 :
(4 sc, dec) x 6 (30)
Round 16 :
(3 sc, dec) x 6 (24)
Round 17 :
1 sc in each st (24)
Round 18 :
1 sc in each st (24)
Info :
Begin to stuff the head lightly to hold shape but still allow shaping for the muzzle and snout. Use small pieces of fiberfill to push into narrow sections later.
Round 19 :
(2 sc, inc) x 6 (30) — begin forming top snout extension, incs placed at front center to elongate muzzle
Round 20 :
1 sc in each st (30)
Round 21 :
1 sc in each st (30)
Round 22 :
(3 sc, inc) x 6 (36)
Info :
We will now carve the snout shape with a shallow ridge and side decreases. Work flat shaping by placing increases on top center and decreases on underside to form chin.
Round 23 :
(4 sc, inc) x 6 (42)
Round 24 :
1 sc in each st (42)
Round 25 :
(7 sc, dec) x 4 + (3 sc, dec) x 2 to shape tapered snout (38) — place decs along lower jaw line
Info :
Move marker as needed so the front center remains aligned with snout tip. Continue stuffing more firmly to create firm muzzle that holds sculpted shape.
Round 26 :
(4 sc, dec) x 6 (30)
Round 27 :
(3 sc, dec) x 6 (24)
Round 28 :
(2 sc, dec) x 6 (18)
Round 29 :
(1 sc, dec) x 6 (12)
Info :
Now sculpt the eye ridges and brows by stitching a short row of 6-8 sc in front of the eyes and pulling tight to create a ridge. Use contrasting aquamarine for a subtle eyelid line if desired.
Round 30 :
1 sc in each st (12)
Round 31 :
1 sc in each st (12)
Round 32 :
1 sc in each st (12)
Round 33 :
6 dec (6) — do not close completely; leave tail for sewing muzzle to neck later
Round 34 :
Fasten off leaving long tail for sewing (6)
Info :
Sew a short slip-stitched seam along the top of the snout to refine the ridge. Use mattress stitch to attach head to neck later. Keep head slightly stuffed but not overfilled to ease sewing depth.
— Neck & Throat Plate :
Round 1 :
6 sc in magic ring (6)
Round 3 :
(1 sc, inc) x 6 (18)
Round 4 :
(2 sc, inc) x 6 (24)
Round 5 :
(3 sc, inc) x 6 (30)
Info :
Work this neck in spirals; we will sculpt a long curved neck about 18-24 rnds. Use pale ice-blue for the throat plates (switch color at Info below).
Info :
Change to Pale Ice Blue yarn now for the underbelly throat plates. Carry the white inside if you plan stripes, or fasten off and rejoin at the edge for crisp color change.
Round 6-8 :
1 sc in each st (30)
Round 9 :
BLO 1 sc in each st (30) — creates a subtle ridge line for plate edge
Round 10-12 :
1 sc in each st (30)
Info :
Create throat plate shapes by crocheting 6 individual overlapping scale-plates (see scale plate section) and sew them along the center front of the neck from base of head down 8-10 rounds.
Round 13 :
(4 sc, inc) x 6 (36) — gentle widen for shoulder transition
Round 14-18 :
1 sc in each st (36)
Info :
Stuff neck lightly as you go so it stays sculpted but still flexible for assembly. If using wire for poseability, insert a wire core now before completing the final neck rounds. Wrap the wire in a thin layer of fiberfill to avoid poking through stitches.
Round 19 :
(5 sc, dec) x 6 (30)
Round 20 :
(3 sc, dec) x 6 (24)
Round 21 :
1 sc in each st (24)
Round 22 :
Fasten off leaving long tail for sewing to body
Info :
Attach throat plating (see plate pattern) by sewing each plate centered and slightly overlapping. Use slip-stitch edges to keep plates flush and neat.
— Body :
Round 1 :
6 sc in magic ring (6)
Round 3 :
(1 sc, inc) x 6 (18)
Round 4 :
(2 sc, inc) x 6 (24)
Round 5 :
(3 sc, inc) x 6 (30)
Round 6 :
(4 sc, inc) x 6 (36)
Round 7 :
(5 sc, inc) x 6 (42)
Round 8 :
(6 sc, inc) x 6 (48)
Info :
Body begins as an oval torso. Increase rounds build the chest; maintain even tension. Mark side placement for front legs at Rnd 15-18 later.
Round 9-12 :
1 sc in each st (48)
Round 13 :
(7 sc, inc) x 6 (54)
Round 14-16 :
1 sc in each st (54)
Info :
At Rnd 16 measure width to ensure legs will sit square. Place stitch markers where front legs will attach (approx 10-12 sts from center on each side). Also plan tail placement at the back center.
Round 17 :
(8 sc, inc) x 6 (60)
Round 18-22 :
1 sc in each st (60)
Info :
Begin shaping lower body by alternating rounds with small decreases to form taper toward the hips. Change to white if you worked any accent colors for the belly earlier.
Round 23 :
(8 sc, dec) x 6 (54)
Round 24 :
(7 sc, dec) x 6 (48)
Round 25 :
1 sc in each st (48)
Round 26 :
(5 sc, dec) x 6 (42)
Round 27 :
(4 sc, dec) x 6 (36)
Info :
Before closing the bottom, leave a wide opening for attaching legs and stuffing. Stuff the body firmly to ensure the dragon can sit. Position the neck opening toward the front for later seam placement.
Round 28 :
(3 sc, dec) x 6 (30)
Round 29 :
(2 sc, dec) x 6 (24)
Round 30 :
Fasten off leaving long tail for sewing neck and closing (24)
Info :
Keep the opening large enough to insert body wiring if desired. Reinforce seam where neck will be sewn by adding a row of sc around the neck opening in BLO before attaching head.
— Front Legs / Arms (Make 2) :
Round 1 :
6 sc in magic ring (6)
Round 3 :
(1 sc, inc) x 6 (18)
Round 4 :
(2 sc, inc) x 6 (24) — start foot/hand width
Info :
These front limbs are sculpted with a rounded paw and three defined claws. We will work the toes as short bumps and add claws later by sewing translucent spikes or crocheting small cones.
Round 5-7 :
1 sc in each st (24)
Round 8 :
(3 sc, inc) x 6 (30)
Round 9 :
1 sc in each st (30)
Round 10 :
(3 sc, dec) x 6 (24) — sculpt wrist
Info :
Divide the next round into three toe sections: mark 3 groups of 8 sts and work short shaping at the front of the paw to create three lobes. You may insert a small amount of stuffing into paw before lobes are made.
Round 11 :
Work in rounds as follows to form toes: [In first 8 sts: (2 sc, dec) x 2 = 6] then next 8 sts same then last 8 sts same. Total after shaping remains 18 if you tuck lobes in; otherwise maintain 24 and form lobes by front tube sewing (24)
Round 12-14 :
1 sc in each st (24) — lengthen arm
Round 15 :
(4 sc, dec) x 4 + (3 sc, dec) x 2 to shape taper toward shoulder (20)
Round 16 :
1 sc in each st (20)
Round 17 :
(2 sc, dec) x 5 (15)
Round 18 :
Fasten off leaving long tail for sewing (15)
Info :
Stuff paws firmly and arms lightly. Sew claws: attach three small crystal cones to the tip of each paw or crochet cones: ch2, 3 sc in 2nd ch, dec, fasten off, leave tail to sew (3 rounds cones).
— Hind Legs (Make 2) :
Round 1 :
6 sc in magic ring (6)
Round 3 :
(1 sc, inc) x 6 (18)
Round 4 :
(2 sc, inc) x 6 (24)
Round 5 :
(3 sc, inc) x 6 (30) — form foot width
Round 6-9 :
1 sc in each st (30)
Info :
Hind leg includes a larger thigh and joint area to sit under the body. Keep top of leg slightly wider for sewing into hip sockets on body Rnd 23-26 positions.
Round 10 :
(4 sc, inc) x 6 (36)
Round 11-13 :
1 sc in each st (36)
Round 14 :
(4 sc, dec) x 6 (30)
Round 15 :
1 sc in each st (30)
Round 16 :
(3 sc, dec) x 6 (24)
Round 17 :
(2 sc, dec) x 6 (18)
Round 18 :
1 sc in each st (18)
Round 19 :
(1 sc, dec) x 6 (12)
Round 20 :
6 dec (6) — leave opening for stuffing and sewing (6)
Round 21 :
Fasten off leaving long tail (6)
Info :
Stuff hind legs firmly with emphasis on foot and thigh for stable sit. Attach claws as on front paws and reinforce seam where leg meets body using multiple passes for strength.
— Tail :
Round 1 :
6 sc in magic ring (6)
Round 3 :
(1 sc, inc) x 6 (18)
Round 4 :
(2 sc, inc) x 6 (24)
Round 5-8 :
1 sc in each st (24)
Info :
We will taper the tail slowly to achieve a long curved form. Insert wire core if making poseable tail—wrap with thin batting before inserting to avoid punctures. Place crystal spikes along dorsal line later.
Round 9 :
(4 sc, dec) x 4 + (3 sc, dec) x 2 to form a slight taper (20)
Round 10-13 :
1 sc in each st (20)
Round 14 :
(3 sc, dec) x 5 (15)
Round 15 :
1 sc in each st (15)
Round 16 :
(2 sc, dec) x 5 (10)
Round 17 :
1 sc in each st (10)
Round 18 :
(1 sc, dec) x 5 (5)
Round 19 :
Fasten off leaving long tail for sewing (5)
Info :
Sew tail to back center of body at Rnd 27-30 area. Add dorsal scale-spikes from base to tip: make diamond spikes (see spike pattern) and sew evenly spaced. Reinforce attachment with sculpting stitches to hold curve.
— Wing Pair (Make 2) :
Round 1 :
6 sc in magic ring (6)
Round 3 :
(1 sc, inc) x 6 (18)
Round 4 :
(2 sc, inc) x 6 (24)
Round 5 :
(3 sc, inc) x 6 (30)
Info :
Wing structure is made in two layers: outer bone ridge and inner membrane. Work the bone ridge first as a sculpted tube, then the membrane as a broad, flat piece joined to the ridge with scalloped edging.
Round 6-9 :
1 sc in each st (30) — extend bone base
Round 10 :
(4 sc, inc) x 6 (36)
Round 11-12 :
1 sc in each st (36)
Round 13 :
Start membrane: ch 1, work 40 sc across to form the wing membrane edge then turn and work in rows; join to bone ridge along the inner curve with sl st (counts vary by tension)
Round 14-20 :
Work membrane in rows: Row A: 1 sc across; Row B-F: decrease along outer edge progressively to create curved membrane profile. Aim for 8-12 rows that taper toward wing tip.
Info :
Work the membrane mostly in SC with occasional HDC for softer drape. Use BLO along the inner edge to create a neat ridge when attaching to bone. Add contrasting pale blue as an inner lining color before attaching for a two-tone effect.
Round 21 :
Join membrane to bone ridge with sl st every 2-3 sts; fasten off leaving tail for sewing (36)
Round 22 :
Create wing finger ridges: crochet 3-4 narrow tubes (12-14 rnds each) and stitch into membrane to form finger bones
Info :
Sew wings to back at body Rnd 18-22 positions. Pin wings with natural curve and use mattress stitch along a tab of 6-8 stitches to secure. Reinforce with extra passes if you plan to pose the wings.
— Scale Plates & Decorative Petals (Make many) :
Scale Plate Pattern (Make 12-18) Round 1 :
6 sc in magic ring (6)
Round 3 :
(1 sc, inc) x 6 (18)
Round 4 :
1 sc in each st (18)
Round 5 :
FLO 1 sc in each st (18) — creates a slightly cupped petal
Round 6 :
Fasten off leaving long tail for sewing
Info :
Sew scale plates overlapping along the neck and shoulders forming layered feathers as pictured. Use pale ice-blue underplates for contrast then top with white plates for a frosted effect.
— Horns & Large Spikes (Make 6-8) :
Round 1 :
4 sc in magic ring (4)
Round 3 :
(1 sc, inc) x 4 (12)
Round 4-6 :
1 sc in each st (12)
Round 7 :
(1 sc, dec) x 4 (8)
Round 8 :
1 sc in each st (8)
Round 10 :
Fasten off leaving tail for sewing (4)
Info :
Sew horns in a crown across the head top; place translucent resin spikes behind horns for layered crystalline effect. For added sparkle, coat horns lightly with fabric glue and sprinkle fine glitter.
— Crystal Spike (separate resin/acrylic piece) Pattern — Crocheted Cone (Optional) :
Round 1 :
4 sc in magic ring (4)
Round 3 :
(1 sc, inc) x 4 (12)
Round 4-6 :
1 sc in each st (12)
Round 7 :
(1 sc, dec) x 4 (8)
Round 9 :
Fasten off leaving tail and stuff lightly (4)
Info :
Once crocheted cones are made, coat inner side with clear-drying glue and press small translucent crystals into place to mimic the look shown in images, or purchase small acrylic spikes to sew on for a sharper result.
— Eyelids & Eye Surround (Make 2) :
Round 1 :
8 sc in magic ring (8)
Round 3 :
(2 sc, inc) x 4 (20)
Round 4 :
1 sc in each st (20)
Round 5 :
FLO 1 sc in each st (20) — creates ridge for eyelid
Round 6 :
Fasten off leaving tail for sewing
Info :
Sew eyelids snug around safety eyes and add a thin darker ring of yarn around the iris to emphasize eyes. Use glue to secure glass cabochons if used for striking, glossy eyes.
— Finishing Scalloped Belly Plates (Attached down breast and belly) :
Plate Row 1 :
Ch 10, sl st across to form small scalloped plate, Fasten off leaving tail. Make 10-12 plates total.
Info :
Sew plates along belly center from lower neck to tail base, overlapping slightly to simulate armored plating. Use contrasting aquamarine for the plate seams to mimic the darker lines in photo.
— Assembly Instructions & Final Shaping :
Info :
Pin all pieces to body before sewing. Use mattress stitch for invisible joins and reinforce with extra passes for weight-bearing joints like hips and shoulders. Hide wiring ends inside body and cap with a bit of glue to avoid slippage.
Info :
Sew head to neck using the long tail; stitch evenly around the neck opening so head sits slightly forward as in reference. Use small stitches to pull jaw and brow into sculpted expressions.
Info :
Attach wings to back between Rnds 18-22 of body; seat wing tabs into a reinforced row and stitch through two layers of body fabric for strength. Adjust wing curve by slightly stuffing the membranes and finger bones.
Info :
Sew claws and spikes into place. For the translucent crystal pieces, stitch through the base with strong nylon thread and dab clear glue at the seam for extra hold. Space dorsal spikes evenly along tail and spine, decreasing size toward tail tip.
Info :
Add embroidered nostrils and mouth with fine yarn and a blunt needle. Lightly shade creases with watered-down fabric paint or pastel chalk for depth. Weave in and hide all ends securely.
This Giant Frost Ice Dragon pattern is a labor of love that rewards you with a dramatic, sculptural amigurumi that doubles as decor and a treasured keepsake. Each plate, ridge and crystal adds personality and gives the dragon a frosty, magical presence. The step-by-step instructions guide you through careful shaping and assembly so your finished dragon will sit proudly wherever you place it. Enjoy the slow, satisfying process—and don't forget to share your frosty companion with friends! ❄️🧶