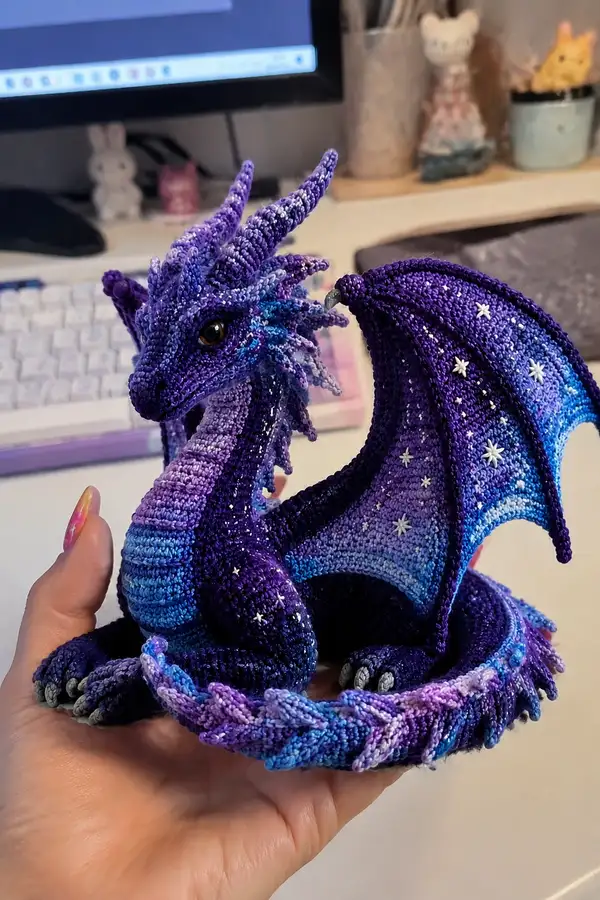
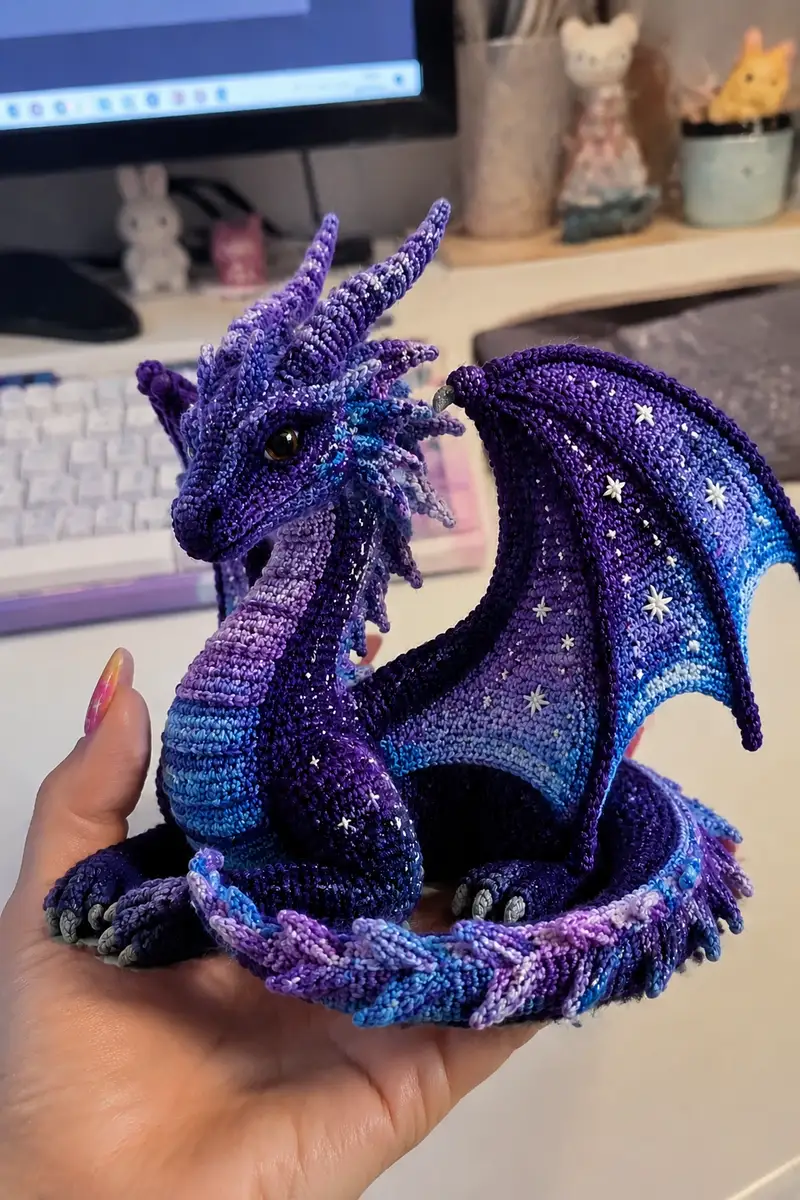
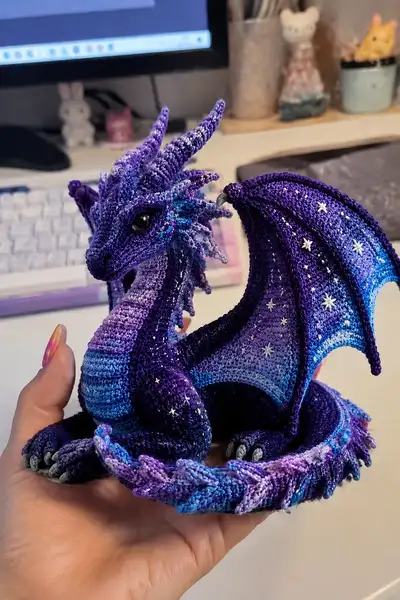
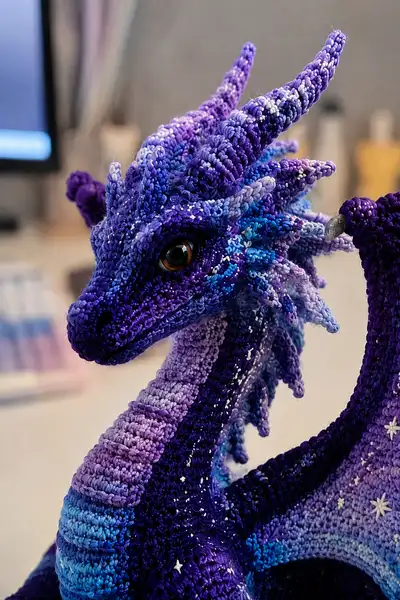
Create a stunning galaxy-themed dragon amigurumi with shimmering purple-to-blue variegated yarn and delicate star embroidery. This pattern features a sculpted head with curved horns, a long ribbed neck, articulated wings with starry details, curled tail, and textured scales. Finished size fits comfortably in the palm (hand-sized to small desk sculpture) and makes an eye-catching handmade gift or shelf companion. Detailed round-by-round instructions and assembly tips included for confident crocheters.
Progress Tracker
0% Complete
— Head :
Round 1 :
6 sc in magic ring (6)
Round 3 :
(1 sc, inc) x 6 (18)
Round 4 :
(2 sc, inc) x 6 (24)
Round 5 :
(3 sc, inc) x 6 (30)
Round 6 :
(4 sc, inc) x 6 (36)
Round 7 :
(5 sc, inc) x 6 (42)
Round 8 :
(6 sc, inc) x 6 (48)
Round 9 :
1 sc in each st (48)
Round 10 :
1 sc in each st (48)
Round 11 :
1 sc in each st (48)
Info :
Place safety eyes between rounds 13-15, approximately 8-10 stitches apart depending on look. Mark center front for nose shaping and plan horn bases at top of head.
Round 12 :
(6 sc, dec) x 6 (42)
Round 13 :
(5 sc, dec) x 6 (36)
Round 14 :
(4 sc, dec) x 6 (30)
Round 15 :
1 sc in each st (30)
Info :
Insert safety eyes now if using. Position them on round 13 or 14, 8-10 sts apart. Secure backs firmly. Begin very light stuffing at the muzzle to preserve sculpted nostrils.
Round 16 :
(3 sc, dec) x 6 (24)
Round 17 :
(2 sc, dec) x 6 (18)
Round 18 :
(1 sc, dec) x 6 (12)
Info :
Fasten off leaving a long tail for sewing the head to the neck later. Finish stuffing the head to a firm but not rock-hard density to keep sculpted features.
Round 20 :
Using the long tail, sew a short eyebrow ridge by stitching back across the brow area and pulling tight to define the forehead; fasten and weave in end.
Info :
To create the snout ridge and nostrils: embroider two small horizontal stitches at the tip and a vertical center stitch from nostrils to brow if desired. Use a matching darker purple for subtle definition.
— Horns (Make 2) :
Round 1 :
6 sc in magic ring (6)
Round 3 :
(1 sc, inc) x 3 (9)
Round 4 :
1 sc in each st (9)
Round 5 :
(2 sc, inc) x 3 (12)
Round 6 :
1 sc in each st (12)
Round 7 :
(3 sc, inc) x 3 (15)
Info :
Horns are made spiral by doing one spiral increase every 2-3 rounds and working in continuous rounds; optionally insert a thin wire core after round 4 to help shape curve. Stuff lightly until almost closed.
Round 8 :
1 sc in each st (15)
Round 9 :
(4 sc, inc) x 3 (18)
Round 10 :
1 sc in each st (18)
Round 11 :
(5 sc, inc) x 3 (21)
Round 12 :
1 sc in each st (21)
Round 13 :
(6 sc, dec) x 3 (18)
Round 14 :
(4 sc, dec) x 3 (15)
Info :
Shape the horn into a gentle curve using your fingers or the inserted wire; sew bases to head at marked horn positions using the long tail and ladder stitch until secure. Repeat for second horn.
— Frill Spikes (Make 10-12, small accents) :
Round 1 :
4 sc in magic ring (4)
Round 2 :
1 sc in each st (4)
Round 3 :
(1 sc, inc) x 2 (6)
Round 4 :
1 sc in each st (6)
Round 5 :
(2 sc, inc) x 2 (8)
Round 6 :
1 sc in each st (8)
Info :
Make between 10 and 14 of these spikes in a mix of dark purple, light lilac, and turquoise to echo the photograph. Sew along the neck seam starting behind the head and continuing down the neck; space about 4-6 stitches apart depending on neck circumference.
— Neck (ribbed, long) :
Round 1 :
6 sc in magic ring (6)
Round 3 :
(1 sc, inc) x 6 (18)
Round 4 :
(2 sc, inc) x 6 (24)
Round 5 :
1 sc in each st (24)
Round 6 :
1 sc in each st (24)
Info :
Neck is worked in continuous rounds. To make the ribbed texture, every 3rd round work in BLO for a single round, then continue normal rounds. This creates the raised rings seen in the photos.
Rounds 7-26 :
Repeat pattern: 2 rounds normal (1 sc each st), then 1 round BLO (1 sc in each st BLO) for visible ribbing. Continue to lengthen the neck until you have 20 rounds total from round 7 to 26 (end count remains 24 each round).
Info :
Begin lightly stuffing the neck from round 10 onward, filling more firmly as you reach the lower neck. Keep the neck slightly flexible for natural pose. If using gradient yarn, allow color changes to fall across the ribs for a banded effect.
Round 27 :
(2 sc, dec) x 6 (18)
Round 28 :
(1 sc, dec) x 6 (12)
Info :
Fasten off leaving a long tail to sew the neck into the body opening. Finish stuffing the inside of the neck firmly but leave slight room to allow head positioning during assembly.
— Body :
Round 1 :
6 sc in magic ring (6)
Round 3 :
(1 sc, inc) x 6 (18)
Round 4 :
(2 sc, inc) x 6 (24)
Round 5 :
(3 sc, inc) x 6 (30)
Round 6 :
(4 sc, inc) x 6 (36)
Round 7 :
(5 sc, inc) x 6 (42)
Round 8 :
(6 sc, inc) x 6 (48)
Round 9 :
(7 sc, inc) x 6 (54)
Round 10 :
1 sc in each st (54)
Info :
Change to darker navy or deep purple now if you want a darker back; carry the variegated yarn inside the body to keep continuity. Body top will be slightly wider than belly; plan wing and leg attachment positions before stuffing.
Round 11 :
1 sc in each st (54)
Round 12 :
1 sc in each st (54)
Round 13 :
1 sc in each st (54)
Round 14 :
1 sc in each st (54)
Info :
Begin stuffing body lightly at round 12, gradually increasing firmness until round 16. Keep the belly slightly flatter to allow the dragon to sit; pad the underside more than the top.
Round 15 :
(8 sc, dec) x 6 (48)
Round 16 :
(7 sc, dec) x 6 (42)
Round 17 :
(6 sc, dec) x 6 (36)
Round 18 :
(5 sc, dec) x 6 (30)
Round 19 :
1 sc in each st (30)
Round 20 :
1 sc in each st (30)
Info :
Mark front center on round 19 to align the neck; leave an opening about 6-8 stitches wide to sew the neck in (or create an opening large enough to insert neck and sew around). Continue stuffing and shape hips slightly wide for sitting posture.
Round 21 :
(3 sc, inc) x 6 (36)
Round 22 :
1 sc in each st (36)
Round 23 :
1 sc in each st (36)
Round 24 :
(3 sc, dec) x 6 (30)
Round 25 :
(2 sc, dec) x 6 (24)
Round 26 :
(1 sc, dec) x 6 (18)
Info :
Fasten off leaving a long tail to close the bottom or to attach to a base if you prefer. For stability, you can insert a small plastic disk or felt circle inside the base before finishing closing. Weave tail and hide inside.
— Front Legs (Make 2) :
Round 1 :
6 sc in magic ring (6)
Round 3 :
(1 sc, inc) x 6 (18)
Round 4 :
1 sc in each st (18)
Round 5 :
(2 sc, inc) x 6 (24)
Round 6 :
1 sc in each st (24)
Info :
To create the paw shape, decrease slightly on round 10 and then shape the ankle narrower. Stuff the paw firmly and the leg lightly to keep a natural, slightly floppy front limb.
Round 7 :
1 sc in each st (24)
Round 8 :
(3 sc, dec) x 6 (18)
Round 9 :
1 sc in each st (18)
Round 10 :
(2 sc, dec) x 6 (12)
Round 11 :
1 sc in each st (12)
Round 12 :
1 sc in each st (12)
Round 13 :
(1 sc, inc) x 6 (18)
Round 14 :
1 sc in each st (18)
Round 15 :
(4 sc, dec) x 3 (15)
Round 16 :
(3 sc, dec) x 3 (12)
Round 17 :
1 sc in each st (12)
Round 18 :
Fasten off leaving long tail for sewing. Add 3 small claws by embroidering or crocheting tiny cone toes (see claws). Stuff paw before closing.
— Back Legs (Hind, Make 2) :
Round 1 :
6 sc in magic ring (6)
Round 3 :
(1 sc, inc) x 6 (18)
Round 4 :
(2 sc, inc) x 6 (24)
Round 5 :
(3 sc, inc) x 6 (30)
Round 6 :
1 sc in each st (30)
Round 7 :
1 sc in each st (30)
Info :
Make the hind legs more rounded and wider at the top for realistic sitting pose. Stuff feet firmly to allow the dragon to bear weight and sit upright.
Round 8 :
(4 sc, dec) x 6 (24)
Round 9 :
1 sc in each st (24)
Round 10 :
(3 sc, dec) x 6 (18)
Round 11 :
1 sc in each st (18)
Round 12 :
(2 sc, dec) x 6 (12)
Round 13 :
1 sc in each st (12)
Round 14 :
(1 sc, inc) x 6 (18)
Round 15 :
1 sc in each st (18)
Round 16 :
(2 sc, inc) x 6 (24)
Round 17 :
1 sc in each st (24)
Round 18 :
(4 sc, inc) x 4, (3 sc, inc) x 2 (30) - distribute increases around to keep round count 30
Round 19 :
1 sc in each st (30)
Round 20 :
Fasten off leaving long tail for sewing; stuff well and shape heel and toes. Add claws as for front legs.
— Claws/Toes (Make 12 small claws) :
Round 1 :
3 sc in magic ring (3)
Round 2 :
1 sc in each st (3)
Round 4 :
1 sc in each st (4)
Info :
Make toe claws in light grey or silver yarn. Sew three claws onto each paw spaced evenly at front; for hind feet attach four claws across front curve.
— Tail (long, braided-feel braid edge) :
Round 1 :
6 sc in magic ring (6)
Round 3 :
(1 sc, inc) x 6 (18)
Round 4 :
(2 sc, inc) x 6 (24)
Round 5 :
1 sc in each st (24)
Round 6 :
1 sc in each st (24)
Info :
Tail length will be approximately 20-26 rounds depending on how long you want it to curl around base. For braided edge, make a separate chain-braid strip from multi-colored yarn then sew along tail edge, or work a shell edge by alternating short textured spikes.
Rounds 7-20 :
Work even rounds 1 sc in each st (24) for 14 rounds to build length; on every 4th round add a shallow increase of 6 stitches distributed to maintain gentle tapering as needed until round 18.
Round 21 :
(3 sc, dec) x 6 (18)
Round 22 :
(2 sc, dec) x 6 (12)
Info :
Stuff tail firmly near the base and more lightly toward the tip. Before closing, slip a thin wire through the center for poseability, secure ends by folding and stitching, then finish closing the tail tip.
— Wing Panels (Make 2 large panels) :
Info :
Wings are worked flat in rows/rounds to create a membrane. The photographed wings show a gradient with dark outer edge, lighter inner highlight, and embroidered stars. We'll build each wing panel by starting at the base (near shoulder) and increasing to form a triangular fan. Work flat and finish the edge with a raised ridge worked in the round to create the bat-wing rib.
Round 1 (wing foundation) :
ch 14, sc in 2nd ch from hook and across (13) — counts as row 1
Round 2 :
ch1, turn, sc across (13)
Round 3 :
ch1, turn, sc in first, inc next, sc across until last, inc in last (15)
Round 4 :
ch1, turn, sc across (15)
Round 5 :
ch1, turn, sc in first, inc next, sc across, inc last (17)
Round 6 :
ch1, turn, sc across (17)
Info :
Continue this pattern increasing one stitch every second row at both outer edges to fan wing outward. Keep working until wing reaches desired size; the photographed wing is about 28-32 rows tall with final top width around 45-52 sts.
Rounds 7-28 :
Repeat: row of sc across, then row with two edge increases (one each side) every other row. By row 28 you should have approximately 51 stitches across. Adjust to match your yarn and gauge to create a proportionate wing roughly half the dragon's body length.
Round 29 :
Work even sc across to firm membrane (51)
Round 30 :
Fasten off leaving long tail for attaching to wing rib. Make second panel mirrored. Optional: use a second colorway to create inner gradient by switching yarn about 8-12 rows up from base.
Wing Rib (edge, work in rounds around panel) :
Round 1 :
With darker yarn, join at base corner and work sc evenly around wing edge; for corners work 3 sc in corner to keep shape; make approximately 120 sc around depending on panel size (count should match your panel perimeter)
Round 2 :
1 sc in each st BLO (matches perimeter) to create raised rib and clean edge
Round 3 :
(1 sc, inc) x around to create a slightly padded ridge (approx +30 sts) depending on perimeter
Info :
Insert thin wire inside the rib between rounds 1 and 2 before tightening to allow wing to pose. Wrap ends of wire with tape and bury inside the rib so no sharp ends are exposed. Sew rib to wing base of body so wing stands away from body slightly.
Round 4 :
Fasten off and weave in ends. Repeat for second wing.
Wing Embellishment (stars and sparkle) :
Info :
Using small white embroidery thread or thin yarn, stitch tiny 6-point star shapes across the membrane. For larger stars worked like small flattened asterisks, stitch 6 straight lines crossing at center. For tiny pin dots, use French knots or small beads. Add silver sequins if desired and secure with invisible thread.
— Wing Supports / Humerus (Attachable ribs) :
Round 1 :
ch 10, sc in 2nd ch from hook across (9)
Round 2-6 :
Work even sc across 9 sts for 5 rounds to create a short stiff rib. Make 3 ribs for each wing. Stuff lightly and insert florist wire into center of rib before closing. Sew ribs evenly along wing base inside; secure firmly to body shoulder.
Info :
When sewing wings to body, position at rounds 10-14 of body for balanced look. Use multiple anchor points along ribs to secure weight and shape. If you want the wing to fold closed, attach only at the shoulder seam and sew the bottom of the rib to the outer hip round to create a hinged fold.
— Decorative Scale Rows (optional surface texture) :
Info :
To mimic small scale detail on the head and shoulders, work 1-2 rows of 3-loop crocodile stitches or puffs along the shoulder ridge. Alternatively, embroider tiny horizontal stitches with a slightly lighter color to create star-like flecks.
— Assembly Notes and Finishing Touches :
Info :
Weave in all tails but leave long tails on head, neck, wings and limbs for sewing. Use whip stitch or mattress/ladder stitch to attach pieces invisibly. Add star embroidery and tiny bead accents last to avoid catching them while sewing pieces together.
— Optional Extra Texture Pieces (mane, under-spikes) :
Round 1 :
ch 6, sc across (5)
Round 2 :
1 sc in each st, fold to create small petal; fasten off (5)
Info :
Make 12-18 small petals in alternating colors and sew along neck base under larger spikes to create layered frill effect as in photo. Slight variation in length creates a natural, tapered frill.
This galaxy dragon is a joyful mix of texture, color, and tiny starry details — every stitch creates a bit of magic. The sculpted head and horns, ribbed neck, and articulated wings combine to make a stunning display piece or a treasured handmade gift. Enjoy the meditative repetition of the ribs and the satisfying sparkle as you embroider stars across the wings. I hope this pattern inspires you to explore variegated yarn and layered textures—happy stitching and may your dragon guard your creative space! 🧶🌟