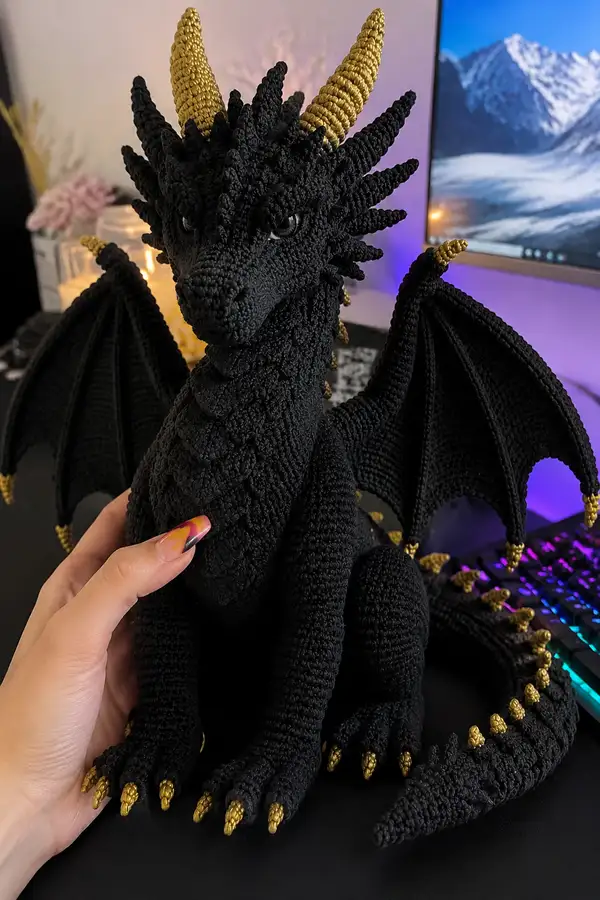
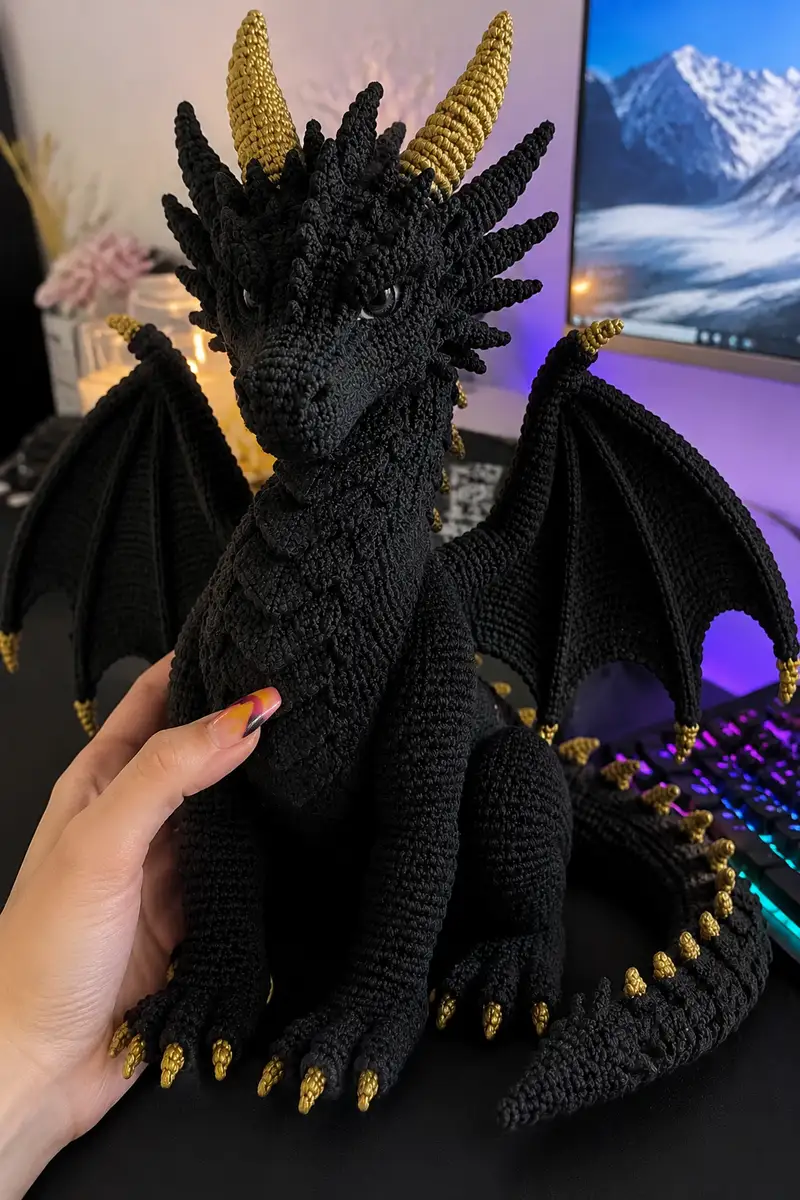
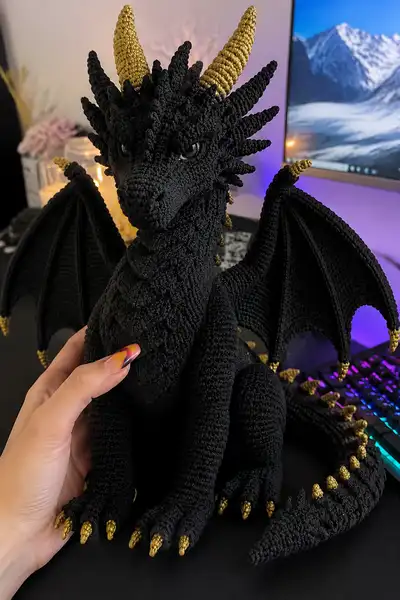
Create a dramatic giant obsidian black dragon with striking gold horns and claws. This detailed amigurumi pattern guides you through sculpted head and snout, textured scales, articulated wings with ribbing, spiral tail, and metallic gold accents. Perfect for advanced crocheters who love character-making and fantasy creatures. The finished dragon sits as a proud display piece with a richly textured body and bold metallic highlights.
Progress Tracker
0% Complete
— Head :
Round 1 :
6 sc in magic ring (6)
Round 3 :
(1 sc, 1 inc) x 6 (18)
Round 4 :
(2 sc, 1 inc) x 6 (24)
Round 5 :
(3 sc, 1 inc) x 6 (30)
Round 6 :
(4 sc, 1 inc) x 6 (36)
Round 7 :
(5 sc, 1 inc) x 6 (42)
Round 8 :
(6 sc, 1 inc) x 6 (48)
Round 9-16 :
1 sc in each st (48)
Info :
Place safety eyes between rounds 12 and 13, approximately 8-10 stitches apart for a slightly fierce look. Use a stitch marker at the first stitch of each round to keep track. Work tightly so stuffing does not show through.
Round 17 :
(6 sc, 1 dec) x 6 (42)
Round 18 :
(5 sc, 1 dec) x 6 (36)
Info :
Begin stuffing the head firmly at this point, inserting fiberfill in small amounts and ensuring even pressure around the eyes and cheeks. Add more to create a smooth, sculpted shape.
Round 19 :
(4 sc, 1 dec) x 6 (30)
Round 20 :
(3 sc, 1 dec) x 6 (24)
Round 21 :
(2 sc, 1 dec) x 6 (18)
Round 22 :
(1 sc, 1 dec) x 6 (12)
Info :
Fasten off leaving a long tail for sewing and shaping. The head here forms the top and crown; the elongated snout is worked separately and sewn into the front opening. Keep head opening large enough to accept the snout base for invisible joining.
— Snout / Muzzle (Make 1) :
Round 1 :
6 sc in magic ring (6)
Round 3 :
(1 sc, 1 inc) x 6 (18)
Round 4 :
(2 sc, 1 inc) x 6 (24)
Round 5-8 :
1 sc in each st (24)
Info :
The snout is worked longer to create the prominent nose and profile. Be careful to keep even tension; the snout should taper slightly toward the tip to create a defined dragon nose.
Round 9 :
(2 sc, 1 dec) x 6 (18)
Round 10 :
1 sc in each st (18)
Round 11 :
(1 sc, 1 dec) x 6 (12)
Round 12 :
1 sc in each st (12)
Round 13 :
(1 sc, dec) x 4, 4 sc (8)
Round 14 :
1 sc in each st (8)
Round 15 :
Work 2 rounds of 1 sc in each st while elongating tip slightly by adding 2 sc evenly across first round to keep curve (8-10)
Info :
Stuff snout firmly, shaping the nose ridge and nostril area. Use a small amount of fiberfill in the tip to maintain point. Sew snout into head opening aligning rounds so the snout curves slightly downwards for a proud profile.
Round 16 :
Fasten off leaving long tail for sewing. Use mattress stitch or whip stitch to sew snout to head; weave tail through several rounds to anchor securely.
— Neck with Layered Scales :
Round 1 :
6 sc in magic ring (6)
Round 3 :
(1 sc, 1 inc) x 6 (18)
Round 4 :
(2 sc, 1 inc) x 6 (24)
Round 5 :
1 sc in each st (24)
Round 6 :
(3 sc, 1 inc) x 6 (30)
Round 7-9 :
1 sc in each st (30)
Info :
Work the neck slightly longer than usual to allow for layered scale appliques later. Keep rounds even and slightly firm; the neck needs structure for the head and chest balance.
Round 10 :
(4 sc, 1 inc) x 6 (36)
Round 11-16 :
1 sc in each st (36)
Info :
Now we will add layered scale pieces: work a set of 18 small scale appliques to cover front of neck (scales pattern below). Pin scales in an overlapping pattern starting from the bottom of the neck upward, sewing through both scale and neck rounds for a secure attachment.
Scale piece :
Round 1: 6 sc in magic ring (6). Round 2: 6 inc (12). Round 3: (2 sc, 1 inc) x 4 = 16. Round 4: Fasten off leaving tail for sewing; shape by folding top edge and whip stitching a small tuck to make the scale curved. Make 18-22 scales depending on neck length.
Round 17-20 :
1 sc in each st (36)
Round 21 :
(4 sc, 1 dec) x 6 (30)
Round 22 :
(3 sc, 1 dec) x 6 (24)
Info :
Begin stuffing the neck lightly; keep the stuffing firmer at the base to support the head. Continue to pin and sew scales as you complete each scale to ensure alignment. Leave top opening to attach head later.
Round 23 :
(2 sc, 1 dec) x 6 (18)
Round 24 :
(1 sc, 1 dec) x 6 (12)
Info :
Fasten off leaving long tail for sewing head to neck. Reinforce seam by sewing through several rounds; hide the tail under the first row of scales to conceal joining stitches.
— Body :
Round 1 :
6 sc in magic ring (6)
Round 3 :
(1 sc, 1 inc) x 6 (18)
Round 4 :
(2 sc, 1 inc) x 6 (24)
Round 5 :
(3 sc, 1 inc) x 6 (30)
Round 6 :
(4 sc, 1 inc) x 6 (36)
Round 7 :
(5 sc, 1 inc) x 6 (42)
Round 8 :
(6 sc, 1 inc) x 6 (48)
Round 9-14 :
1 sc in each st (48)
Info :
At round 10 mark the front center of the body to help position legs and neck. Keep body evenly stuffed but not rock-hard; we want a firm but slightly supple torso for sitting posture. If adding internal armature, insert at this stage before closing lower rounds.
Round 15 :
(6 sc, 1 dec) x 6 (42)
Round 16 :
(5 sc, 1 dec) x 6 (36)
Round 17 :
(4 sc, 1 dec) x 6 (30)
Info :
Leave the opening at the top of the body for neck insertion. Before finishing decreases, arrange internal stuffing and any poseable wire. The body should taper slightly to create a natural chest to belly transition.
Round 18 :
(3 sc, 1 dec) x 6 (24)
Round 19 :
(2 sc, 1 dec) x 6 (18)
Round 20 :
(1 sc, 1 dec) x 6 (12)
Info :
Fasten off leaving long tail for sewing the neck into the body. If the dragon will be seated, sew the base rounds flat into a slight curve to improve stability. Reinforce seam using mattress stitch around the attachment hole.
— Front Legs / Forelimbs (Make 2) :
Round 1 :
6 sc in magic ring (6)
Round 3 :
(1 sc, 1 inc) x 6 (18)
Round 4 :
(2 sc, 1 inc) x 6 (24)
Round 5-8 :
1 sc in each st (24)
Info :
These rounds form the foot and lower leg. Stuff the foot firmly to give a solid base for the dragon to sit on. Keep the toe area packed well to support the gold claws later.
Round 9 :
(3 sc, 1 dec) x 6 (18)
Round 10-14 :
1 sc in each st (18)
Round 15 :
(2 sc, 1 dec) x 6 (12)
Round 16 :
(1 sc, 1 dec) x 6 (6)
Info :
Fasten off leaving long tail for sewing. Leave top opening slightly large to attach to the body at indicated rounds 10-12 of the body for a natural shoulder placement. Make sure both legs are identical in length and stuffing.
Toe/claw placement :
Before closing top, separate foot into three toes by stitching through top rounds to create individual digits. Sew claws (gold cones) to the tip of each toe using long tail and weave through several rounds for a secure hold.
— Hind Legs (Make 2) :
Round 1 :
6 sc in magic ring (6)
Round 3 :
(1 sc, 1 inc) x 6 (18)
Round 4 :
(2 sc, 1 inc) x 6 (24)
Round 5-9 :
1 sc in each st (24)
Info :
Hind legs are thicker and slightly longer than front legs to support seated posture. Work firm stuffing into heel and foot to create weight. Shape knee by adding a small amount of stuffing between rounds 7 and 8.
Round 10 :
(3 sc, 1 dec) x 6 (18)
Round 11-15 :
1 sc in each st (18)
Round 16 :
(2 sc, 1 dec) x 6 (12)
Round 17 :
(1 sc, 1 dec) x 6 (6)
Info :
Fasten off leaving long tail. Attach hind legs to bottom of body, aligning with marked points made earlier. Reinforce the join with multiple passes to secure the heavier weight of the hind legs.
— Tail :
Round 1 :
6 sc in magic ring (6)
Round 3 :
(1 sc, 1 inc) x 6 (18)
Round 4 :
(2 sc, 1 inc) x 6 (24)
Round 5-6 :
1 sc in each st (24)
Round 7 :
(3 sc, 1 dec) x 6 (18)
Round 8-10 :
1 sc in each st (18)
Info :
We will create a long tapered tail by very gradually decreasing. Insert a length of wire if a slightly poseable tail is desired; ensure ends are wrapped and padded with stuffing so they do not poke through yarn.
Round 11 :
(2 sc, 1 dec) x 6 (12)
Round 12-16 :
1 sc in each st (12)
Round 17 :
(2 sc, 1 dec) x 4 (8)
Round 18-22 :
1 sc in each st (8)
Round 23 :
(1 sc, 1 dec) x 2 (6)
Round 24-28 :
1 sc in each st (6)
Round 29 :
2 dec, 1 sc (3)
Round 30 :
Fasten off leaving long tail for sewing. The tail tip will be decorated with gold spikes evenly spaced. Make 10-14 small spike cones (see spike pattern) and sew along the dorsal ridge of the tail with even spacing.
— Wing (Make 2) :
Info :
Each wing is worked flat in rounds that act like rows to create a wing membrane with defined ribs. Work the wing with a slightly smaller hook to keep the membrane taut. Add internal wire or thin armature to the main rib if you want poseable wings.
Round 1 :
6 sc in magic ring (6)
Round 3 :
(1 sc, 1 inc) x 6 (18)
Round 4 :
(2 sc, 1 inc) x 6 (24)
Round 5 :
(3 sc, 1 inc) x 6 (30)
Round 6 :
(4 sc, 1 inc) x 6 (36)
Round 7-10 :
1 sc in each st (36)
Round 11 :
(4 sc, 1 dec) x 6 (30)
Round 12-18 :
1 sc in each st (30)
Info :
Now we will work outward ribs: place a marker at the top center, and from that point work 5 outward ribs using rows of sc with increasing length to shape membrane points. Each rib increases on the first rows and then decreases to create pointed scallops. Use BLO on the final row of each rib to create a ridge appearance.
Rib 1 (center) Round 19-24 :
Row-style: ch1 turn; 1 sc every stitch across for 6 rows (30) then work back in FLO for a ridge. Fasten off and repeat for each rib, adjusting rib width: Rib 2 wider 8 rows, Rib 3 wider 10 rows, Rib 4 8 rows, Rib 5 6 rows to create scalloped edge.
Round 25-32 :
Rejoin around edge and work 1 sc in each st to tidy edge (count will vary between 30-46 depending on scallops). Use 1 sc in each st BLO on top edge to emphasize wing bone line.
Info :
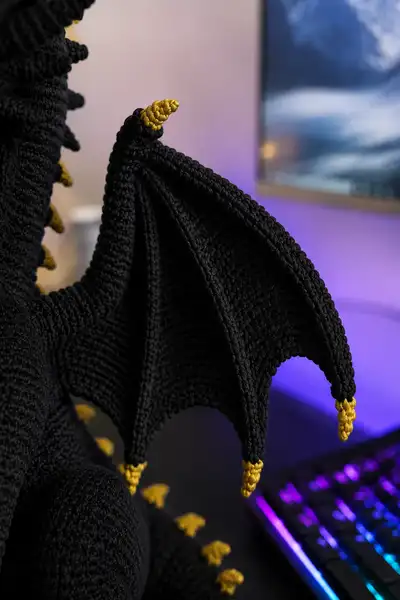
Attach thin wire into the base of the wing by crocheting a short tube to insert the wire and sew closed; this will help wings stand. Add gold cone tips to the last point of each scallop as shown in images using small gold cones (see cone pattern).
Round 33 :
Fasten off leaving long tail for sewing. Securely sew wing base to body between rounds 12-16 on the side of the torso, aligning bones with the shoulder seam for a natural look.
— Horns (Make 2 large spiral horns) :
Info :
Horns are worked in metallic gold with a smaller hook for a tight spiral cone. Work in continuous rounds without joining to create a natural spiral; use stitch markers every 6 rounds to keep track. The horns in the picture are tall and tapered with a spiral texture created by alternating sc and sl st rows.
Round 1 :
6 sc in magic ring (6)
Round 3 :
(1 sc, 1 inc) x 6 (18)
Round 4 :
(2 sc, 1 inc) x 6 (24)
Round 5 :
(3 sc, 1 inc) x 6 (30)
Round 6-12 :
1 sc in each st (30)
Round 13 :
(3 sc, 1 dec) x 6 (24)
Round 14-18 :
1 sc in each st (24)
Round 19 :
(2 sc, 1 dec) x 6 (18)
Round 20-24 :
1 sc in each st (18)
Round 25 :
(1 sc, 1 dec) x 6 (12)
Round 26-30 :
1 sc in each st (12) shaping taper. Fasten off leaving long tail to sew at base. If you want spiral texture, alternate a round of sl st around to pull the rows into a subtle spiral as you go.
— Small Spikes / Crest (Make 18-22) :
Round 1 :
4 sc in magic ring (4)
Round 3 :
1 sc in each st (8)
Round 4 :
(1 sc, dec) x 2 (6)
Round 5 :
1 sc in each st (6)
Info :
Make many small spikes in black and a few gold-tipped ones for the tail. Sew evenly down the center back and neck, spacing them approximately every 4-6 stitches depending on tail/neck length. Secure with a few extra back-and-forth stitches for sturdiness.
Round 6 :
Fasten off leaving tail for sewing. For gold-tipped spikes, make the final round in gold or sew gold cone to tip after attaching.
— Claws & Gold Cones (Make 18-24 small cones) :
Round 1 :
6 sc in gold in magic ring (6)
Round 2 :
(1 sc, 1 inc) x 3 (9)
Round 3 :
1 sc in each st (9)
Round 4 :
(1 sc, dec) x 3 (6)
Round 5 :
1 sc in each st (6)
Round 6 :
Dec 3 times to close slightly (3) Fasten off leaving tail for sewing. Sew cones to toes, wing tips, tail tip and horns as indicated in assembly.
— Wing Ribs Detail (BLO ridges) :
Round 1 :
Join yarn at wing base and sc around rib line for 6 rounds creating a raised bone look (rib count will follow wing circumference, approx. 20-30 sc each round).
Round 2-6 :
1 sc in each st BLO to emphasize ridge. Fasten off and shape by lightly steam blocking if yarn allows to flatten membrane and set rib shape.
Info :
Stitch the ribs to the membrane at regular intervals to lock your desired curvature. Wire may be added inside the rib tube to make wing poseable. Be sure to secure wire ends with extra stitches and padding so they cannot shift.
— Decorative Neck Scales and Chest Plates :
Scale Shape :
Create 24 rounded plates using the following mini pattern: Round 1: 6 sc in mr (6). Round 2: 6 inc (12). Round 3: (2 sc, 1 inc) x 4 = 16. Round 4: 1 sc in each st. Fasten off leaving tail to sew. Shape each by bending slightly and securing a tuck stitch at the top to create a convex scale.
Info :
Arrange scales in overlapping rows from the neck down to the chest and along the belly following the reference photo. Sew each scale through several rounds to the body to ensure a firm attachment and consistent overlap.
— Final Finishing Rounds and Surface Detail :
Info :
Use surface slip stitch to add small ridges and texture along the snout and eyebrows. Work tiny embroidery stitches for nostrils and eyebrow slits with black embroidery thread for subtle definition. Add white eye highlights with thin yarn or acrylic paint if desired after eyes are attached.
Round 1 :
Weave in all long tails carefully using a yarn needle, stitching through multiple rounds and trimming close to fabric. Reinforce all major joins (neck, wings, legs) with at least two rounds of overcast whip stitching for durability.
Info :
Optional blocking: lightly steam wings and allow to dry over a curved surface to set shape. For cotton yarn, pressing carefully with a cloth between iron and piece can help set ribs. Check yarn care instructions and test a scrap first.
This majestic obsidian dragon brings fantasy to life with deep black texture and brilliant gold highlights. Each section — from the sculpted snout to the layered neck scales and defined wing ribs — comes together to form a dramatic display piece you will be proud to share. The process of crafting it is as rewarding as the result, and every added spike or cone brings more personality. 🐉🧶 Keep your patience and enjoy the slow, satisfying build of a creature fit for any shelf or gift display. ✨