" />
🧢 Beautiful ✨ Detailed πŸ’ Adorable

Giant Orange Iguana Amigurumi Pattern

Giant Orange Iguana Amigurumi Pattern
4.9β˜… Rating
10-12 Hours Time Needed
2.0K Made This
βœ‚οΈ

Advanced Level

Designed for experienced crocheters, these patterns involve intricate designs and complex techniques to challenge and inspire.

⏱️

All-Day Adventure

Requires 8-10 hours, ideal for a full day of immersive crocheting.

🧸

Cute Companion

An adorable friend to cherish, handcrafted with love to bring comfort and joy for years to come.

About This Giant Orange Iguana Amigurumi Pattern

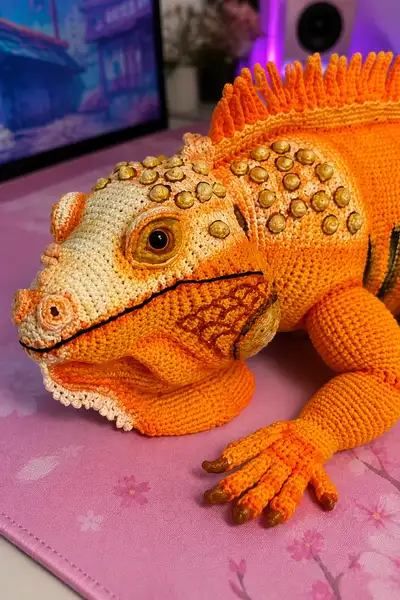
This pattern recreates a lifelike, large iguana amigurumi with vivid orange body, pale beige facial area, and black-striped tail. Visible features include raised ornamental scales on the head, a sculpted dewlap (throat fold), realistic glass cabochon eyes, and a long tail with even stripes. The pattern uses tightly crocheted cotton yarn for crisp texture and stable shaping.
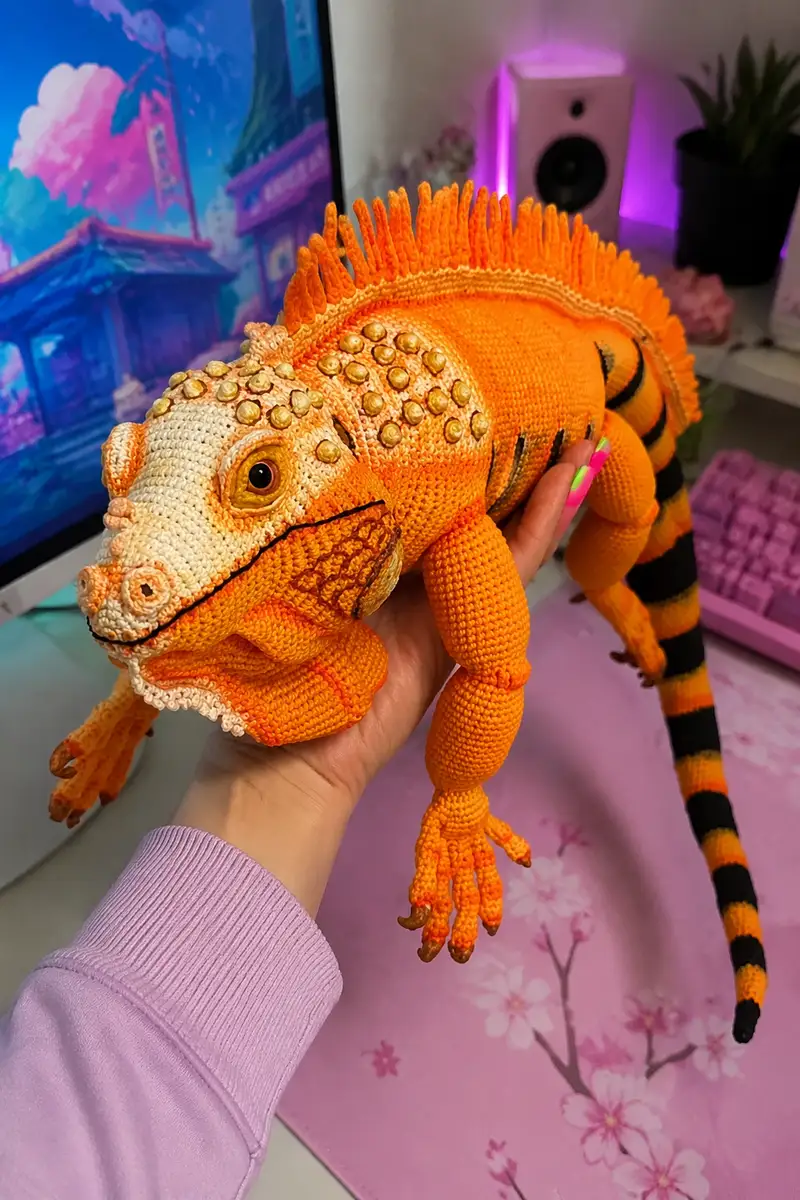
Giant Orange Iguana Amigurumi Pattern crochet pattern - detailed view of completed project

Special techniques include insertion of a steel wire internal frame for posture, sewn-on polymer clay eyelids or glass cabochons, and layered scale decoration. The instructions emphasize step-by-step shaping and assembly so the final piece sits and poses naturally.

Why You'll Love This Giant Orange Iguana Amigurumi Pattern

I love how tactile and sculptural this iguana turns out β€” the contrast between the bright orange body and the pale face gives it real character. The textured head details, dramatic dewlap and striped tail let you practise sculptural amigurumi techniques that really elevate a toy from cute to lifelike. I also enjoy the challenge of adding glass eyes and individual scales; it makes the finished animal feel like a miniature work of art.

Giant Orange Iguana Amigurumi Pattern step 1 - construction progress Giant Orange Iguana Amigurumi Pattern step 2 - assembly progress Giant Orange Iguana Amigurumi Pattern step 3 - details and accessories Giant Orange Iguana Amigurumi Pattern step 4 - final assembly and finishing

Switch Things Up

I absolutely love how this iguana pattern allows for so many creative adjustments β€” try brighter or more muted oranges, or substitute greens and browns for a classic iguana look. Use thicker yarn and a larger hook to scale the pattern up into a cuddly plush, or swap to lighter thread and a finer hook to make a highly detailed miniature.

I like to experiment with eye types: glass cabochons give a museum-quality realism, while embroidered eyes keep the toy child-safe. You can also vary the crest β€” looped yarn tassels for a fluffy ridge or crocheted tabs for a neater, sculpted effect. Don't be afraid to add small accessories like a fabric branch or crocheted rock base to create a scene for display.

Common Mistakes & How to Fix Them

βœ— Skipping stitch markers at round starts can cause misaligned features and uneven shaping; always mark your first stitch of each round βœ— Inconsistent tension between rounds creates lumpy or uneven surfaces; practice maintaining steady, even tension throughout the entire project βœ— Not stuffing gradually as you work causes difficulty reaching inside later; stuff sections as you complete them for best results βœ— Forgetting to add wire or frame before closing tight openings will make inserting the internal skeleton nearly impossible later βœ— Changing yarn color without securing ends or weaving them in can create bulky nodes; tuck and weave ends as you go for a smooth finish βœ— Attaching eyes or large decorations after heavy stuffing can distort the head; position and secure eyes before final stuffing and closing βœ— Not checking stitch math when increasing/decreasing causes visible distortions; verify totals after each round increase or decrease
Giant Orange Iguana Amigurumi Pattern

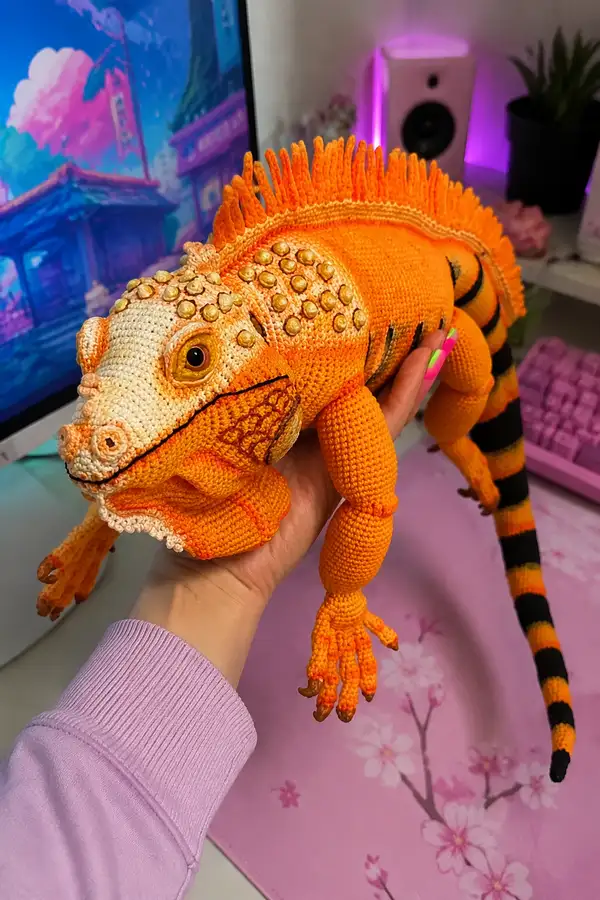
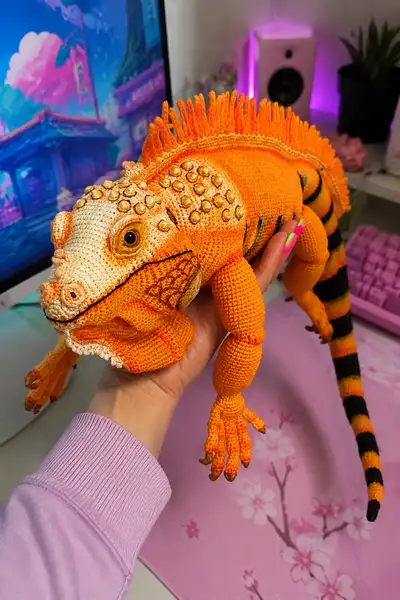
Bring this realistic, hand-sized iguana amigurumi to life β€” a striking orange reptile with beige face, black-striped tail, sculpted scales and a dramatic dewlap. This pattern recreates the textured head, articulated limbs, and long striped tail seen in the photos. Detailed shaping, glass-eye instructions and decorative scale placement are included so you can make a lifelike one-of-a-kind plush reptile.

Advanced 10-12 Hours

Materials Needed for Giant Orange Iguana Amigurumi Pattern

β€” Main Fabric

  • 01
    Alize Cotton Gold (or comparable worsted/light DK cotton): approximately 200g bright orange (main body)
  • 02
    Approximately 100g light beige/cream for face and throat detailing
  • 03
    Approximately 50g black for tail stripes
  • 04
    Small amounts (10-20g) of darker orange or brown for painted shading and embroidery details
  • 05
    Optional: additional pale orange or coral for tonal layering

β€” Tools Required

  • 01
    1.25 mm crochet hook (used by the original maker for dense fabric)
  • 02
    Optional 1.0-1.5 mm hook for tiny details or eyelid seams
  • 03
    Steel wire for internal frame, 1.5 mm diameter recommended
  • 04
    Polyester fiberfill (holofiber) for stuffing
  • 05
    Glass cabochons for eyes, approx. 12 mm diameter
  • 06
    Polymer clay for eyelids (optional) or pre-made eyelids
  • 07
    Needles for sewing (long doll needle and thick short needle for heavy seams)
  • 08
    Pins for positioning
  • 09
    Thin round-nose pliers for bending wire ends
  • 10
    Scissors
  • 11
    Stitch markers (at least 4-6)
  • 12
    Fabric glue or PVA for fixing glass eyes or eyelids
  • 13
    Fine-tipped permanent marker or pastel for tonal shading (optional)
  • 14
    Optional: floral wire or pipe cleaners for poseable toes

Progress Tracker

0% Complete

β€” Head :

Round 1 :

6 sc in magic ring (6)

Round 2 :

6 inc (12)

Round 3 :

(1 sc, inc) x 6 (18)

Round 4 :

(2 sc, inc) x 6 (24)

Round 5 :

(3 sc, inc) x 6 (30)

Info :

Work tightly with 1.25 mm hook. This head is sculpted and requires firm fabric to hold shaping. Use bright orange yarn for the crown; change to beige later for the face area. Mark the first stitch of every round to keep track of counts.

Round 6 :

(4 sc, inc) x 6 (36)

Round 7 :

(5 sc, inc) x 6 (42)

Round 8 :

(6 sc, inc) x 6 (48)

Round 9-11 :

1 sc in each st (48) β€” work 3 rounds even to build crown height

Info :

Between rounds 11 and 12 prepare beige yarn for face shaping. The face will be crocheted in beige for about the next 10 rounds; join beige in the first stitch of round 12 and carry orange inside if you plan to add top color later. Alternatively, change back to orange after face shaping.

Round 12 :

Change to beige. 1 sc in each st (48)

Round 13 :

1 sc in each st (48)

Round 14 :

1 sc in each st (48)

Info :

Eye placement: place safety eyes or glue-in glass cabochons between rounds 14 and 16. For a lifelike expression, place them about 9-11 stitches apart (count center point as reference). If using glass cabochons with polymer clay eyelids, prepare eyelid pieces ahead and set them in before final stuffing.

Round 15 :

1 sc in each st (48). Insert eyes now between rounds 15 and 16, approximately 9 stitches between centers for a moderate expression (adjust 1-2 stitches wider or narrower to customize).

Round 16 :

1 sc in each st (48). After inserting eyes, embroider upper eyelid outlines or attach clay lids before continuing.

Round 17 :

(6 sc, dec) x 6 (42)

Round 18 :

(5 sc, dec) x 6 (36)

Info :

Begin stuffing head firmly but leave room to add the jaw and dewlap. For the realistic jowl and lower lip, you will crochet separate lower jaw pieces and attach later; leave a long tail to stitch them in place.

Round 19 :

(4 sc, dec) x 6 (30)

Round 20 :

(3 sc, dec) x 6 (24)

Round 21 :

(2 sc, dec) x 6 (18)

Round 22 :

(1 sc, dec) x 6 (12)

Round 23 :

6 dec (6) β€” do not fasten off yet; this is the top crown closure. Tighten and hide tail for now; cut yarn leaving long tail if you will sew crown to skull later.

Info :

Set head aside after stuffing lightly β€” we'll add extra shaping with sewn-in darts and the lower jaw. Many of the facial details (nostrils, scale placements) will be embroidered or attached as separate small pieces.

β€” Snout / Lower Jaw :

Make 1 lower jaw piece in beige with orange edge for sculpted lip.

Round 1 :

6 sc in magic ring (6)

Round 2 :

6 inc (12)

Round 3 :

(1 sc, inc) x 6 (18)

Round 4 :

(2 sc, inc) x 6 (24)

Round 5-7 :

1 sc in each st (24) β€” build a slightly elongated oval shape for lower jaw

Round 8 :

(2 sc, dec) x 6 (18)

Round 9 :

(1 sc, dec) x 6 (12)

Round 10 :

6 dec (6). Fasten off leaving a long tail for sewing. Stuff gently and shape to form a broad lower jaw with slight curvature; attach to lower front of head with ladder stitch, aligning upper edge to head opening. Reinforce seam with extra passes to keep jaw snug.

Info :

After attaching, use thin yarn or upholstery thread to sew a subtle mouth line from side to side. Emphasize a slight smile or neutral line depending on desired expression. Embroider nostrils on the snout above the jaw using darker orange or brown yarn.

β€” Dewlap (Throat Flap) :

Create two layered semicircles in beige edged with orange for the dewlap. This is worked flat and sewn to the lower jaw and neck.

Dewlap Round 1 :

Ch 20, join to form ring with sl st, work 1 sc in each ch around (20)

Dewlap Round 2 :

(1 sc, inc) x 10 (30)

Dewlap Round 3 :

1 sc in each st (30)

Dewlap Round 4 :

Work scallop: *skip 1 st, 5 sc in next st, skip 1 st, sl st in next* across for frilly edge. Fasten off leaving long tail for sewing.

Info :

Sew the dewlap to the lower jaw and underside of head. Pin in position, then baste with long stitches to check shape before permanent sewing. Use a few stitches to gather where the dewlap meets the jaw to create natural folds.

β€” Body :

Round 1 :

6 sc in magic ring (6)

Round 2 :

6 inc (12)

Round 3 :

(1 sc, inc) x 6 (18)

Round 4 :

(2 sc, inc) x 6 (24)

Round 5 :

(3 sc, inc) x 6 (30)

Round 6 :

(4 sc, inc) x 6 (36)

Round 7-10 :

1 sc in each st (36) β€” these rounds build torso width

Info :

If adding a body frame: insert steel wire skeleton now. Create a spine wire that runs from body center into tail and up into head. Wrap the wire in thin fabric tape or medical adhesive fabric tape so it won't cut yarn or slide inside stuffing. Ensure wire ends are folded back and capped with tape or felt.

Round 11 :

(4 sc, inc) x 6 (42)

Round 12-16 :

1 sc in each st (42)

Info :

Begin shaping belly by switching to beige on rounds 12-16 if you want a lighter underside. In the pictured example, only the face is beige, but a very pale belly can add realism. If you change color, carry unused yarn inside to avoid bulk.

Round 17 :

(5 sc, dec) x 6 (36)

Round 18 :

(4 sc, dec) x 6 (30)

Round 19 :

(3 sc, dec) x 6 (24)

Round 20 :

(2 sc, dec) x 6 (18)

Round 21 :

1 sc in each st (18) β€” leave an opening at the top edge for neck attachment; do not close.

Info :

Stuff the body firmly but leave the last 6-8 rounds lightly stuffed to allow sewing the head and legs without overfilling. Reinforce inner frame attachment points by sewing through wire wrap and yarn so limbs and head stay secure under handling.

Round 22-26 :

Continue 1 sc in each st to build torso length (18). Stop after 4-5 rounds before the tail junction to attach legs and reinforce seam area.

β€” Tail :

Info :

The tail is long, tapered and striped. Begin at base with body color (orange), decreasing gradually over many rounds. Insert the steel wire spine into tail core during work for poseability. For stripes, change color at specified rounds: orange then black bands of 3-6 rounds depending on thickness, ending with a pointed black tip.

Round 1 :

Join orange to body opening and pick up 18 sc around (18)

Round 2 :

1 sc in each st (18)

Round 3 :

(2 sc, dec) x 4, 2 sc (14)

Round 4-6 :

1 sc in each st (14)

Round 7 :

Change to black. 1 sc in each st (14)

Round 8-9 :

1 sc in each st (14) β€” black stripe continues for 2 rounds

Round 10 :

Change to orange. 1 sc in each st (14)

Round 11-13 :

1 sc in each st (14)

Round 14 :

Change to black. 1 sc in each st (14)

Info :

Continue alternating color bands roughly every 2-4 rounds to create the striped tail seen in photos. Tidy color changes: join new color in first stitch of the new round and carry the unused yarn inside the tail, weaving it in every 6-8 rounds to secure. Insert the wire into the tail hollow before heavy stuffing; secure wire with tape and a few stitches around base.

Rounds 15-60 :

Repeat tapered decreases gradually every 4-6 rounds: decrease 2 sts each taper round until tail reaches 6-8 sts around, alternating color bands as desired. Example decrease pattern every 6th round: (3 sc, dec) x n depending on current stitch count. Continue until tail reaches 6 sc circumference.

Final Tail Rounds :

When tail is about 6-8 stitches circumference, work even rounds in chosen colors for several rounds and then decrease to 4 sc and 2 sc, fasten off leaving tail point to stitch closed over wire. Do not cut wire; fold end and cap with tape or felt and anchor inside tip.

β€” Front Legs (Make 2) :

Info :

Front legs are jointed at shoulder with a slightly bulbous upper arm, slender wrist, and splayed fingers. The creator used four finger sizes; fingers are crocheted separately and inserted into the hand with wire or sew-in method. Stuff fingers lightly or leave hollow if you will insert wire skeleton.

Upper Arm Round 1 :

6 sc in magic ring (6)

Round 2 :

6 inc (12)

Round 3 :

(1 sc, inc) x 6 (18)

Round 4 :

(2 sc, inc) x 6 (24)

Round 5-8 :

1 sc in each st (24) β€” build rounded upper arm

Round 9 :

(3 sc, dec) x 6 (18)

Round 10-12 :

1 sc in each st (18) β€” create wrist section

Round 13 :

(2 sc, dec) x 6 (12)

Round 14 :

1 sc in each st (12)

Info :

Insert thin wire or pipe cleaner into leg if you wish poseable fingers and wrists. Leave a 3–4 cm tail of wire out at the top to anchor in the body. Stuff the arm lightly; hands are sewn later after fingers are attached.

Round 15 :

Fasten off leaving long tail for sewing to body. Repeat for second front leg.

β€” Hand & Fingers :

Info :

Make 4 fingers per hand of varying sizes. The fingers in the original are worked thin and long with a slight enlargement at the base. Do not overstuff; fingers must be flexible. Finger tips can be finished with a small sewing of brown yarn or polymer clay nails.

Finger Size A (Make 2 per hand) Round 1 :

6 sc in magic ring (6)

Round 2-4 :

1 sc in each st (6)

Round 5 :

(1 sc, inc) x 3 (9)

Round 6-12 :

1 sc in each st (9). Lengthen to desired finger length (approx 5-6 cm). Fasten off leaving long tail. Repeat for each finger with variations in even rounds to create 4 finger sizes. For the smallest finger stop at round 10; for the largest continue to round 15.

Info :

Sew fingers into the hand opening using long tails. Arrange splayed as in photos, securing each finger with multiple passes through the palm. If adding wire, insert before final stitching and wrap wire tail around internal arm wire for extra anchorage.

β€” Back Legs (Make 2) :

Info :

Back legs are thicker and longer than front legs with larger feet. Use the same technique as front legs but increase for a larger paw. Attach toes using the same finger patterns but slightly wider bases.

Round 1 :

6 sc in magic ring (6)

Round 2 :

6 inc (12)

Round 3 :

(1 sc, inc) x 6 (18)

Round 4 :

(2 sc, inc) x 6 (24)

Round 5 :

(3 sc, inc) x 6 (30)

Round 6-9 :

1 sc in each st (30)

Round 10 :

(4 sc, dec) x 6 (24)

Round 11-14 :

1 sc in each st (24) β€” build length

Round 15 :

(3 sc, dec) x 6 (18)

Round 16-18 :

1 sc in each st (18) β€” shape ankle

Round 19 :

(2 sc, dec) x 6 (12)

Round 20 :

1 sc in each st (12) β€” finish leg and leave opening for toe attachment

Info :

Sew back legs to body at rounds 14-16 of the body where you left space. Pin and measure spacing to achieve a natural stance. Reinforce seam heavily as these support the toy's weight.

β€” Scales / Decorative Raised Bumps :

Info :

Head scales are created as small raised circles or cabochons glued/sewn to the head. In the original, glass or polymer pieces were applied. You can crochet small beads or use store-bought cabochons. Arrange them in rows on the crown and cheeks and secure with glue plus thread stitch for durability.

Small Scale Round 1 :

6 sc in magic ring (6)

Small Scale Round 2 :

6 inc (12)

Small Scale Round 3 :

1 sc in each st (12). Fasten off leaving tail for sewing. Make 12–18 small scales for crown and cheeks depending on desired layout.

Info :

To mimic the shiny cabochons in the image, you can coat paperclay discs with varnish or use ready-made glass cabochons glued to a crocheted backing. Once arranged, glue, then stitch around each piece to secure it.

β€” Crests / Dorsal Spines :

Info :

The dorsal spines are short yarn loops or narrow crocheted strips positioned along the upper back and neck. In the photo they are short, upright yarn tassels attached to the dorsal seam. I'll describe both looped and crocheted tab methods.

Crest Tab (Make 20-25) Round 1 :

Ch 10, sl st back along chain to form a short cord. Fasten off leaving long tail for attaching. Attach tabs along spine at equal intervals from base of skull to mid-tail, curving slightly towards the back.

Loop Method :

Cut 20–30 pieces of yarn 6–8 cm long, fold in half and use a latch hook or slip knot to attach to the center back seam in a single row creating the upright crest. Trim any uneven ends and shape with scissors to reproduce the short, spiky crest in the photos.

β€” Eyelids and Eyes :

Info :

The pictured iguana uses 12 mm glass cabochons for eyes with polymer clay eyelids fixed around them for realism. If you prefer safety eyes, choose a similar diameter. Work eyelids in polymer clay or make crocheted eyelid cups in beige and glue or stitch around the glass pieces. Secure eyes before final stuffing and closing the head.

Eyelid Cup (Crochet) Round 1 :

6 sc in magic ring (6)

Round 2 :

6 inc (12)

Round 3 :

1 sc in each st (12) β€” flatten cup lightly and sew around inserted glass cabochon, securing with glue as needed. Repeat for both eyes.

β€” Tail Stripes Finishing :

Info :

When making color changes on the tail, weave ends neatly inside the core. After finishing, you may want to paint faint shading stripes using pastel or textile markers to match the subtle transitions shown in the photos.

β€” Assembly and Final Shaping :

Info :

Before assembling, block pieces by dampening lightly and shaping on a towel. Assemble on a flat surface with pins and measure each attachment against the reference photo: head centered on top of torso, front legs set near front base of body, back legs spaced evenly to support weight. Use dense stitches and reinforced sewing to secure each limb and the tail to the body frame.

Step :

Sew head to body at body round 21 using long tail left on head; use mattress stitch or whip stitch and baste first, then reinforce. Stuff head to final firmness as you sew to ensure smooth neck connection.

Step :

Sew legs to body and ensure symmetry. Add internal wire ties to connect limb wires to the body wire skeleton for stronger anchorage.

Step :

Attach scales and cabochons with powerful glue and then stitch around each for safety. If using polymer clay eyelids, bake, tint and varnish prior to attaching. Glue eyelids, then sew through surrounding crochet for stability.

Info :

Use acrylic paint or pastel to add tonal shading around eyes, mouth, and belly to mimic the subtle beige and orange gradations visible in the original. Seal pastel with matte varnish if desired.

Assembly Instructions

  • Attach head to body by inserting the neck portion into the body opening. Pin in place first, then sew securely using a ladder stitch all around, ensuring even attachment between body round 21 and head base (use long tails from both parts).
  • Position front legs at the sides where the chest begins (body rounds 7-10). Pin and measure to make sure both legs sit at the same height, then sew through arm top and body rounds with a strong needle and double thread for reinforcement.
  • Attach back legs to the bottom of the body at rounds 12-16, spacing them to give a stable tripod when paired with tail contact. Sew tightly and stitch through any internal wire for extra strength.
  • Attach fingers by sewing each pre-made finger into the hand opening and arranging splayed; use multiple passes and knots inside the hand to prevent loosening. If inserting wire, anchor wire ends into the palm and wrap around the internal wire for stability.
  • Attach tail at the rear body opening. Insert tail spine into the body, then sew the first 4–6 rounds of the tail to the body opening tightly to hide the junction; reinforce with extra stitches for a secure connection.
  • Sew on dorsal crest tabs evenly along the spine from base of skull down the tail. Pin them first to visualize the row and ensure spacing matches the reference.
  • Glue and stitch head scales and cabochons into place, then embroider fine mouth lines and nostril detail with darker yarn. Add shading with pastels or thin washes of diluted acrylic and seal if using pastels.
  • Weave in and secure all loose ends invisibly by threading them into the nearest rows. Trim yarn tails close to the work and use a dab of fabric glue inside seams where needed for extra security.

Important Notes

  • πŸ’‘Use stitch markers consistently at the beginning of each round to avoid counting errors and maintain proper shaping
  • πŸ’‘Stuff body parts gradually as you work rather than waiting until the end, especially for narrow openings like arms and legs
  • πŸ’‘For glass cabochon eyes, position and secure before stuffing head fully - they cannot be repositioned once locked in place
  • πŸ’‘Maintain consistent tension throughout the project; too tight creates stiff, small pieces, too loose creates floppy, holey fabric
  • πŸ’‘When sewing pieces together, use yarn slightly thinner than working yarn for neater, less visible seams
  • πŸ’‘Pin all pieces in position before final sewing to ensure proper placement and symmetry
  • πŸ’‘For amigurumi, work tightly enough that stuffing doesn't show through stitches
  • πŸ’‘Keep a row counter or notepad to track rounds, especially in long even-stitch sections

This lifelike iguana amigurumi combines sculptural crocheting, tiny detail work, and mixed-media finishing to become a truly special handmade piece. From the ridge of small crest tabs to the striped poseable tail, every stitch contributes to a realistic, expressive creature. Enjoy the process of shaping and decorating β€” and be proud of your miniature reptile masterpiece! 🧢🐊✨

You ask,

we answer.

FAQs

What is the finished size of this amigurumi?

Based on the specified materials and hook size (1.25 mm), the finished iguana will measure approximately 90-100 cm from snout to tip of tail. Using thicker yarn or larger hook will proportionally increase the size.

Can I use different yarn weights for this pattern?

Yes! You can use any yarn weight, but adjust your hook size to be 1-2 sizes smaller than the yarn recommendation to keep fabric dense for amigurumi. Changing weight will change final size and may require adjusting stitch counts or wire gauge.

Do I need to use glass cabochons for eyes or can I embroider them?

Both options work. Glass cabochons give a realistic glossy finish and are ideal for display pieces. Embroidered eyes are safer for children and add charm. If using glass, secure with glue and stitches.

How much stuffing will I need?

For this large iguana, approximately 200-300 grams of polyester fiberfill will be sufficient depending on how firmly you stuff. Stuff feet and paws firmer and torso/head moderately for shape retention.

Can I make the legs and tail poseable?

Absolutely. Use steel wire (1.5 mm diameter recommended) for a strong internal frame. Anchor wires in the torso and wrap with fabric tape to secure. Bend wire to pose limbs and tail.

What if my stitch count is off?

If you notice a counting error, unravel back to the last round where count was correct and rework. Using a stitch marker at the start of each round and noting counts prevents most mistakes.

How do I attach decorative scales safely?

Glue scales (cabochons) with a strong clear-drying adhesive, then stitch around edges to secure. For toys intended for children, avoid glued small parts and use embroidered or crocheted scales instead.

How to prevent the frame wire from rotating inside the body?

Wrap the wire with fabric tape (medical adhesive tape) before inserting. Also sew through the wrapped wire at several attachment points to anchor it to the body yarn.