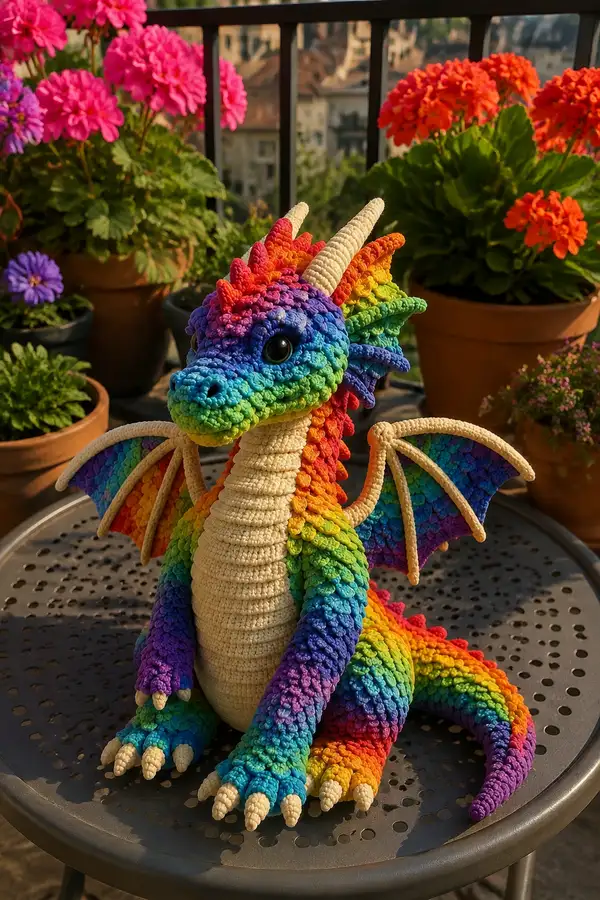
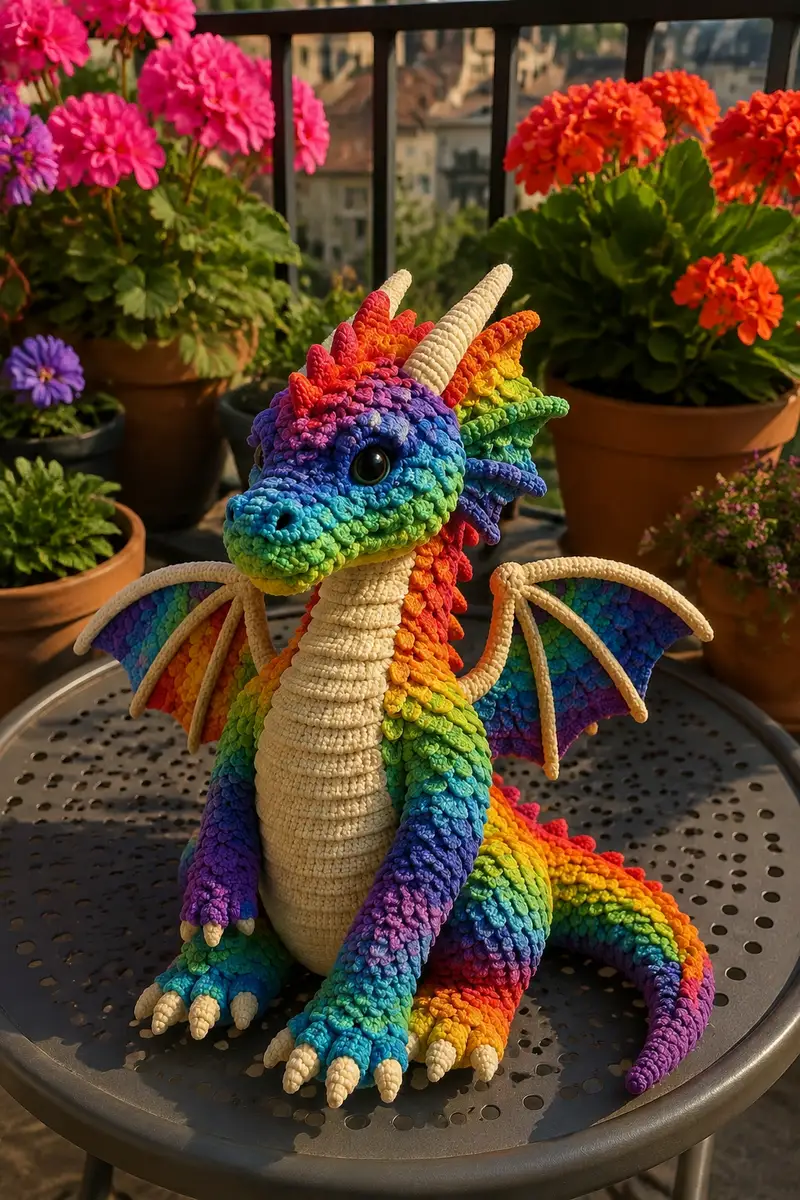
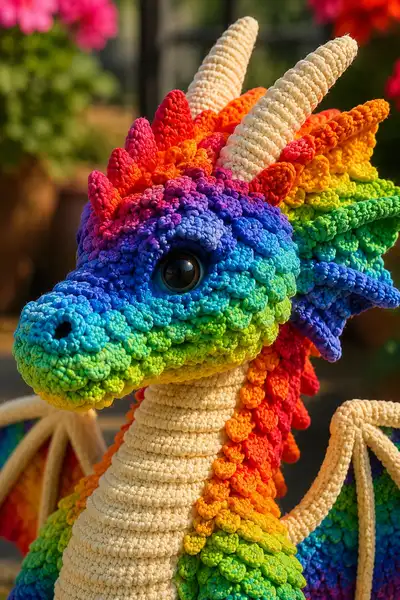
Create a dazzling rainbow dragon with layered crocodile-style scales, cream underbelly, poseable wings and sculpted horns. This pattern recreates the plush dragon pictured—bright graduated rainbow scales, textured claws, and a long curled tail. Detailed round-by-round instructions take you from a tight amigurumi base to lush, three-dimensional scales and a fully assembled, display-ready dragon. Suitable for experienced crocheters who love colorwork and sculpted shaping.
Progress Tracker
0% Complete
— Head :
Round 1 :
6 sc in magic ring (6)
Round 3 :
(1 sc, inc) x 6 (18)
Round 4 :
(2 sc, inc) x 6 (24)
Round 5 :
(3 sc, inc) x 6 (30)
Round 6 :
(4 sc, inc) x 6 (36)
Round 7 :
(5 sc, inc) x 6 (42)
Round 8 :
(6 sc, inc) x 6 (48)
Round 9 :
1 sc in each st (48)
Info :
We will create crocodile-style scale rows across the head starting now. The head base remains 48 sts so scales are worked over pairs of stitches (24 scales per round). Keep your color changes aligned with the gradient yarn to reproduce the rainbow. Place stitch marker at the beginning of each round.
Round 10 :
1 sc in each st (48)
Round 11 :
Start scale row: working crocodile stitch across base (see technique below) over 24 scale positions (48 base stitches). After completing the scale row, sl st to join (48 base stitches remain)
Info :
Crocodile stitch technique for this pattern: you will always work scales over two base stitches. For each scale: dc5 around the post of stitch A (the second of the pair), then on the next anchoring row work a reverse set to overlap. In practice we alternate: Row A = base sc round; Row B = work scales into pairs of stitches (dc5 around the post of stitch). After a scale row, work one sc round to anchor.
Round 12 :
1 sc in each st (48) - anchoring round after scales
Round 13 :
Scale row: work crocodile scales around next 24 positions (48 base sts). Make sure to space the scales evenly so the eyes will sit correctly. End with sl st to join (48)
Info :
Place safety eyes between rounds 13 and 14, approximately 8-10 stitches apart center-to-center (this pattern uses larger 18mm eyes so spacing of 9 stitches between eyes works well). To position eyes: count from center-front of muzzle and place eyes about 11-13 stitches back on each side depending on face shape.
Round 14 :
1 sc in each st (48)
Round 15 :
Scale row: crocodile scales worked across (48 base sts = 24 scales). After completing the row, sl st to join (48)
Info :
If you want a slightly rounder muzzle, add one extra sc round before the next scale row. Bear in mind additional sc rounds change the vertical placement of the eyes and crest—measure often with stitch marker and pin eyes before securing.
Round 16 :
1 sc in each st (48)
Round 17 :
Scale row: crocodile scales across 24 positions (48). After finishing scale clusters, check symmetry around the eyes and nose. Sl st to join
Round 18 :
1 sc in each st (48)
Round 19 :
Scale row (last wide head scale row): dc5 clusters over each pair of sts across (24 scales). Sl st to join (48)
Round 20 :
1 sc in each st (48)
Info :
Begin subtle decreases to shape the back of the skull. Start stuffing the head with fiberfill firmly around the eye area and gradually toward the neck. Stuff until the head is firm but still a touch squeezable—the scales compress slightly over stuffing.
Round 21 :
(6 sc, dec) x 6 (42)
Round 22 :
(5 sc, dec) x 6 (36)
Round 23 :
1 sc in each st (36)
Round 24 :
(4 sc, dec) x 6 (30)
Round 25 :
(3 sc, dec) x 6 (24)
Info :
As you decrease, continue stuffing toward the back of the skull and around the crown. If you're adding a center ridge of smaller scales, crochet them on now (see Spine/crest section) before the final closure so you can align them easily.
Round 26 :
(2 sc, dec) x 6 (18)
Round 27 :
(1 sc, dec) x 6 (12)
Info :
Fasten off leaving a long tail for sewing the head to the neck/body. Finish stuffing the head firmly but avoid overstuffing which pushes through the scales' texture. Weave tail in when attaching to body using a mattress or whip stitch for a neat join.
— Neck & Underbelly (ribbed cream) :
Round 1 :
With cream yarn, 6 sc in magic ring (6)
Round 3 :
(1 sc, inc) x 6 (18)
Round 4 :
(2 sc, inc) x 6 (24)
Round 5 :
(3 sc, inc) x 6 (30)
Round 6 :
(4 sc, inc) x 6 (36)
Round 7 :
1 sc in each st (36)
Info :
We will create a ribbed underbelly by working alternating hdc/back-loop-only rounds. This produces the ridged cream chest seen in the photos. Keep the underbelly narrower than the body circumference so it tucks neatly when sewn.
Round 8 :
1 hdc in each st BLO (36)
Round 9 :
1 sc in each st (36)
Round 10 :
1 hdc in each st BLO (36)
Round 11 :
1 sc in each st (36)
Round 12 :
1 hdc in each st BLO (36)
Round 13-20 :
Repeat rounds 11-12 four times more until the neck length matches photo (alternating sc and hdc BLO). Maintain 36 sts throughout
Info :
Stuff the neck lightly while working rib rounds, make it firm but flexible. The neck will be stitched into the body opening; leave a long tail when finishing to sew securely. If you prefer a slightly longer neck, add additional sc/hdc BLO repeats in even numbers to maintain rib pattern.
Round 21 :
Fasten off leaving long tail for sewing to head and body. Do not close opening.
— Body (main rainbow base) :
Round 1 :
6 sc in magic ring (6)
Round 3 :
(1 sc, inc) x 6 (18)
Round 4 :
(2 sc, inc) x 6 (24)
Round 5 :
(3 sc, inc) x 6 (30)
Round 6 :
(4 sc, inc) x 6 (36)
Round 7 :
(5 sc, inc) x 6 (42)
Round 8 :
(6 sc, inc) x 6 (48)
Round 9 :
(7 sc, inc) x 6 (54)
Round 10-14 :
1 sc in each st (54)
Info :
Switch to your variegated rainbow yarn now to begin body scales. The body is worked in base sc rounds of 54 stitches with scale rows worked on top. Keep marker at round start and mark front center to help position legs and belly attachment.
Round 15 :
Scale row: crocodile-style scales over 27 positions (54 base sts). Work dc5 clusters as your scale petals in the method described earlier. Sl st to join (54)
Round 16 :
1 sc in each st (54)
Round 17 :
Scale row: crocodile scales over 27 positions (54). Sl st to join
Round 18 :
1 sc in each st (54)
Round 19-26 :
Alternate scale rows and sc base rounds to build body height; work a total of 8 scale rows interleaved with 8 sc rounds (end with an sc round). Maintain 54 sts
Info :
Position legs: the front leg attach points are approximately at the start of round 18 (counting from the body base); mark left and right positions 12 sts apart on each side of front center. Rear legs at back third of body about rounds 24-26 positions. Pin before sewing.
Round 27 :
(7 sc, dec) x 6 (48)
Round 28 :
1 sc in each st (48)
Round 29 :
(6 sc, dec) x 6 (42)
Round 30 :
(5 sc, dec) x 6 (36)
Round 31 :
1 sc in each st (36)
Info :
Begin stuffing body firmly from base upward, distribute fiberfill evenly—legs will be sewn into the body and need a firm base. If adding internal armature or wire for the tail, insert here before closing the hole completely.
Round 32 :
(4 sc, dec) x 6 (30)
Round 33 :
(3 sc, dec) x 6 (24)
Round 34 :
(2 sc, dec) x 6 (18)
Round 35 :
(1 sc, dec) x 6 (12)
Info :
Fasten off leaving long tail for sewing to the underbelly and neck. Securely close base opening if not attaching additional assembly pieces here. Weave tail inside and keep stuffing even to avoid lumps under scales.
— Front Arms (Make 2) :
Round 1 :
6 sc in magic ring (6)
Round 3 :
(1 sc, inc) x 6 (18)
Round 4 :
1 sc in each st (18)
Round 5 :
Scale row across arm: crocodile-style scales over 9 positions (18 base sts). Sl st to join
Round 6 :
1 sc in each st (18)
Round 7 :
Scale row across arm again (9 scales). Sl st to join
Info :
Stuff the paw/hand firmly to create a rounded foot. Use the smaller 2.5mm hook for the claws to keep them neat and firm. If you want poseable arms, insert a pipe cleaner or wire now leaving ends tucked toward shoulder.
Round 8 :
1 sc in each st (18)
Round 9 :
(2 sc, dec) x 4, 1 sc (14)
Round 10 :
1 sc in each st (14)
Round 11 :
(1 sc, dec) x 4, 2 sc (10)
Round 12 :
1 sc in each st (10)
Round 13 :
(1 sc, dec) x 2, 2 sc (8)
Round 14 :
1 sc in each st (8)
Round 15 :
Fasten off leaving long tail for sewing. Add small cream claws: with cream yarn make 3 small cone claws each 3 rounds (see Claw section) and sew to front of paw centered at round 4-5
Info :
Sew arms to body at front positions (refer to Body Info). Use long tails and whip stitch through both the arm opening and the body base to create a secure, nearly invisible seam. Add reinforcement stitches at top and bottom of seam if the toy will be handled often.
— Hind Legs (Make 2) :
Round 1 :
6 sc in magic ring (6)
Round 3 :
(1 sc, inc) x 6 (18)
Round 4 :
(2 sc, inc) x 6 (24)
Round 5 :
1 sc in each st (24)
Round 6 :
Scale row across foot: crocodile scales over 12 positions (24 base sts). Sl st to join (24)
Round 7 :
1 sc in each st (24)
Round 8 :
(3 sc, dec) x 6 (18)
Round 9 :
1 sc in each st (18)
Round 10 :
(2 sc, dec) x 6 (12)
Round 11 :
1 sc in each st (12)
Round 12 :
(1 sc, dec) x 4 (8)
Round 13 :
1 sc in each st (8)
Round 14 :
Fasten off leaving long tail for sewing. Add 4 cream claws to each foot: sew each 3-round cone (see Claws) spaced across the toe area
Info :
Hind legs are slightly chunkier to support the dragon sitting pose. When sewing to body, position the base of the foot flat against underside of body at the marks placed on body rounds 24-26. Secure thoroughly with multiple passes of whip stitch.
— Tail :
Round 1 :
6 sc in magic ring (6)
Round 3 :
(1 sc, inc) x 6 (18)
Round 4 :
(2 sc, inc) x 6 (24)
Round 5-8 :
1 sc in each st (24)
Round 9 :
Scale row across tail: crocodile scales over 12 positions (24 sts). Sl st to join
Round 10-22 :
Alternate sc rounds and scale rows, decreasing the frequency of scales toward the tip. Work 6 scale rows interleaved with sc rounds over the length of the tail
Info :
Insert wire or pipe cleaner centrally if you want a poseable tail; secure wire ends by folding or taping then push inside the stuffing before continuing to round 20. Stuff tail firmly at base and more lightly toward the tapered tip.
Round 23 :
(2 sc, dec) x 6 (18)
Round 24 :
(1 sc, dec) x 6 (12)
Round 25 :
6 dec (6) - finish tip, fasten off leaving long tail for sewing to body back center
— Horns (Make 2) :
Round 1 :
6 sc in magic ring (6) using cream yarn and 2.5mm hook (6)
Round 3 :
1 sc in each st (12)
Round 4 :
(2 sc, dec) x 3 (9)
Round 5-12 :
1 sc in each st (9) - work 8 rounds to create horn length
Round 13 :
(1 sc, dec) x 3 (6)
Round 14-18 :
1 sc in each st (6) - tapering tip, stuff lightly each round as you go to keep long tapered form
Round 19 :
Fasten off leaving long tail for sewing. Make second horn matching length exactly
Info :
Sew horns to the skull crown at positions measured 6-7 stitches apart along the top dorsal center, pointing slightly backward. Use strong yarn tail and pinch base firmly while sewing to avoid wobble.
— Dorsal Spines and Head Crest (Make multiple small scales) :
Info :
Small individual scales (crest and dorsal row) are worked in tiny cluster petals to reproduce the textured mane. Each small crest scale is worked as: ch2, 5 dc in 2nd ch from hook, sl st to base. Make 34-42 small scales in graduated sizes to sew along head, neck and back. Use brighter reds/oranges near head and transition to yellow/green down back. Make scales in two sizes: small (as above) and medium (ch2, 7 dc in 2nd ch).
Round 1 :
Make 22 small crest scales for head (use bright red/orange/pink gradients), arrange and sew starting at crown and trailing to top of neck. Sew so the widest part of the scale overlaps the prior scale by 50% to create the ridged mane
Info :
Spacing: place the first head crest scale centered between the horns and work outward. For the back dorsal row, use medium scales spaced every 1-2 base rounds to achieve the layered effect shown.
— Wings (Make 2 wings: bones + membrane) :
Wing Bones — Round 1 :
With cream yarn, ch 30 (this will form the outer bone). Work returning sc along the chain: 1 sc in 2nd ch from hook and across (29 sc). Turn and work 2 rows sc in each stitch to produce a firm rod. Fasten off leaving long tail (this becomes the wing bone). Make 4 bones per wing (one main, three struts).
Wing Membrane :
Work the membrane flat in rainbow yarn. Foundation: ch 40, join to form ring without twisting (40 sts). Round 1: 1 sc in each ch around (40). Round 2: 1 sc in each st (40). Round 3: Decrease shaping for tapered wing tip: (5 sc, dec) x 6 (34). Round 4-6: 1 sc each (34). Round 7: (4 sc, dec) x 6 (28). Round 8-10: 1 sc each (28). Fasten off leaving long tail for sewing.
Info :
Attach the cream wing bones to the membrane by sewing the rods along the folded edge of the membrane to form ribs; the main bone follows the outer edge and three struts fan to the inner fold. Insert thin wire into the bone rods if you want poseable wings—fold wire ends and tape before pushing them into the bone tubes and sewing closed.
Assembly of Wing :
Sew completed membrane to the body at the dorsal attachment points (approx body rounds 16-20), secure every 2-3 stitches along the base for full, even curve. Repeat for second wing symmetrically.
— Claws (Make 14 small claws total) :
Claw :
With cream yarn and 2.5mm hook: Round 1: 6 sc in magic ring (6). Round 2: (1 sc, inc) x 2 (8). Round 3: 1 sc in each st (8). Round 4: dec x 4 (4). Fasten off leaving long tail. Make 14 claws: 6 for feet (3 each foot), 3 for each front paw (2 front paws). Sew claws to feet/paws aligning to toe points.
Info :
Sew claws with the seam hidden at the base of the claw. Use extra reinforcement stitches where claws will rub against surfaces.
— Scale Rows and Surface Detailing (Back/Body/Head/Tail) :
Info :
The dragon's distinctive texture is achieved by layering crocodile-style scales in rows across the head, neck, back, legs and tail. Below are suggested scale rows counts and placement; each 'Scale Row' means you work the crocodile cluster across the number of base stitches indicated and then anchor with a sc round.
Head scale rows :
Work 6-8 scale rows from muzzle back to the crown alternating with sc anchor rounds (we used rounds 11-19 above). Each head scale row uses 24 scale positions (48 base sts).
Neck scale rows :
Work 6 scale rows alternating with sc rounds aligning scale rows to overlap slightly with crest scales. Use 18 base stitches across neck width (if neck base is 36 sts you will get 18 scales per row).
Back scale rows :
From body rounds 15-26 create 8-10 scale rows over the 54 base stitch circumference (27 scales per row). For each row use alternating placement so each scale slightly overlaps the previous row by about half its height.
Tail scale rows :
Work 6 scale rows along the tail, gradually decreasing scale size as you approach the tip. Use wire inside tail if poseable.
Leg and Arm scales :
Make 2-4 scale rows on each limb depending on size. On arms use 9 scales per row and on legs use 12 scales per row. When sewing limbs to the body, sew scale rows first to blend texture at the seam.
Info :
To change color accents, swap to a solid color for certain scale rows to create bands (for example bright red crest scales along the head). When changing colors, carry unused yarn inside where possible or fasten off for clean color stripes.
— Finishing Touches & Embroidery :
Info :
Embroider small nostrils using 2-3 stitches of black or dark yarn centered on the muzzle tip (work at round 10-11 front center). Add a light mouth line by sewing a short curved line under the muzzle with matching yarn. If desired, shade cheek areas with soft pastel chalk or blush applied sparingly to the scales for a subtle face highlight.
Final Assembly :
Weave in all ends, steam-block lightly if needed (test a tiny hidden area first), and brush up scales to soften edges. If using safety eyes, ensure washers are fully locked. Pin final pieces in place to check proportions: head to neck to body, wings and tail angles. Once satisfied, sew each piece with long sewing tails and reinforce with multiple passes.
Info :
Edge tidying: After sewing, hide any remaining tails by threading them into the body with a yarn needle and trimming close. For extra stability in the wings or jaws, add a stitch or two of fabric glue to the internal seams—but only as a last step.
This giant rainbow dragon pattern brings a burst of color and sculptural texture to your crochet collection! The layered scales and ribbed belly create a tactile, whimsical companion that feels almost alive. Detailed instructions guide you through every part from head to tail so assembling this beauty is rewarding and fun. 🐉🧶 Don your favorite yarn cake and enjoy each carefully textured row—your finished dragon will be a joyful display piece or treasured handmade gift. 🌈✨