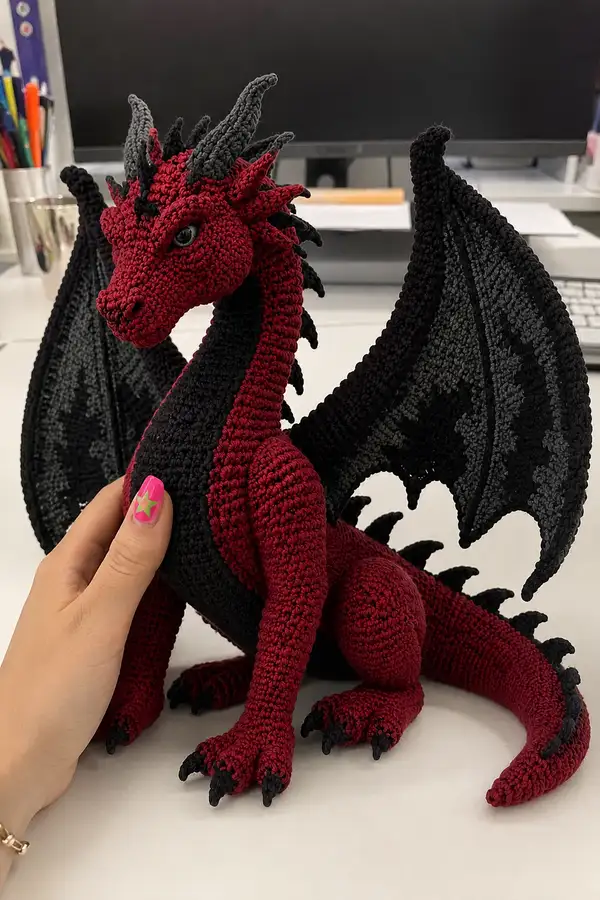
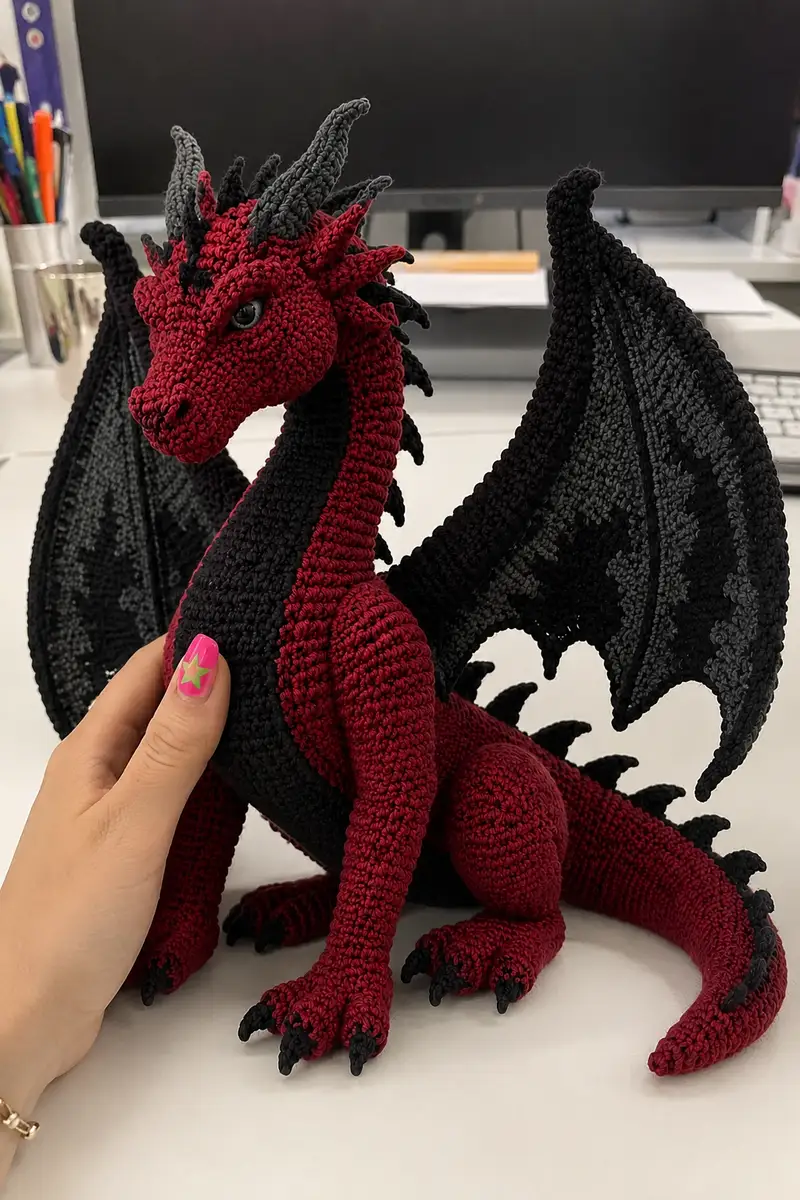
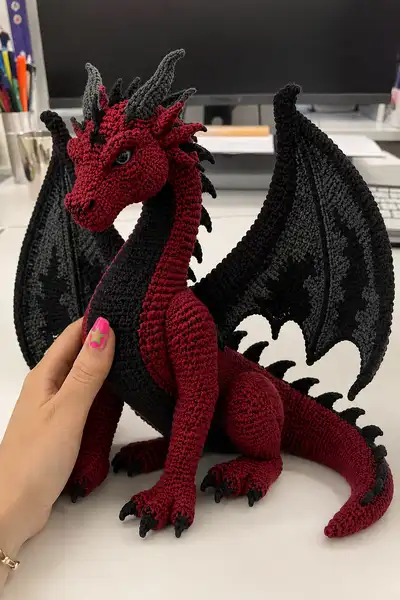
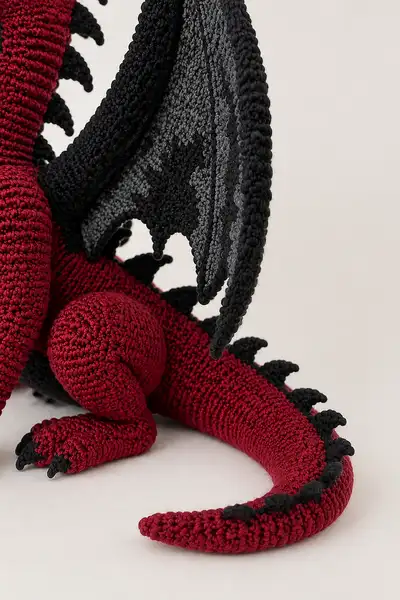
Create a dramatic ruby-red dragon with smoky black wings and sculpted horns using this detailed amigurumi pattern. This large, poseable plush features textured ridges, a long curved neck, articulated tail spikes, and layered wing membranes. The pattern includes step-by-step rounds, assembly tips, and finishing notes so you can recreate the same majestic look and personality.
Progress Tracker
0% Complete
— Head :
Round 1 :
6 sc in magic ring (6)
Round 3 :
(1 sc, inc) x 6 (18)
Round 4 :
(2 sc, inc) x 6 (24)
Round 5 :
(3 sc, inc) x 6 (30)
Round 6 :
(4 sc, inc) x 6 (36)
Round 7 :
(5 sc, inc) x 6 (42)
Round 8 :
(6 sc, inc) x 6 (48)
Round 9 :
(7 sc, inc) x 6 (54)
Round 10 :
(8 sc, inc) x 6 (60)
Round 11-13 :
1 sc in each st (60)
Info :
Decide eye placement now. For this sculpted dragon place safety eyes between rounds 14 and 15, spaced about 10-12 sts apart to get the slightly fierce expression. Use stitch markers to mark eye centers before continuing.
Round 14-15 :
1 sc in each st (60)
Info :
If adding eyelid shaping, embroider a small ridge above each eye after placing safety eyes; this creates the arched, fierce look visible on the finished dragon.
Round 16 :
(8 sc, dec) x 6 (54)
Round 17 :
(7 sc, dec) x 6 (48)
Round 18 :
1 sc in each st (48)
Round 19 :
(5 sc, dec) x 6 (42)
Info :
Begin very light stuffing at the belly of the head and sides to keep the shape rounded but still malleable for snout shaping. Will continue stuffing later.
Round 20 :
(4 sc, dec) x 6 (36)
Round 21 :
(3 sc, dec) x 6 (30)
Round 22 :
1 sc in each st (30)
Info :
We will create a slight muzzle extension. Mark the front center 6 sts (these will be used as the snout front). Keep the head open for additional shaping; do NOT close yet - we will work a shaping band to push out the snout.
Round 23 :
(2 sc, inc) x 6 (36)
Round 24 :
1 sc in each st (36)
Round 25 :
(2 sc, dec) x 6 (30)
Round 26 :
1 sc in each st (30)
Round 27 :
(1 sc, dec) x 6 (24)
Round 28 :
(1 sc) x 24 (24)
Info :
Start stuffing the head more firmly now, pushing fiberfill into the snout and cheek areas to create a defined muzzle. Use a stuffing tool or pencil to reach the nose region. Avoid overstuffing the back of the head because it needs to join the neck flexibly.
Round 29 :
(1 sc, dec) x 6 (18)
Round 30 :
1 sc in each st (18)
Round 31 :
(1 sc, dec) x 6 (12)
Round 33 :
Fasten off leaving a long tail for sewing to the neck. Use this tail to finish closing any gaps and to attach horn anchors later.
Info :
At this point the head is mostly closed; leave a small opening if you want to add a little weight in the base for stability. Securely weave in the working end after sewing to neck.
— Horns (Make 2 large, 2 small) :
Round 1 :
Using smoke gray, 6 sc in magic ring (6)
Round 3 :
(1 sc, inc) x 6 (18)
Round 4 :
1 sc in each st (18)
Round 5 :
(3 sc, dec) x 4 + (2 sc) at end to shape (14) // note: create tapered ridge by alternating
Round 6 :
1 sc in each st (14)
Round 7 :
(2 sc, dec) x 3 + 2 sc (11)
Round 8 :
1 sc in each st (11)
Round 9 :
(1 sc, dec) x 3 + 2 sc (8)
Round 10 :
1 sc in each st (8)
Round 11 :
Dec every other st to taper to 4. Fasten off leaving long tail to sew. (4)
Info :
For the larger horns use additional rounds: after round 5 repeat rounds 4-6 two more times before tapering. For smaller horns repeat fewer increases. Position the horns on the head top behind the eyes: two larger horns central and two small horns slightly to the side as shown in the photo.
— Neck :
Round 1 :
Join ruby red to the head base opening. Work 30 sc evenly around opening (30)
Round 2 :
1 sc in each st (30)
Round 3 :
1 sc in each st BLO (30) (create subtle ridge facing forward)
Round 4-7 :
1 sc each (30)
Info :
Work the neck in continuous rounds to avoid visible seams. Use a stitch marker at the start of each round. The ribbed texture shown in the photo is achieved by alternating some rounds in BLO and working tight tension.
Round 8 :
(6 sc, inc) x 3 + (6 sc) (33) // gentle flare at chest
Round 9-14 :
1 sc each (33)
Round 15 :
(8 sc, inc) x 3 + (9 sc) (36)
Round 16-20 :
1 sc each (36) — work several rows in BLO on one round every 3 rounds to create visible longitudinal ribs
Info :
If you want a slightly poseable neck, insert a length of floral wire or craft wire through the center of the neck now before stuffing. Wrap the wire with a little stuffing or felt to avoid poking through yarn.
Round 21 :
(3 sc, dec) x 6 (30)
Round 22-24 :
1 sc each (30)
Round 25 :
(2 sc, dec) x 6 (24)
Round 27 :
(1 sc, dec) x 6 (18)
Round 29 :
Fasten off leaving long tail for sewing to body. Stuff neck fairly firmly so it holds a curved pose and is plump where it meets the chest.
Info :
Create the distinctive dorsal ridge by preparing the spike pieces (see 'Spikes' section) and sew them along the top center of the neck with even spacing; align one spike at each 3-4 rounds depending on desired spacing.
— Body :
Round 1 :
6 sc in magic ring (6)
Round 3 :
(1 sc, inc) x 6 (18)
Round 4 :
(2 sc, inc) x 6 (24)
Round 5 :
(3 sc, inc) x 6 (30)
Round 6 :
(4 sc, inc) x 6 (36)
Round 7 :
(5 sc, inc) x 6 (42)
Round 8 :
(6 sc, inc) x 6 (48)
Round 9 :
(7 sc, inc) x 6 (54)
Round 10-13 :
1 sc each (54)
Info :
This body will form a seated posture. The increase rounds above form a base that will hold the legs and tail anchor. Decide where legs will attach: mark four positions evenly spaced around the lower third of the body. The front leg anchor points should be about 12-14 stitches apart across the front.
Round 14 :
(8 sc, inc) x 6 (60)
Round 15-18 :
1 sc each (60)
Round 19 :
(9 sc, inc) x 6 (66)
Round 20-23 :
1 sc each (66)
Info :
Begin light stuffing in the bottom of the body now but leave top portion understuffed for neck insertion. Place a small amount of weighted pellets at the base center if you want the piece to sit stably; enclose pellets inside a fabric pouch and add before stuffing fully.
Round 24 :
(9 sc, dec) x 6 (60)
Round 25 :
(8 sc, dec) x 6 (54)
Round 27 :
(6 sc, dec) x 6 (48)
Round 28 :
(5 sc, dec) x 6 (42)
Round 30 :
Fasten off leaving long tail for sewing neck. Stuff body firmly, paying attention to the base where legs are attached.
Info :
Leave a circular opening of approx 10-12 sts at the top for joining the neck. You will sew the neck opening to the body opening later. Keep the body stuffing firm at the lower half to support seated posture.
— Front Legs / Forearms (Make 2) :
Round 1 :
6 sc in magic ring (6)
Round 3 :
(1 sc, inc) x 6 (18)
Round 4 :
(2 sc, inc) x 6 (24)
Info :
The foot is formed at the first rounds; you will shape the paw and then extend up into a cylindrical forearm. The finished forearm is tapered at the shoulder to insert neatly into the body.
Round 6-10 :
1 sc each (24)
Round 11 :
(3 sc, dec) x 6 (18)
Round 12-16 :
1 sc each (18)
Round 17 :
(2 sc, dec) x 4 + (2 sc) = (14) — shape wrist
Round 18-20 :
1 sc each (14)
Info :
Stuff the paw area firmly so the toes are well-defined. Leave the top of the arm understuffed enough to ease sewing to the body. For a stronger attachment, place a few reinforcement stitches of a contrasting color on the inside seam where you will sew in.
Round 21 :
Fasten off leaving long tail for sewing. Make sure the paw area has three small claw points (see 'Claws' section) sewn to the front edge.
— Rear Legs / Thighs (Make 2) :
Round 1 :
6 sc in magic ring (6)
Round 3 :
(1 sc, inc) x 6 (18)
Round 4 :
(2 sc, inc) x 6 (24)
Round 5 :
(3 sc, inc) x 6 (30)
Round 6-9 :
1 sc each (30)
Info :
These rounds shape the rounded thigh. The leg is then curved to form a seated hip joint. Work the rear legs a bit larger than front legs for balance.
Round 10 :
(4 sc, inc) x 6 (36)
Round 11-16 :
1 sc each (36)
Round 17 :
(4 sc, dec) x 6 (30)
Round 18-21 :
1 sc each (30)
Round 22 :
(2 sc, dec) x 6 (24)
Round 23-25 :
1 sc each (24) — finish foot shaping and stuff firmly
Info :
Sew the legs to the body while the body is underarmed; align the top of the thigh to rounds 10-14 of the body to form the seated posture. Reinforce the seam with extra passes and weave ends neatly inside.
— Claws (Make 12 small claws for feet) :
Round 1 :
4 sc in magic ring with black (4)
Round 3 :
Sl st to next st and fasten off leaving tail to sew onto paw tip; or use small crochet claw technique to leave a slight hook for a curved claw.
Info :
Sew three claws onto each paw spaced evenly across the front. On the rear feet attach three claws across the front edge; on front paws attach three more claw pieces. Ensure the claws are curved slightly and point downward.
— Tail :
Round 1 :
6 sc in magic ring (6)
Round 3 :
(1 sc, inc) x 6 (18)
Round 4 :
(2 sc, inc) x 6 (24)
Round 5-8 :
1 sc each (24)
Round 9 :
(3 sc, inc) x 6 (30)
Round 10-16 :
1 sc each (30)
Info :
The tail should taper gradually. Plan where you will attach dorsal spikes (see 'Spikes' section) — mark positions roughly every 3-4 rounds along the top of the tail from the base to the tip. Keep the tail stuffing medium-firm to allow a graceful curve.
Round 17 :
(3 sc, dec) x 6 (24)
Round 18-21 :
1 sc each (24)
Round 22 :
(2 sc, dec) x 6 (18)
Round 23-25 :
1 sc each (18)
Round 26 :
(1 sc, dec) x 6 (12)
Round 27 :
1 sc each (12) — shape tip and fasten off leaving long tail for sewing
— Back Spikes / Dorsal Plates (Make 12-14) :
Round 1 :
4 sc in magic ring (4)
Round 3 :
(1 sc, inc) x 4 (12)
Round 5 :
(2 sc, dec) x 3 + 3 sc = (12) — shape into a triangular spike by working a flat point on one side: sc across then fasten off leaving long tail
Info :
Sew spikes along the top center of the neck, back, and tail. Space evenly every 3-4 rounds along the neck and tail; on the body place larger spikes across the top center with slightly wider spacing. Use black for the tips and a transition color (ruby) for the base to mimic a dark crest.
— Wings (Make 2 mirrored wings) :
Info :
The wings are made in two parts: a curved frame (outer edge) worked in rounds to create a thick sturdy ridge, and a flat membrane crocheted in rows then joined. The outer edge is black and membrane uses a smoke-gray gradient to black for the darker patches.
Frame Round 1 :
With black, ch 36 (foundation chain forming top curve). Turn and sc into 2nd ch from hook across (35)
Frame Round 2 :
Work 3 sc in last ch to turn work along the edge, continue across opposite side of foundation chain to form an oval; sc 35 back along opposite side, then 3 sc in end (this joins to form a long oval frame). Approx total 76 sc
Frame Round 3-5 :
1 sc each around working in continuous rounds (76)
Frame Round 6 :
BLO 1 sc each around to create a crisp ridge on the outer edge (76)
Frame Round 7-10 :
1 sc each around (76). On round 9 add 8 evenly spaced incs along the lower edge to create a slightly scalloped outer profile (84)
Info :
Block the frame gently by pinning it into the desired wing curve. This frame will provide the wing outline. Keep the frame slightly rigid by stuffing sparingly inside or inserting a lightweight wire if you want poseable wings.
Membrane Row 1 :
Join smoke gray at the inner edge of the frame and ch 1. Work 60 sc across into the frame opening (60)
Membrane Row 2 :
Turn, ch1, 1 sc in each st (60)
Membrane Row 3 :
Turn, ch1, (6 sc, dec) across to create slight scallops along the lower membrane edge (54)
Info :
To create the smoky patches on the inner membrane, switch to black for a few short rows in the center portion from the bottom up: join black at center and work 6-8 stitches in black per relevant row, then return to smoke gray. Carry color neatly along the wrong side or fasten off and rejoin to avoid loose floats.
Membrane Row 4-10 :
Alternate 1 sc rows and 1 sc BLO rows to create texture. Reduce width gradually across rows to shape membrane like a bat wing: Row 4: 1 sc (54), Row 5: (6 sc, dec) x 6 (48), Row 6: 1 sc (48), Row 7: (5 sc, dec) x 6 (42), Row 8: 1 sc (42), Row 9: (4 sc, dec) x 6 (36), Row 10: 1 sc (36)
Membrane Row 11-14 :
Work 1 sc rows decreasing slowly to create scalloped lower tips: Row 11: (3 sc, dec) x 6 (30), Row 12: 1 sc (30), Row 13: (2 sc, dec) x 6 (24), Row 14: 1 sc (24)
Membrane Row 15 :
Fasten off leaving long tail for joining to the frame; repeat for the opposite wing mirrored. Optionally, using slip stitch, join the membrane edge to the frame inner ridge to create the wing shape.
Info :
Sew membranes into frame with small whip stitches. Pay attention to the scalloped lower edge: add small curved points (picot or 3-ch loops) at the tips for the decorative scallops visible on the dragon's wing bottom edge.
Frame Final Round :
After attaching membranes, add an outer ridge by working 1 sc around the entire frame edge in black to hide assembly stitches and give a finished look. Use tight tension to form a smooth, thick ridge.
— Eye Detailing and Facial Embroidery :
Info :
Place safety eyes between head rounds 14-15. Use washers on safety eyes or backstitch with yarn around the eye base through several stitches to secure. For realistic eyelids, use backstitch with black yarn across 3-4 stitches above the eye, pulling slightly to create a lowered lid effect. For nostrils, use small satin stitch or three short sc clusters at the snout tip in black.
— Assembly :
Info :
Before final assembly weave all free ends in and block wings to shape. Pin every major part in place first, studying the pictures or your chosen pose carefully. Use pins to align left and right pieces symmetrically before sewing.
This majestic ruby red dragon combines sculptural shaping with dramatic black wings for a show-stopping handmade companion. Each carefully constructed round and sewn spike brings the dragon’s personality to life, and the layered membrane wings give a realistic, shadowed look that’s deeply satisfying to assemble. Whether you display it on a shelf or gift it to a fantasy fan, this project rewards patience with a stunning final piece. 🐉🧶✨