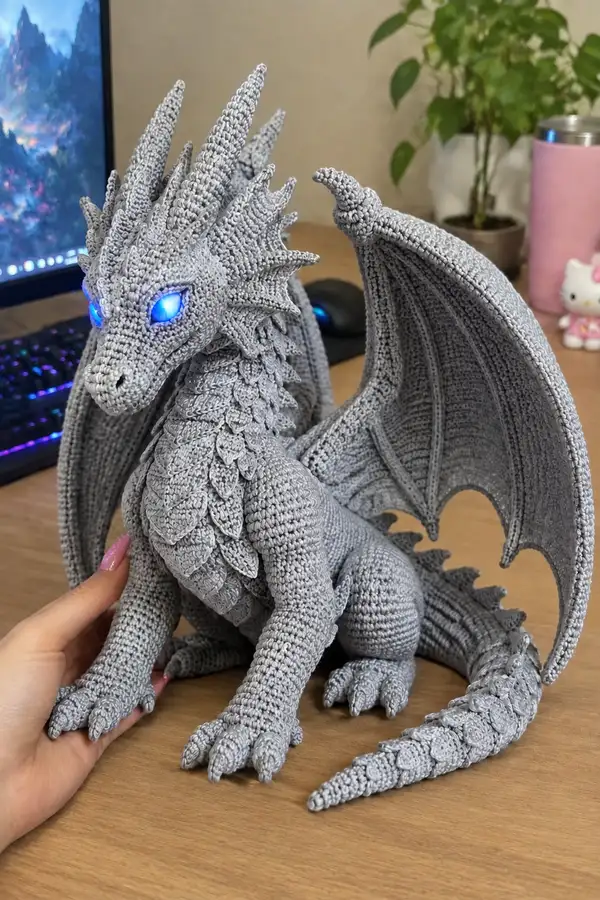
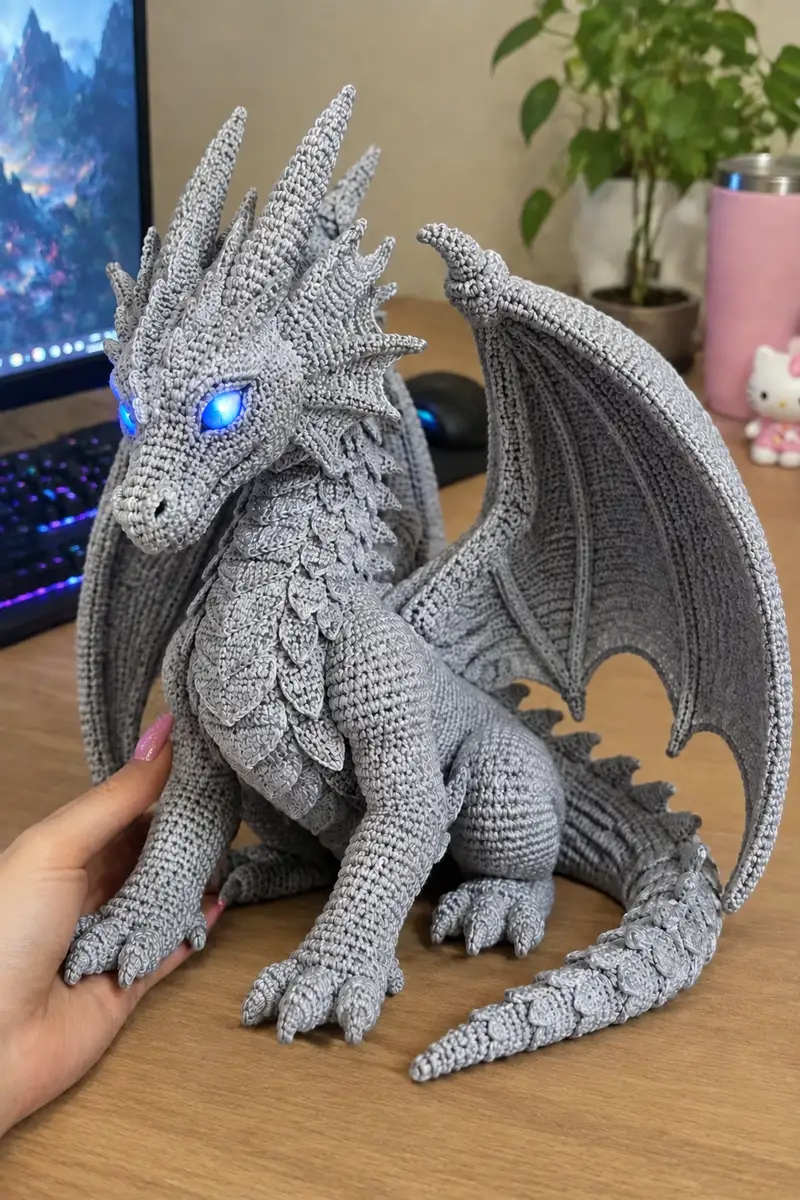
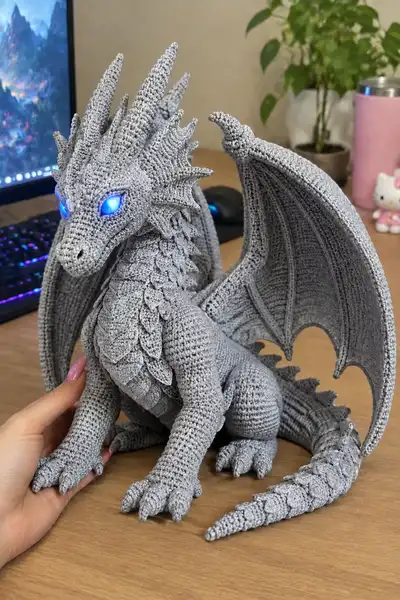
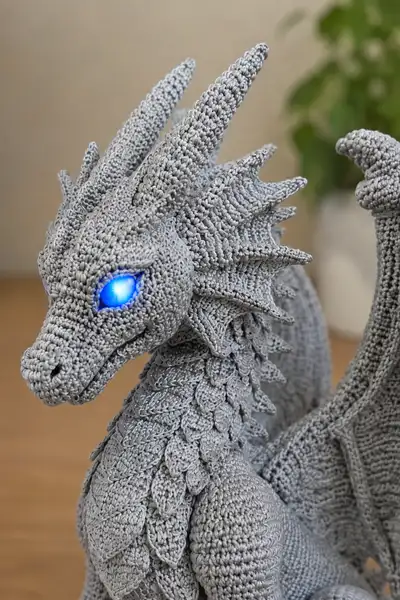
A majestic, highly detailed dragon amigurumi worked in smooth silver yarn with layered scales, articulated wings and glowing blue LED eyes. This pattern reconstructs every curve and texture visible in the photos — horns, neck frills, layered breast scales, clawed feet and a long tapered tail with overlapping scales. Designed for crocheters who enjoy sculptural amigurumi with textured details and assembly work.
Progress Tracker
0% Complete
— Head :
Round 1 :
6 sc in magic ring (6)
Round 3 :
(1 sc, 1 inc) x 6 (18)
Round 4 :
(2 sc, 1 inc) x 6 (24)
Round 5 :
(3 sc, 1 inc) x 6 (30)
Round 6 :
(4 sc, 1 inc) x 6 (36)
Round 7 :
(5 sc, 1 inc) x 6 (42)
Round 8 :
(6 sc, 1 inc) x 6 (48)
Round 9-11 :
1 sc in each st (48)
Info :
Place safety eyes/LED modules between Rounds 13-14 depending on desired expression. When using LED eyes, test fit the module before securing — allow battery pack access in the neck cavity or back.
Round 12 :
(6 sc, 1 dec) x 6 (42)
Round 13 :
1 sc in each st (42)
Round 14 :
(5 sc, 1 dec) x 6 (36)
Info :
This is the shaping area for the forehead and eye sockets. Mark the stitch at the top of the head for orientation. Eyes should sit centered on the curve created by Rounds 11-14.
Round 15 :
1 sc in each st (36)
Round 16 :
(4 sc, 1 dec) x 6 (30)
Round 17 :
1 sc in each st (30)
Round 18 :
(3 sc, 1 dec) x 6 (24)
Info :
Begin elongating the muzzle: work the next rounds slightly offset — place decreases evenly toward the lower half to form the snout. Stuff the front of the head lightly now to keep muzzle shape.
Round 19 :
(2 sc, 1 dec) x 6 (18)
Round 20 :
1 sc in each st (18)
Round 21 :
(1 sc, 1 dec) x 6 (12)
Round 22 :
1 sc in each st (12) — work around snout tip to form nostrils area; do not stuff too firmly here
Round 23 :
(1 sc, inc) x 6 (18) — bring circumference back slightly for jaw shaping
Round 24 :
1 sc in each st (18)
Round 25 :
(2 sc, inc) x 6 (24) — shape cheeks and jaw joints
Round 26-27 :
1 sc in each st (24)
Info :
Insert LED eye wiring now if you are using internal batteries tucked into the neck. Leave slack so batteries can be removed. If using simple safety LED eyes, insert and lock plates; add a small disk of felt behind for reinforcement.
Round 28 :
(3 sc, inc) x 6 (30) — build the back of the head and lower neck base
Round 29 :
1 sc in each st (30)
Round 30 :
(4 sc, inc) x 6 (36)
Round 31 :
1 sc in each st (36)
Round 32 :
(5 sc, inc) x 6 (42) — start forming the neck join; ensure the stitch count matches the body neck opening
Round 33 :
1 sc in each st (42)
Info :
Fasten off leaving a long tail for sewing to the body. Finish stuffing head firmly but not overstuffed; head should be rigid enough to support horns and frills but have a little give for sewing.
— Neck frill and layered scales (Make many) :
Info :
Neck frills and chest scales are made from a repeating leaf/scale motif. Make approximately 80-120 scales for the neck/chest and an additional 60-100 for tail and spine depending on overlap. Use a smaller hook (2.75-3.0mm) for crisper scales.
Scale Round 1 :
Ch 6, sc in 2nd ch from hook, hdc in next, dc in next, hdc in next, 3 sc in last ch, then working down the other side of chain: hdc, dc, hdc, sc — join with sl st at base (11-12 sts shaped teardrop)
Scale Round 2 :
Ch 1, 1 sc in each stitch around the teardrop edge to thicken and create a ridge. (approx. 12 sc)
Scale Round 3 :
BLO 1 sc in each st around to create a pronounced curl along the outer edge (12)
Scale Round 4 :
Ch 1, 1 sc in first 3 sts, sl st into next st to create a notch at the base, fasten off leaving tail for sewing. (4 sc + base)
Info :
Sew scales overlapping so the lower edge of one covers the upper edge of the next. For the neck use tighter overlap (approx 40-60% overlap) to achieve dense armor-like texture.
— Body :
Round 1 :
6 sc in magic ring (6)
Round 3 :
(1 sc, 1 inc) x 6 (18)
Round 4 :
(2 sc, 1 inc) x 6 (24)
Round 5 :
(3 sc, 1 inc) x 6 (30)
Round 6 :
(4 sc, 1 inc) x 6 (36)
Round 7 :
(5 sc, 1 inc) x 6 (42)
Round 8 :
(6 sc, 1 inc) x 6 (48)
Round 9 :
(7 sc, 1 inc) x 6 (54)
Round 10 :
(8 sc, 1 inc) x 6 (60)
Round 11-16 :
1 sc in each st (60)
Info :
If you want a slightly narrower chest you can work Rounds 11-16 in BLO to create a subtle ridge for where the scales will overlap and to give a proud chest curve.
Round 17 :
(8 sc, 1 dec) x 6 (54)
Round 18 :
1 sc in each st (54)
Round 19 :
(7 sc, 1 dec) x 6 (48)
Round 20-22 :
1 sc in each st (48)
Info :
Mark front center stitch at Round 11-14 to assist with limb placement. When attaching legs and arms, align seams so the stitches on limbs meet same round numbers on body for a neat join.
Round 23 :
(6 sc, 1 dec) x 6 (42)
Round 24 :
1 sc in each st (42)
Round 25 :
(5 sc, 1 dec) x 6 (36)
Round 26 :
1 sc in each st (36) — begin stuffing body firmly but not hard; leave cavity for head/neck and optional battery pack
Round 27 :
(4 sc, 1 dec) x 6 (30)
Round 28 :
(3 sc, 1 dec) x 6 (24)
Round 29 :
(2 sc, 1 dec) x 6 (18)
Round 30 :
(1 sc, 1 dec) x 6 (12) — leave a long tail for closing or for sewing the head neck ring into this opening
Info :
Before closing completely, insert any wiring anchor points for wing supports: tuck wires into the upper back cavity, secure with tape or a small felt pocket, then stuff around them for stability.
— Forelegs (Make 2) :
Round 1 :
6 sc in magic ring (6)
Round 3 :
(1 sc, 1 inc) x 6 (18)
Round 4 :
(2 sc, 1 inc) x 6 (24)
Info :
These first rounds form the paw base. The forelimbs are sculpted to taper slightly at the wrist and flare into shoulder joints that will be sewn onto the body at Rounds 11-13.
Round 5 :
1 sc in each st (24)
Round 6 :
(3 sc, 1 dec) x 6 (18) — shape the wrist
Round 7-9 :
1 sc in each st (18)
Round 10 :
(2 sc, 1 inc) x 6 (24) — start the lower forearm
Round 11-14 :
1 sc in each st (24)
Info :
Stuff the paw fairly firmly at this stage — toes will be added in the next rounds. Use small amounts of stuffing to ensure shape without lumps.
Round 15 :
(4 sc, 1 inc) x 4, (4 sc, 1 inc) x 2 adjusting evenly to keep 30 sts total (30) — expand toward shoulder
Round 16-18 :
1 sc in each st (30)
Round 19 :
(4 sc, 1 dec) x 6 (25) — slight taper before join
Round 20 :
1 sc in each st (25) — leave long tail for sewing to body; do not fasten off
Info :
Make 2 forelegs identical. For added poseability, insert a thin wire spine inside each leg before stuffing, leaving ends protected and bent back before final sewing.
Tip (Toes) :
Toes/claws are small cone motifs: MR 4 sc, inc to 6, 1 sc round to shape then fasten off leaving tail to sew. Make 4-5 claws per paw and sew them to the paw tip spaced evenly.
— Hind Legs (Make 2) :
Round 1 :
6 sc in magic ring (6)
Round 3 :
(1 sc, 1 inc) x 6 (18)
Round 4 :
(2 sc, 1 inc) x 6 (24)
Round 5 :
(3 sc, 1 inc) x 6 (30)
Round 6-9 :
1 sc in each st (30)
Info :
These legs require more volume than forelegs — work them slightly tighter and stuff more firmly at the foot base so the dragon can sit upright without toppling.
Round 10 :
(4 sc, 1 inc) x 6 (36)
Round 11-14 :
1 sc in each st (36)
Round 15 :
(4 sc, 1 dec) x 6 (30)
Round 16-18 :
1 sc in each st (30)
Round 19 :
(3 sc, 1 dec) x 6 (24)
Round 20-22 :
1 sc in each st (24) — leave opening at top for sewing to hip area; do not fasten off until sewn
Info :
Sew hind legs near the rear of the body between Rounds 18-22 for stability. Pin, check posture, then ladder stitch the seam. Add extra slip stitches internally to anchor if the dragon will be handled frequently.
— Tail :
Round 1 :
6 sc in magic ring (6)
Round 3 :
(1 sc, 1 inc) x 6 (18)
Round 4 :
(2 sc, 1 inc) x 6 (24)
Round 5-8 :
1 sc in each st (24)
Info :
Attach scales along the top of the tail in staggered rows. Work tail in spiral to avoid seam, and add scales as you go or sew them on afterward. Wire insertion is optional for poseable tail.
Round 9 :
(3 sc, 1 dec) x 6 (18)
Round 10-12 :
1 sc in each st (18)
Round 13 :
(2 sc, 1 dec) x 6 (12)
Round 14-16 :
1 sc in each st (12)
Round 17 :
(1 sc, 1 dec) x 6 (6)
Round 18-25 :
Continue tapering by alternating 1 sc round and dec round until tail reaches desired length and taper. Example: R18 1 sc (6), R19 dec to 3; then add small increases occasionally if making a thicker mid-tail (adjust math to keep shape)
Info :
For the top ridge of scales, sew larger scale motifs in the first third of the tail with smaller scales toward the tip. Secure each with a whip stitch at the base and a few stitches across the body of the scale.
— Horns & Spikes (Make 6 large/10 small) :
Large Horn Round 1 :
6 sc in magic ring (6)
Round 3 :
1 sc in each st (12)
Round 4 :
(2 sc, 1 inc) x 4, 1 sc in remaining 4 sts (16) — base flares slightly
Round 5-10 :
1 sc in each st (16) — work even to lengthen horn
Round 11 :
(2 sc, 1 dec) x 4 (12)
Round 12-20 :
1 sc in each st (12) then gradually decrease every 3-4 rounds by (1 sc each side) until you reach 6 sts then 3 sts and close to a point; stuff lightly as you go
Info :
Large horns are stiffened internally with rolled cardboard, plastic tubing or wrapped wire. Insert reinforcement before final stuffing and closing. For small spikes use fewer even rounds (e.g., 6-10 rounds total) and sew along the spine.
— Wings (Make 2 large membranes + ribs) :
Wing Rib (Make 2 per wing) Round 1 :
Ch 40 (or desired length for rib), sc in 2nd ch from hook and across (39 sc). Turn and sc back along chain for a firm strap forming a long, flat rib. Fasten off leaving long tail for attaching to wing membrane and body.
Info :
Create 3-4 ribs per wing (1 main and 2-3 support ribs) sized to match the photograph. Reinforce ribs by inserting thin wire before final rows — wire should stop short of ends and be wrapped with yarn.
Wing Membrane Round 1 :
Attach yarn to the base where ribs meet; ch 1, sc evenly along the first rib edge to form membrane base. Work increasing rows outward to create broad curved triangle.
Wing Membrane Round 2 :
Work (1 sc in next 6 sts, inc) along the row to shape; repeat on each row outward (use counts to create width; typical membrane will reach 40-60 sts at widest point depending on rib length)
Round 3-10 :
1 sc in each st increasing at the curve edges to shape the membrane. Work even for several rows to get a plate-like membrane (counts will vary per rib length; aim for 10-15 rows total)
Info :
Use BLO on the membrane outer edge every 4th row to create visible ribbed texture. When attaching to ribs, align the membrane ridges with the ribs and whip stitch firmly with a long tail.
Wing Edge Ruffle Round :
Work 1 sc in each st around the wing edge, then (ch 3, sl st in next st) to create scalloped edge similar to pictured wing tips. Fasten off and sew membrane to ribs at base and along rib lines.
Wing Inner Ridges :
Working on the inner face, attach yarn and work narrow ridged columns using 1 sc in back loop only for 10-20 rows along each rib position to mimic the long vertical ridges visible in photographs. Sew ribs to the inner membrane from the center outwards.
Info :
Leave the base of the main wing strap long enough to insert into the back cavity of the body and anchor by sewing through several rounds; use wire reinforcement if you want poseable wings.
— Wing Finishing Ridges (BLO) :
Round 1 :
Attach to wing inner face at base, ch 1, BLO sc across to create ridges (repeat across each rib area). Work 12-18 rows to create tall ribs that match photo proportions.
Info :
Ridges are slightly raised by working into BLO. Use the same stitch count for each ridge to keep symmetry. Block the wing by pinning it to shape and misting lightly (cotton yarn will hold shape well when slightly damp).
— Chest Scale Rows (Layering) :
Info :
Attach scale motifs in horizontal overlapping rows down the center chest. Start at top near neck and work downward in rows — row 1 will have fewer large scales, rows below will expand. Use the scale motif pattern above and sew each scale overlapping the one above by about 50%.
Row Placement :
Row 1: 4 large scales; Row 2: 5-6 scales; Row 3: 7-8 scales; continue increasing as the chest widens. For each row stitch scales securely at the base and secure a few stitches across the body of the scale.
Info :
Alternate scale sizes across the chest and use smaller scales at shoulders and larger toward the center front for a natural look. Also place scales along the spine and tail as shown in pictures.
— Claws & Details :
Claw (Make 20) Round 1 :
MR 4 sc (4)
Round 2 :
Inc around to 8 sc (8)
Round 3 :
1 sc in each st (8)
Round 4 :
Dec around to 4 sc (4), stuff lightly, fasten off leaving tail for sewing
Info :
Sew claws to paw tips by tacking the base firmly then adding 2-3 secure stitches through paw fabric; use black/charcoal yarn to embroider short line accents at the nostril and claw root if desired.
— Face & Mouth Finishing :
Info :
Use a small embroidery of 2-3 black stitches for nostrils on the snout tip and a short line for closed mouth seam. For an open mouth you would need to crochet opposing jaw halves and secure LED wiring before closing.
Round (Eye reinforcement) :
If using LED modules, crochet a small felt pocket or a circular disc of dense crochet (ch 2, 6 sc in ring, fasten off) to back the eye receiver. Glue or sew the LED to this reinforcement and then sew into the head before final closure.
Info :
Always position eyes symmetrically — mark both sides and measure between; about 10-13 stitches apart (count from the center seam) gives the confident gaze shown.
— Assembly :
Info :
Block larger pieces (wings, horns) by pinning to shape and allowing to dry if using cotton yarn. Assemble with pins before final sewing and check balance when placing legs and tail so the dragon sits evenly.
This Giant Silver Moonlight Dragon is a labor of love — every scale and ridge builds into a striking, display-ready sculpture that commands a shelf. Working through the layers of scales, shaping the horns, and finally seeing the blue eyes glow is so satisfying. 🐉🧶 Take your time, enjoy the assembly, and celebrate the moment you place the final stitch — this dragon will be treasured for years. Happy stitching and glowing creations! ✨