🧢 Beautiful ✨ Detailed πŸ’ Adorable

Gingham Blanket Pattern

Gingham Blanket Pattern
4.4β˜… Rating
12-15 Hours Time Needed
4.0K Made This
βœ‚οΈ

Intermediate Level

Ideal for those with basic crochet experience, featuring slightly more advanced stitches and techniques to expand your skills.

⏱️

Multi-Day Project

A rewarding 12+ hour journeyβ€”perfect for dedicated crafters who love detailed work.

πŸ€—

Soft Hug

Gentle, plush, and full of warmth, creating a sense of comfort and coziness wherever they find a home.

About This Gingham Blanket Pattern

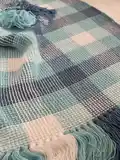
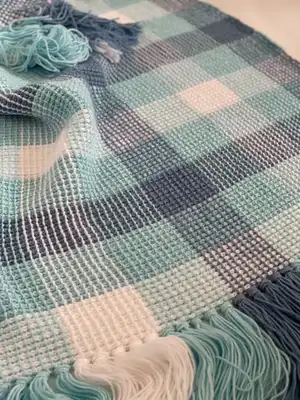
This pattern creates a medium-sized gingham crochet blanket worked in DK weight yarn using front post and back post double crochet to build a textured grid. The surface crochet slip stitches create the gingham squares and the blanket is finished with tassels for a stylish edge. It is made in one piece with a minimal number of yarn ends to weave in, making finishing quick and tidy.

Gingham Blanket Pattern crochet pattern - detailed view of completed project

Written in US terminology for a medium blanket size (see tables for size adjustments). Includes step-by-step instructions for FPdc, BPdc, surface crochet and tassel finishing.

Why You'll Love This Gingham Blanket Pattern

I absolutely love this pattern because it creates a stunning woven gingham effect using simple post stitches and surface slip stitches. I enjoy how the texture builds steadily as you work the FPdc and BPdc rows β€” it feels like knitting but crocheted. The color sequence and panel system make it easy for me to customize the look while keeping the construction straightforward. I also love that it is worked in one piece with very few ends to weave, and the tassels add the perfect finishing touch that makes each blanket feel handmade and special.

Gingham Blanket Pattern step 1 - construction progress Gingham Blanket Pattern step 2 - assembly progress Gingham Blanket Pattern step 3 - details and accessories Gingham Blanket Pattern step 4 - final assembly and finishing

Switch Things Up

I love how easy it is to customize this blanket by changing colours; try softer pastels for a baby-friendly version or bold contrasting hues for a modern look.

To make a larger or smaller blanket, simply increase or decrease your starting chains in multiples of 20 plus 2 and adjust the total number of rows using Table 1 and Table 2 as a guide.

If you want a chunkier throw, swap to a bulkier yarn and a larger hook β€” this will give a squishier texture and faster make, but check your gauge and adjust starting chains accordingly.

For a mini keychain or baby version, use a lighter weight yarn and smaller hooks; follow the same stitch pattern but reduce the chain and row counts.

Change the tassel style: instead of full tassels, add fringe, pom-poms, or tiny crocheted flowers for a different finish.

Try alternating the surface slip-stitch colour sequence for a striped gingham effect rather than the classic checkerboard look.

I often add a simple single crochet border in a contrasting colour to frame the blanket neatly and hide any uneven edges.

To make the blanket reversible, practice making your surface slip-stitch rows more shallow so they are less pronounced on the wrong side, or add matching surface rows on both sides.

Experiment with the frequency of colour panels: fewer repeats will create larger gingham squares, while more repeats will create smaller, tighter checks.

Consider combining this pattern with other stitch patterns for a mixed-texture blanket β€” for example, add a band of moss stitch or granny squares at one end.

If you like a neater finish, block the blanket lightly after finishing to even out rows and help the surface crochet settle into a flat gingham pattern.

I sometimes embroider small details over selected squares for a playful, personalized touch or to highlight a special area of the blanket.

Common Mistakes & How to Fix Them

βœ— Skipping the turning chain or miscounting the turning chain placement; always ch3 at the start of rows where indicated and count the ch3-turning chain as the first stitch when instructed. βœ— Not keeping the working yarn behind the blanket during surface crochet; keep the working yarn BEHIND the blanket so slip stitches form correctly and your surface rows are tidy. βœ— Pulling your stitches too tight when making FPdc or BPdc; maintain a consistent, moderate tension so post stitches sit neatly and panels line up evenly. βœ— Forgetting to change colour in the last stitch of the previous section; change colour into the last stitch of the prior row as instructed to ensure seamless colour transitions and tidy edges. βœ— Failing to leave long yarn tails for tassels when joining surface crochet colours; leave long tails when joining so you can use them for tassels instead of trying to hide or weave short ends later.

Gingham Blanket Pattern

Create a soft, textured gingham blanket using front post and back post double crochet for a woven effect. This pattern uses DK yarn and surface slip stitches to form the classic gingham squares, finished with playful tassels. Perfect for gifting or cozying up at home, the blanket is worked in one piece with very few yarn ends to weave in.

Intermediate 12-15 Hours

Materials Needed for Gingham Blanket Pattern

β€” Main Fabric

  • 01
    Ouma Ralie Feels Like Cashmere DK from Kismet Yarns - 3 x 100g Frosty White (A)
  • 02
    Ouma Ralie Feels Like Cashmere DK from Kismet Yarns - 4 x 100g Bubblegum Blue (B - light blue)
  • 03
    Ouma Ralie Feels Like Cashmere DK from Kismet Yarns from Kismet Yarns - 4 x 100g Beach House Blue (C - dark blue)
  • 04
    DK / Light (3) weight yarn - 273 yards / 250 meters per 100g (approximate meterage used in pattern)
  • 05
    Fiber content referenced in yarn substitutions: 100% Acrylic (for suggested alternatives)

β€” Tools Required

  • 01
    Crochet hook 5mm (used for main fabric)
  • 02
    Crochet hook 7mm (used for surface crochet and slip stitch rows)
  • 03
    Optional crochet hook US G / 4mm (mentioned in yarn substitution notes)
  • 04
    Scissors
  • 05
    Yarn needle / tapestry needle for weaving in ends
  • 06
    Stitch markers
  • 07
    Measuring tape
  • 08
    Hooks for pulling tassels through (your crochet hook can be used)
  • 09
    Pins for blocking (optional)

Progress Tracker

0% Complete

β€” Materials :

Info :

5mm crochet hook. 7mm crochet hook. Yarn: Ouma Ralie Feels Like Cashmere DK from Kismet Yarns: 3 x 100g Frosty White (A), 4 x 100g Bubblegum Blue (B - light blue), 4 x 100g Beach House Blue (C - dark blue). Finished size approx 33.7 inches x 38.4 inches (85.5cm x 97.5cm).

β€” Stitches & Abbreviations :

Infos :

ch = chain. sl st = slip stitch. hdc = half double crochet. BPdc = Back Post double crochet. FPdc = Front Post double crochet. st/sts = stitch/stitches. ch3-tc = chain 3 turning chain. H = crochet hook. YOH = yarn over hook. rep = repeat. WS = Wrong Side. RS = Right Side.

β€” Instructions :

Info :

Instructions are written for a medium size blanket, consult Table 1 on page 3 for number of starting chains for smaller or bigger blanket sizes.

Info :

This pattern tends to curl in the beginning, don't worry when that happens, the surface crochet stitches added at the end will flatten it out.

Info :

Ch 182 with colour A and 5mm H

Row 1 :

hdc in fourth ch from H, ch 1, skip 1 st, *hdc in next st, ch 1, skip 1 st, rep from * to end of row, end with a hdc in last ch, turn (photo 1 shows the first few hdc's)

Row 2 :

(WS) ch 3, skip first st, *FPdc around next st, ch 1, rep from * to end of row, hdc around ch3-tc, turn (see photos 2-11 for FPdc, photos 12-13 for last hdc - you should now have 89 FPdc and one hdc at the end of your row)

Row 3 :

(RS) ch 3, skip first st, *BPdc around next st, ch 1, rep from * to end of row, hdc around ch3-tc, turn (see photos 14-18)

Row 4 :

(WS) ch 3, skip first st, *FPdc around next st, ch 1, rep from * to end of row, hdc around ch3-tc, turn

Rows 5-10 :

rep rows 3-4 another 3 times

Rows 11-20 :

Change to colour B (photos 20-21, do this in the last st of row 10), rep rows 3-4 five times

Rows 21-30 :

Change to colour C, rep rows 3-4 five times

Rows 31-40 :

Change to colour B, rep rows 3-4 five times

Rows 41-50 :

Change to colour A, rep rows 3-4 five times

Rows 51-60 :

Change to colour B, rep rows 3-4 five times

Rows 61-70 :

Change to colour C, rep rows 3-4 five times

Rows 71-80 :

Change to colour B, rep rows 3-4 five times

Rows 81-90 :

Change to colour A, rep rows 3-4 five times

Rows 91-100 :

Change to colour B, rep rows 3-4 five times

Rows 101-110 :

Change to colour C, rep rows 3-4 five times

Rows 111-120 :

Change to colour B, rep rows 3-4 five times

Rows 121-130 :

Change to colour A, rep rows 3-4 five times. Fasten Off.

β€” Surface Crochet :

Info :

Turn the blanket so that the WS is facing you. The BPdc and FPdc form vertical rows (photo 22), while the RS has horizontal rows (photo 23). When the WS is facing you, these horizontal rows almost look like the rungs of a ladder behind the BPdc and FPdc vertical rows (photo 24). The surface slip stitches are worked around these "rungs" of the ladder, with the WS facing you.

Info :

Make a slipknot with colour C and place it around the 7mm crochet hook (make sure you leave a long yarn tail, you are not going to work your yarn ends away, you can leave these tails in the tassels you are going to add). Join colour C with a slip stitch on the right side of the first "vertical row" formed by the BPdc and FPdc, around the first bottom horizontal row (photo 25-26). Make sure that your working yarn is BEHIND the blanket. Make a slip stitch around the next horizontal row right above the bottom row. Keep making slip stitches around the horizontal rows (photo 27) until you reach the top and fasten off (remember to leave a long yarn tail, photo 32 = wrong side, photo 33 = right side).

Info :

Begin the second vertical row by making slip stitches between the next two rows of BPdc and FPdc (remember to keep your working yarn BEHIND the blanket). Fasten off. Make 10 such slip stitch-rows in colour C. Continue making 10 slip stitch rows in each colour (see photo 28-31 for first row in colour B), following the same colour sequence: First with C, then B, A, B, C, B, A, B, C.

β€” Finishing :

Info :

Use your hook to pull the yarn tail of every second row into the adjacent space, where you will add your tassel (photo 34). Make 20 tassels of each colour and tie five at the bottom and five at the top of each of the vertical slip stitch columns in the same colour as the vertical slip stitches (one tassel every second row). Use your hook to pull the mid-section of your tassel through the same space as your 2 yarn tails (photo 35), open it a bit wide with your fingers and pull the tail end of the tassel through (photo 36). Once you've added all the tassels, trim them to an even length.

Assembly Instructions

  • When adding surface crochet rows, make a slipknot with the working colour and join with a slip stitch on the right side of the first vertical row formed by the BPdc and FPdc, keeping the working yarn behind the blanket.
  • Work 10 vertical slip-stitch rows in each surface crochet colour following the colour sequence (C, B, A, B, C, B, A, B, C) and fasten off, leaving long yarn tails for tassels.
  • Use your crochet hook to pull the yarn tail of every second row into the adjacent space to create the loop for tassels; place one tassel every second row along the vertical slip-stitch columns.
  • Make 20 tassels of each colour and attach five at the bottom and five at the top of each vertical slip stitch column in the same colour as the vertical slip stitches, then trim tassels evenly.
  • Fasten off securely after final colour change (Rows 121-130 change to colour A and Fasten Off), weave in any remaining ends or leave long tails as instructed for tassels.

Important Notes

  • πŸ’‘This pattern is written in US terminology; consult the abbreviations section if you are used to UK terms.
  • πŸ’‘The pattern works in multiples of 20 plus 2; consult Table 1 and Table 2 to adjust starting chains and total rows for different blanket sizes.
  • πŸ’‘Leave long yarn tails when joining surface crochet colours if you plan to use them for tassels so you do not have to weave in many ends later.

This gingham blanket pattern creates a cozy, textured throw with a beautiful woven look and tassel finish. It's versatile, customizable, and works up in panels to give that classic gingham charm. Whether for gifting or keeping, each blanket is a handmade hug you can treasure. 🧢✨

You ask,

we answer.

FAQs

What size will the finished piece be?

The finished blanket for the medium size measures approximately 33.7 inches x 38.4 inches (85.5cm x 97.5cm) when using the recommended yarn and hook sizes.

Can I use different yarn weights for this pattern?

Yes, but changing yarn weight will affect the final size and gauge; adjust hook size accordingly and consult Table 1 and Table 2 to determine the number of starting chains and total rows for your desired size.

Do I need to be experienced with front post and back post stitches?

This pattern is rated intermediate; if you're new to FPdc and BPdc, follow the detailed photo instructions and practice the technique on a small swatch before starting the blanket.

How long does this project typically take to complete?

Most crocheters will need multiple days to complete this blanket; estimate roughly 12-15 hours depending on your pace and whether you make the medium size with surface crochet and tassels.