🧢 Beautiful ✨ Detailed πŸ’ Adorable

God With Us Cross-Stitch Ornament Pattern

God With Us Cross-Stitch Ornament Pattern
4.1β˜… Rating
2-3 Hours Time Needed
3.9K Made This
βœ‚οΈ

Intermediate Level

Ideal for those with basic crochet experience, featuring slightly more advanced stitches and techniques to expand your skills.

⏱️

Bite-Sized Project

Finishes in 2-4 hoursβ€”perfect for an afternoon of creative relaxation.

πŸŽ„

Holiday Cheer

Festive fun for the season, bringing handmade magic to celebrations and creating new family traditions.

About This God With Us Cross-Stitch Ornament Pattern

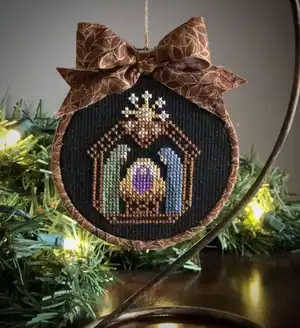
This pattern creates a small nativity-themed ornament titled "God With Us" designed to be stitched on dark (black) Aida fabric for strong contrast. The chart is 34 stitches wide by 40 stitches high and includes a DMC floss legend for accurate color placement. The finished ornament can be mounted in a 3" wooden hoop and embellished with a Swarovski AB crystal at the star center.

God With Us Cross-Stitch Ornament Pattern crochet pattern - detailed view of completed project

Includes both color and black-and-white charts plus clear floss symbol legend for easy stitching. Suggested fabric counts and finished approximate sizes are provided for multiple fabric choices.

Why You'll Love This God With Us Cross-Stitch Ornament Pattern

I absolutely love this pattern because it combines compact design with meaningful subject matter, making it a perfect handmade ornament for the holidays. I enjoy that the piece is small enough to finish quickly yet detailed enough to feel special and gift-worthy. The use of a Swarovski crystal in the star adds a little sparkle that really elevates the finished piece. Stitching this pattern feels calming and rewarding, and the finished ornament looks beautiful hanging on a tree or in a window.

God With Us Cross-Stitch Ornament Pattern step 1 - construction progress God With Us Cross-Stitch Ornament Pattern step 2 - assembly progress God With Us Cross-Stitch Ornament Pattern step 3 - details and accessories God With Us Cross-Stitch Ornament Pattern step 4 - final assembly and finishing

Switch Things Up

I love changing the color palette of this design to suit my holiday decor; try warm golds and creams for a vintage look or jewel tones for a richer finish.

You can make the ornament larger or smaller by changing fabric count and stitch method: use a higher count for a mini or a lower count for a chunkier ornament.

I often switch the center Swarovski crystal for a small glass bead or vintage button for a unique focal point.

Try stitching the design on colored Aida (navy, forest green, burgundy) instead of black to create different moods and contrasts.

If you prefer a framed finish, mount the stitched piece in a small metal ornament frame instead of a hoop for a sleeker look.

I sometimes add a tiny embroidered name or year to the back of the hoop for personalization and gifting.

Swap the wrapped fabric hoop for washi tape or painted hoop edges to coordinate with your color scheme.

For a rustic finish, use natural linen instead of Aida and embroider with muted DMC shades to soften the motif.

I like to create a set of ornaments by varying thread shades slightly to make each one unique while keeping the same overall chart.

Consider adding a thin wire inside the ribbon bow to pose and style it perfectly when finishing the ornament.

For a keepsake version, stitch the same design on evenweave using finer threads for a more detailed, heirloom-quality ornament.

Don't be afraid to combine techniques β€” a few backstitches in metallic thread can highlight the star or halo area for extra shine.

Common Mistakes & How to Fix Them

βœ— Centering the design incorrectly on your fabric; solution: mark the center of your fabric and align it with the red center lines on the chart before beginning to stitch. βœ— Stitching with too many strands on evenweave or high-count fabric; solution: follow the suggested '2 over 1' or '2 over 2' instructions and test a small sample to match the recommended finished measurements. βœ— Using a light background instead of the recommended black Aida which reduces contrast; solution: stitch on black Aida as recommended or adjust color shades to retain contrast if using a different fabric. βœ— Forgetting to secure the Swarovski crystal properly which may fall off later; solution: glue the crystal with a strong fabric adhesive and let it cure fully before handling the ornament. βœ— Failing to check the floss color symbols with the legend which causes misplaced colors; solution: cross-reference each symbol carefully with the DMC legend printed on the chart before stitching each area.

God With Us Cross-Stitch Ornament Pattern

Create a lovely miniature nativity ornament with this compact cross-stitch pattern designed for a 3" hoop. You will stitch a 34w x 40h design that features a tiny stable, figures, and a sparkling center star detail. The pattern includes full color and black-and-white charts plus a DMC floss legend so you can jump right in.

Intermediate 2-3 Hours

Materials Needed for God With Us Cross-Stitch Ornament Pattern

β€” Main Fabric

  • 01
    16 ct Black Aida fabric (Zweigart) - used for the model (stitched 2 over 1)
  • 02
    14/28 count fabric option - finished approx. 2.4" x 2.7" (suggestion: 14 count, 2 over 1 or 28 count, 2 over 2)
  • 03
    16/32 count fabric option - finished approx. 2.2" x 2.5" (suggestion: 16 count, 2 over 1 or 32 count, 2 over 2)
  • 04
    18/36 count fabric option - finished approx. 2.0" x 2.3" (suggestion: 18 count, 2 over 1 or 36 count, 2 over 2)
  • 05
    DMC stranded cotton floss for colors: DMC 842, DMC 208, DMC 930, DMC 931, DMC 433, DMC 3362, DMC 3363, DMC 729, DMC 3865 (quantities as needed for a small 34x40 design)
  • 06
    Swarovski AB Crystal (1 small crystal) to glue over DMC 729 squares at the center of the star
  • 07
    3" wooden hoop (for finishing) and fabric strips to wrap the hoop

β€” Tools Required

  • 01
    Embroidery needle (size 24 or 26) suitable for 16 ct Aida
  • 02
    3" wooden hoop for finishing the ornament
  • 03
    Swarovski AB Crystal (small) and strong fabric glue
  • 04
    Scissors (sharp embroidery scissors)
  • 05
    Tapestry needle for weaving ends
  • 06
    Pins for holding fabric while finishing
  • 07
    Black Aida fabric (16 ct recommended) by Zweigart
  • 08
    DMC stranded cotton floss in listed colors
  • 09
    Optional: small bow or ribbon for hanging

Progress Tracker

0% Complete

β€” Pattern Chart :

Info :

Stitch Count: 34w x 40h

Info :

Model was stitched 2 over 1 on 16 ct Black Aida by Zweigart.

Infos :

14/28 count is approx. 2.4” x 2.7” (suggestion for 14 count, 2 over 1 or for 28 count, 2 over 2). 16/32 count is approx. 2.2” x 2.5” (suggestion for 16 count, 2 over 1 or for 32 count, 2 over 2). 18/36 count is approx. 2.0” x 2.3” (suggestion for 18 count, 2 over 1 or for 36 count, 2 over 2).

Infos :

Color chart and black-and-white chart are provided. Center lines are indicated on the chart with red guide lines in the PDF.

Infos :

Legend (symbols to DMC floss): '=' = DMC 842. 'heart' symbol = DMC 208. 'black diamond' symbol = DMC 930. 'square with star' symbol = DMC 931. 'B' boxed symbol = DMC 433. 'triangle' symbol = DMC 3362. 'starburst' symbol = DMC 3363. 'patterned diamond' symbol = DMC 729. 'circle with dot' symbol = DMC 3865.

Info :

A Swarovski AB Crystal was glued over top of the DMC 729 squares at the center of the star.

Info :

This ornament was finished in a 3” wooden hoop wrapped with fabric strips.

Info :

I hope you enjoy stitching this design.

β€” Finishing & Mounting :

Info :

Center your stitched piece in a 3" wooden hoop, trim and secure the back, wrap the hoop with fabric strips, and add a bow or ribbon for hanging.

Info :

Glue the Swarovski AB crystal carefully over the designated DMC 729 symbol(s) and allow adhesive to fully cure before handling the ornament.

Assembly Instructions

  • Center the completed 34w x 40h stitched piece in a 3" wooden hoop and tighten the hoop screw to hold fabric taut before trimming.
  • Glue a single Swarovski AB Crystal over the DMC 729 square(s) at the center of the star and let the glue cure fully before further handling.
  • Trim the excess fabric behind the hoop leaving a small margin, fold under neatly, and secure with fabric glue or blanket stitch for a clean back finish.
  • Wrap the outer edge of the wooden hoop with fabric strips as shown in the model photo, tying or gluing the ends on the back for a neat appearance.
  • Attach a decorative bow and a hanging loop or ribbon at the top of the hoop to finish; position the bow over the hoop screw if desired for symmetry.

Important Notes

  • πŸ’‘Stitch on black Aida as recommended for best contrast; if using another color, adjust floss shades to maintain visual definition.
  • πŸ’‘Follow the chart center lines to correctly position the design on your fabric before stitching begins.
  • πŸ’‘Use the DMC legend carefully to match symbols to floss numbers; check each color match before starting large areas.
  • πŸ’‘Glue and secure any embellishments (Swarovski crystal) only after stitching and trimming to avoid accidental glue on stitches.

This tiny nativity ornament is a heartfelt reminder of the season and stitches up quickly for gift-giving or tree decorating. The design includes a sparkling Swarovski accent and finishes beautifully in a wrapped 3" hoop for instant display. Stitch one for every member of the family or give as a thoughtful handmade present. πŸŽ„πŸ§΅βœ¨

You ask,

we answer.

FAQs

What size will the finished piece be?

The stitched design is 34 stitches wide by 40 stitches high; on 16 ct Aida stitched 2 over 1 it measures approximately 2.2" x 2.5" and fits a 3" wooden hoop.

Can I use different fabric counts?

Yes β€” suggested finished sizes are provided: 14/28 count ~2.4" x 2.7", 16/32 count ~2.2" x 2.5", 18/36 count ~2.0" x 2.3" depending on stitch method (2 over 1 or 2 over 2).

Do I need the Swarovski crystal and a wrapped hoop?

The Swarovski crystal and wrapped 3" hoop are finishing choices used on the model to add sparkle and a polished look; the pattern can be finished in other frames or as a simple ornament without the crystal.

How long does this project typically take to complete?

Most stitchers finish this small ornament in 2-3 hours depending on experience and stitching speed.