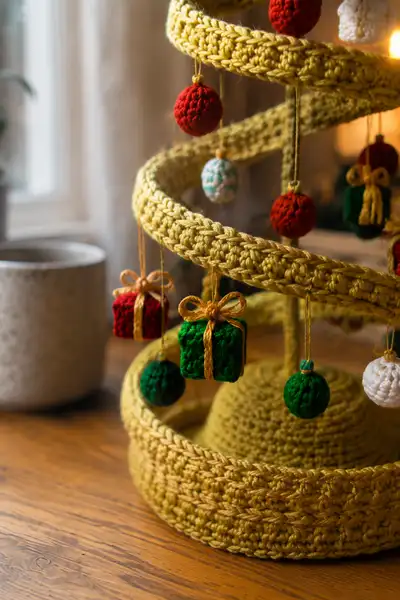
Create a whimsical spiral holiday display that doubles as a tabletop ornament and cheerful home accent. This pattern builds a spiral gold garland wrapped around a covered central rod with hanging crocheted baubles and tiny gift boxes, finished with delicate bows. The finished piece is sturdy, freestanding and perfect for mantle or desk decoration.
Progress Tracker
0% Complete
— Base Disk (Flat Foundation) :
Round 1 :
6 sc in magic ring (6)
Round 3 :
(1 sc, 1 inc) x 6 (18)
Round 4 :
(2 sc, 1 inc) x 6 (24)
Round 5 :
(3 sc, 1 inc) x 6 (30)
Round 6 :
(4 sc, 1 inc) x 6 (36)
Info :
Use bulky gold yarn held singly. Keep tension firm—this disk will support the whole spiral. If using a very thick yarn, consider step-down hook to 5.5mm to tighten stitches.
Round 7 :
(5 sc, 1 inc) x 6 (42)
Round 8 :
(6 sc, 1 inc) x 6 (48)
Round 9 :
(7 sc, 1 inc) x 6 (54)
Round 10 :
(8 sc, 1 inc) x 6 (60)
Info :
If you want a larger base, continue increasing by 6 sts per round using (n sc, inc) until you reach 66 or 72 sts. The sample base pictured measures approx 12-14cm wide using 60 sts round with bulky yarn.
Round 11-14 :
1 sc in each st (60) — work 4 rounds even to flatten disk and strengthen base
Info :
We will build a shallow wall around the disk to create a tray so ornaments don't slide off. Switch to BLO to create a defined rim ridge.
Round 15 :
1 sc in each st BLO (60)
Round 16 :
1 sc in each st (60)
Round 17 :
1 sc in each st (60)
Round 18 :
(6 sc, dec) x 7 + (4 sc) to finish on 60 (60)
Info :
Create a firm rim by adding one round of hdc around the top edge: helps base look finished and strong.
Round 19 :
1 hdc in each st around (60)
Info :
Fasten off leaving long tail (approx 60-80cm) to sew the base cover later to the dowel cover. We will attach the central post to this base. Set base aside.
— Central Dowel Cover (Rod Sleeve) :
Round 1 :
6 sc in magic ring (6)
Round 3 :
(1 sc, 1 inc) x 6 (18)
Round 4 :
(2 sc, 1 inc) x 6 (24)
Round 5-14 :
1 sc in each st (24) — work 10 rounds even to create a tube approx 6-8cm tall depending on rod height
Info :
Measure your dowel length. The cover should be slightly shorter than the full dowel length so top of rod can be visible to secure spiral top. This tube will be folded or stuffed around the dowel so make it snug but not tight.
Round 15 :
1 sc in next 12 sts, then 1 sc in back loops only of remaining 12 sts (24) to create a small ridge for gluing and stability
Round 16-20 :
1 sc in each st (24) — finish tube length to match dowel reach inside base
Info :
Stuff lightly with scrap yarn to take up excess space. Slide cover onto dowel and check fit. If using glue, use hot glue inside base center and press dowel into place, allow to cool. If you prefer removable option, leave dowel unattached and secure spiral with a small screw or washer from underside of base.
Round 21 :
Fasten off leaving long tail for sewing to base (approx 50-80cm)
— Spiral Tube (Main Garland) :
Info :
The spiral is a slightly padded rectangular tube crocheted in continuous rounds to form a long rope that will be pinned in a spiral around the central rod. Length in sample = approx 230-260cm of tube before shaping (depends on how many wraps you want). Work in bulky yarn. This section will list rounds to build a textured strip — you will repeat increases and even rounds to build height and padding.
Round 1 :
6 sc in magic ring (6)
Round 3 :
(1 sc, 1 inc) x 6 (18)
Round 4 :
(2 sc, 1 inc) x 6 (24)
Round 5 :
(3 sc, 1 inc) x 6 (30)
Info :
We will expand the small tube to a wider flattened tube by switching to half double crochet (hdc) rows worked in joined rounds; this creates a ribbon-like strip with height. If you prefer a round rope, stop increasing earlier.
Round 6 :
Change to hdc: 1 hdc in each st around (30)
Round 7 :
1 hdc in each st (30)
Round 8 :
1 hdc in next 10 sts, inc, 1 hdc in next 9 sts, inc, 1 hdc in remaining sts (32)
Round 9 :
1 hdc in each st (32)
Round 10 :
1 hdc in each st (32)
Round 11 :
(4 hdc, inc) x 6 (38)
Round 12 :
1 hdc in each st (38)
Info :
From here we build length — work even rounds to create continuous tube. To speed up, you may work in joined rounds with a slip stitch at end of each round. Keep a stitch marker at the first st of each round for counts.
Round 13-32 :
1 hdc in each st (38) — work 20 rounds even to create tube height and padding (this yields a tube approx 1.6-2cm tall depending on yarn)
Info :
Continue working even rounds until you reach desired tube length. The sample photo uses a tube approx 230cm long with 38 sts circumference and 20 rounds height. If you want a wider or narrower spiral, alter starting increases and the number of hdc rounds per repeat.
Round 33-80 :
Continue 1 hdc in each st (38) — continue in even rounds until tube length measures approx 230-260cm, turn work as you go but maintain continuous rounds; do not fasten off until you are ready to shape spiral
Info :
Stuff tube lightly as you go by pushing thin wrapped fiberfill in along the tube in segments. Do not overstuff—tube should be flexible enough to form spiral ring but have enough body to hold shape. To accelerate, hold two strands of bulky yarn together to create a chunkier look with fewer rounds.
Round 81 :
Once tube reaches desired length, fasten off leaving long tail for sewing onto dowel cover (approx 100cm)
— Small Bauble (Make multiple) :
Round 1 :
6 sc in magic ring (6)
Round 3 :
(1 sc, 1 inc) x 6 (18)
Round 4 :
(2 sc, 1 inc) x 6 (24)
Round 5 :
1 sc in each st (24)
Info :
Place a small bead of glue or sew loop inside top if you want a secure hanging point. The sample baubles use about 5g yarn each and measure approx 2cm diameter.
Round 6 :
(2 sc, 1 dec) x 6 (18)
Round 7 :
(1 sc, 1 dec) x 6 (12)
Info :
Stuff lightly now with a small amount of fiberfill to create a smooth ball shape. Use a stuffing stick or blunt pencil to gently push fill into the sphere.
Round 9 :
Fasten off leaving a long tail for sewing and making a hanging loop (approx 25-30cm)
Info :
To make hanging loops, use metallic thread or matching yarn: fold length in half, form loop and anchor inside top of bauble with a few stitches, then weave ends into the body and knot securely.
— Medium Bauble (Alternate size) :
Round 1 :
6 sc in magic ring (6)
Round 3 :
(1 sc, 1 inc) x 6 (18)
Round 4 :
(2 sc, 1 inc) x 6 (24)
Round 5 :
(3 sc, 1 inc) x 6 (30)
Round 6 :
1 sc in each st (30)
Round 7 :
(3 sc, 1 dec) x 6 (24)
Round 8 :
(2 sc, 1 dec) x 6 (18)
Round 9 :
(1 sc, 1 dec) x 6 (12)
Round 11 :
Fasten off leaving tail for hanging loop (approx 35cm)
Info :
Make as many baubles in red, green and white as desired. The sample has approx 14 baubles of mixed sizes placed evenly spaced along the spiral. Use metallic thread for hangers to echo gold spiral color.
— Tiny Present Box (Make multiple) :
Round 1 :
6 sc in magic ring (6)
Round 3 :
(1 sc, 1 inc) x 6 (18)
Round 4 :
(2 sc, 1 inc) x 6 (24)
Round 5 :
1 sc in each st (24)
Round 6 :
1 sc in each st (24)
Info :
We will create a small cube by working 6 flat squares joined at edges. Use the 24-st circle as base circumference then create four panels to fold into a box. Alternatively, make a tiny box using amigurumi cube shaping below for simpler assembly.
Round 7 :
Switch to 4.0mm hook. Ch 6, turn and sc in 2nd ch from hook across to create a small flat strip: 5 sc (this will be one side panel)
Round 8 :
Rep Round 7 to make four identical strips (5 sc x 4 strips). Fasten off and weave tails.
Info :
Sew strips together in a square tube, stitch ends to form a small cube, then close top and bottom with slip-stitch or whip stitch. Stuff lightly before closing. For a neater finish, create a cross ribbon using contrasting yarn and sew across center.
Alternate Cube (Amigurumi Cube) Round 1 :
6 sc in magic ring (6)
Round 3 :
(1 sc, 1 inc) x 6 (18)
Round 4 :
(2 sc, 1 inc) x 6 (24)
Round 5-8 :
1 sc in each st (24) — work 4 rounds to create a short cube height
Round 9 :
(2 sc, 1 dec) x 6 (18)
Round 10 :
(1 sc, 1 dec) x 6 (12)
Info :
Before final decreases, stuff box lightly to keep shape. Add ribbon by wrapping a thin strip of yarn around box and securing at top. Add a small bow made from metallic thread and attach with a few stitches.
Round 12 :
Fasten off leaving long tail for sewing (approx 40cm)
— Tiny Bow (for Presents) :
Round 1 :
Ch 10, sc in 2nd ch from hook and across (9 sc)
Round 2 :
Ch 1, turn, sc across (9)
Round 3 :
Fold strip in half and secure center with a short length of yarn to form a bow shape; stitch through center to anchor bow. Fasten off leaving tail to stitch to box
Info :
Alternatively make a small bow from metallic thread by making a looped bow and tying center with a tiny length of thread for a dainty look.
— Ornament Hangers and Finishings :
Info :
Make hanging cords for baubles and presents using metallic thread or matching yarn. Cut lengths between 8-12cm depending on desired drop. Fold in half and knot or stitch into ornament tops. Reinforce connection to spiral by wrapping several stitches through the tube at attachment point.
Round 1 :
To create a decorative knot cap for bauble: ch 6, sl st in each ch back to start to form a small ring; sew ring to top of bauble
Info :
Make at least 10-16 ornaments in mixed sizes to echo the sample. The distribution in the photo is approx 12-14 decorations arranged evenly over 5-6 spiral turns.
— Final Shaping and Assembly Prep :
Info :
Lay the base flat and position the dowel sleeve through the base center. Sew the tube base cover to the base using mattress or whip stitch with strong tail. Reinforce with a few extra stitches and knot inside base. If desired, run a bead of hot glue on dowel inside the sleeve for permanent hold.
Round 1 :
Slide the long spiral tube around the dowel by wrapping in a loose helix starting from the base and working up. Secure bottom end to base by sewing tail through base rim and under several stitches for a hidden anchor.
Info :
Stretch and pin spiral into place with equal spacing between wraps (sample has 5 complete wraps). Use pins to hold while you tack stitch every 3-4 cm with long tail, entering through the inner edge of spiral into dowel sleeve to stabilize position.
Round 2 :
Sew the top end of spiral to the dowel sleeve and shape tip into a small cone by decreasing 6 sts each round: (6 sc, dec) x 6 until closed. This creates the tapered top shown in photo.
Info :
When all spiral tacked in place, position ornament hangers and sew their tops to the inside edge of each spiral wrap at regular intervals so ornaments hang freely in the spiral corridor.
Round 3 :
Trim and weave all tails into adjacent rounds. If desired, add a thin wire inside the spiral top seam for extra shape retention; bend wire ends and hide inside dowel or base for safety.
Info :
For increased stability at the bottom, sew an extra spiral turn or add a small coin-weight under the base before closing to prevent tipping when ornaments are added.
This cheerful gold spiral garland brings a handcrafted, whimsical twist to seasonal decor. Each step—from building a sturdy base to shaping the spiral and stringing tiny baubles and presents—adds personality and charm to your home. The finished piece is compact, festive and full of tiny details to admire. 🎁🧶 Display it proudly and enjoy the compliments—it makes a lovely handmade gift or special accent for your holiday table. Happy stitching and joyful decorating! ✨