🧢 Beautiful ✨ Detailed πŸ’ Adorable

Halloween Bunting Pattern

Halloween Bunting Pattern
4.7β˜… Rating
2-3 Hours Time Needed
3.4K Made This
βœ‚οΈ

Intermediate Level

Ideal for those with basic crochet experience, featuring slightly more advanced stitches and techniques to expand your skills.

⏱️

Bite-Sized Project

Finishes in 2-4 hoursβ€”perfect for an afternoon of creative relaxation.

🏑

Cozy Accent

A warm touch for your space that transforms ordinary corners into inviting nooks filled with handmade charm.

About This Halloween Bunting Pattern

This pattern makes a string of eight delicate spider-web motifs joined together to form a Halloween bunting. It uses DMC Cotton Perle size 8 held together with DMC Diamant metallic thread for a subtle sparkle. The webs are worked in rows of treble and chain stitches and joined on the final row to form the garland.

Halloween Bunting Pattern crochet pattern - detailed view of completed project

Perfect for decorating doorways, mantels or party spaces, this bunting adds a handmade seasonal touch. The pattern includes full row-by-row instructions and finishing notes for blocking and joining.

Why You'll Love This Halloween Bunting Pattern

I absolutely love this pattern because it turns simple chains and trebles into an elegant, spooky decoration that really pops with metallic thread. I enjoy how quickly a single web comes together, so you can complete the whole bunting in an afternoon. Holding the black and silver threads together adds a beautiful sparkly effect that catches the light without being overpowering. I also love that the webs join on the final row β€” it makes assembly tidy and satisfying as the garland takes shape.

Halloween Bunting Pattern step 1 - construction progress Halloween Bunting Pattern step 2 - assembly progress Halloween Bunting Pattern step 3 - details and accessories Halloween Bunting Pattern step 4 - final assembly and finishing

Switch Things Up

I love using different color combinations to change the mood; try charcoal with bronze metallic thread for a vintage Halloween look or white with silver for a frosty winter garland.

You can make the webs larger or smaller by changing thread weight and hook sizeβ€”use finer thread and smaller hook for delicate mini webs or a thicker thread for oversized garlands.

I often add tiny beads at picot points for extra sparkle, threading them onto the metallic strand before working the picot to secure them in place.

Consider making multiple bunting strands at different lengths and layering them for a fuller decorative display across a mantel or window.

I sometimes stitch little crocheted spiders or felt shapes into the picot openings for a whimsical, three-dimensional effect.

For outdoor use, try using a weather-resistant thread or coating the finished bunting lightly with clear craft sealant to protect the metallic fibres.

If you prefer a more subtle look, use black cotton alone without the metallic strand β€” the pattern still reads beautifully with just the perle thread.

I also like to attach small loops at each end of the bunting so you can hang it with twine or hooks without distorting the first and last web motifs.

To create bunting for a party, switch colors between webs (for example black and orange alternation) to match themed decor and make a festive set.

Experiment with joining methodsβ€”rather than slip stitching into picots you can add small chain spacers or sew motifs together for a different visual spacing.

Common Mistakes & How to Fix Them

βœ— Working with the two threads separately can cause uneven tension and extra bulk; hold the Black and Silver together as a single strand throughout to maintain consistent texture and drape. βœ— Forgetting to slip stitch into the previous web's picot when joining will leave gaps between motifs; follow Row 8 join instructions carefully and slip stitch into the first picot on the previous web to secure placement. βœ— Skipping the picot finishing points will alter the web shape and spacing; make the picots exactly as written (Ch5, ss at base of ch-5) and count them to keep rows symmetrical. βœ— Not weaving in ends before blocking can lead to loose fibres after finishing; fasten off each web and weave in ends securely before lightly blocking the bunting for the best final appearance.

Halloween Bunting Pattern

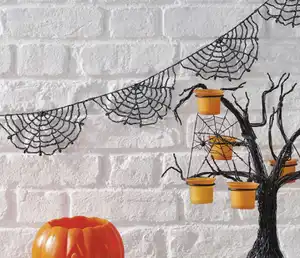
Create a spooky, sparkly spider web bunting to decorate your home for Halloween. This pattern uses black and metallic thread held together to give an eerie shimmer and is worked in rows to form eight web motifs joined into a garland. Clear step-by-step rows and finishing notes help you make a beautiful seasonal decoration you can hang indoors or out.

Intermediate 2-3 Hours

Materials Needed for Halloween Bunting Pattern

β€” Main Fabric

  • 01
    DMC Cotton Perle Thread Size 8 (100% cotton, 10g/80m) - 2 balls of Black (310)
  • 02
    DMC Diamant Metallic Thread Size 5 (72% viscose, 28% polyester metallic, 35m) - 3 reels of Silver (D415)

β€” Tools Required

  • 01
    A 3mm (US C/2 or D/3) hook
  • 02
    Yarn needle for weaving in ends
  • 03
    Scissors (for fastening off and trimming ends)

Progress Tracker

0% Complete

β€” Materials :

Info :

You will need: DMC Cotton Perle Thread Size 8 (100% cotton, 10g/80m) - 2 balls of Black (310). DMC Diamant Metallic Thread Size 5 (72% viscose, 28% polyester metallic, 35m) - 3 reels of Silver (D415). A 3mm (US C/2 or D/3) hook. For yarn stockists contact DMC 01924 231669 www.dmc.com

Info :

Tension is not critical for this project, but it may affect the yarn quantities required

Info :

Web measures 10x20cm (4x8in) and Bunting measures approx 160cm (63in) long

Info :

Abbreviations: picot Ch5, ss in st at base of ch-5

β€” Notes :

Info :

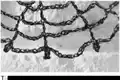
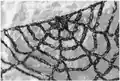
Bunting is made up of 8 Webs, which are worked in rows. The Webs are joined together on the final row. Use Black and Silver held together as a single strand throughout.

β€” Bunting :

FIRST WEB :

Using Black and Silver held together, ch5.

Round 1 :

Row 1 (RS) (Tr in fifth ch from hook, ch1) 4 times, tr in same ch, turn. [6 tr, 5 ch-1 sps]

Round 2 :

Row 2 (WS) Ch6 (counts as tr and ch3), (tr in next tr, ch3) 4 times, tr in final tr (third ch of beg ch-4), turn. [6 tr, 5 ch-3 sps]

Round 3 :

Row 3 Ch8 (counts as tr and ch5), (tr in next tr, ch5) 4 times, tr in final tr, turn. [6 tr, 5 ch-5 sps]

Round 4 :

Row 4 Ch10 (counts as tr and ch7), (tr in next tr, ch7) 4 times, tr in final tr, turn. [6 tr, 5 ch-7 sps]

Round 5 :

Row 5 Ch12 (counts as tr and ch9), tr in next tr, ch7, (tr, ch3, tr) in next tr, ch7, (tr, ch3, tr) in next tr, ch7, tr in next tr, ch9, tr final tr, turn. [8 tr, 2 ch-9 sps, 3 ch-7 sps, 2 ch-3 sps]

Round 6 :

Row 6 Ch14 (counts as tr and ch11), tr in next tr, (ch9, tr in next tr, ch5, tr in next tr) twice, ch9, tr in next tr, ch11, tr in final tr, turn. [8 tr, 2 ch-11 sps, 3 ch-9 sps, 2 ch-5 sps]

Round 7 :

Row 7 Ch16 (counts as tr and ch13), tr in next tr, ch11, (tr in next tr, ch7, tr in next tr, ch11) twice, tr in next tr, ch13, tr in final tr, turn. [8 tr, 2 ch-13 sps, 3 ch-11 sps, 2 ch-7 sps]

Round 8 :

Row 8 Ch8, ss in fifth ch from hook (counts as tr and picot), ch15, tr in next tr, picot, (ch13, tr in next tr, picot, ch9, tr in next tr, picot) twice, ch13, tr in next tr, picot, ch15, tr in final st, picot. [8 tr, 8 picot, 2 ch-15 sps, 3 ch-13 sps, 2 ch-9 sps] Fasten off and weave in ends.

Info :

The spider web pattern is worked in eight rows of treble and chain stitches

Info :

The sparkly effect is achieved by holding black and silver together as one strand

β€” Next Web (Make 7) :

Info :

Using Black and Silver held together, ch5.

Round 1-7 :

Rows 1-7 As Rows 1-7 of First Web.

Round 8 :

Row 8 Ch8, ss in fifth ch from hook (counts as tr and picot), ch15, tr in next tr, picot, (ch13, tr in next tr, picot, ch9, tr in next tr, picot) twice, ch13, tr in next tr, picot, ch15, ss in final st, ch2, ss in first picot on prev Web, ch2, ss in top of tr on current Web. [8 tr, 8 picot, 7 ch-sps] Fasten off and weave in ends.

β€” To Finish :

Info :

For best results, lightly block the Bunting.

Assembly Instructions

  • Join each Web to the previous Web on Row 8 by slip stitching into the first picot on the previous Web as instructed, using ch2 connectors and slip stitches as shown to form the bunting.
  • Hold Black and Silver threads together throughout and work them as a single strand for consistent texture and sparkle.
  • Fasten off each Web after Row 8 and weave in ends securely with a yarn needle before blocking.
  • Lightly block the finished bunting for best results to open out the chain spaces and set the shape.
  • Hang the bunting and optionally suspend small spiders or decorations from the webs to enhance the Halloween effect.

Important Notes

  • πŸ’‘Use Black and Silver held together as a single strand throughout for the sparkly effect and consistent tension.
  • πŸ’‘Tension is not critical for this project, but it may affect the yarn quantities required and final measurements.
  • πŸ’‘Fasten off and weave in ends after completing each Web to keep joining and blocking tidy and easier to manage.
  • πŸ’‘Lightly block the bunting after assembly to open out the web motifs and achieve the best finished appearance.

Make your home feel haunted in the most stylish way with this sparkly spider-web bunting β€” perfect for Halloween parties and seasonal displays. This project is quick to work up and packs a big visual punch using simple trebles and chains held with metallic thread. Hang a few little spiders and you have a beautifully eerie scene that catches the light and the imagination. πŸ•ΈοΈβœ¨

You ask,

we answer.

FAQs

What size will the finished piece be?

The full bunting measures approximately 160cm (63in) long, and each web measures about 10x20cm (4x8in) when using the recommended threads and 3mm hook.

Can I use different yarn weights for this pattern?

You can substitute other threads or yarns, but this will change the finished size and drape; choose a similar-weight perle or fine thread and adjust hook size accordingly for best results.

Do I need prior crochet experience for this pattern?

This pattern is rated intermediate, so basic knowledge of chain, treble and slip stitch, plus working picots, is recommended.

How long does this project typically take to complete?

Most crafters can finish the bunting in 2-3 hours, though time may vary depending on experience and how long you spend on blocking and finishing.