🧢 Beautiful ✨ Detailed πŸ’ Adorable

Handbag "Dew Drop" M Size Pattern

Handbag
4.0β˜… Rating
5-7 Hours Time Needed
2.8K Made This
βœ‚οΈ

Intermediate Level

Ideal for those with basic crochet experience, featuring slightly more advanced stitches and techniques to expand your skills.

⏱️

Weekend Treat

Takes 5-7 hours, making it an enjoyable project to finish over a couple of days.

✨

Stylish Touch

An elegant detail to elevate any look, combining traditional techniques with contemporary design sensibilities.

About This Handbag "Dew Drop" M Size Pattern

This pattern creates the Dew Drop handbag in M size using tubular polyester rope and a 7 mm hook to achieve a firm, structured fabric. The shape is a rounded drop with a flat circular base and tall sides, finished with sturdy I-cord handles and an optional tassel. It includes step-by-step base increases, side rows worked in back loop only, handle I-cord tutorial and detailed joining techniques.

Handbag

Finished measurements are provided and helpful photos guide you through each finishing tip, including how to hide polyester ends with a lighter. The pattern is worked in continuous rounds and is suitable for those comfortable with single crochet and back-loop-only stitches.

Why You'll Love This Handbag "Dew Drop" M Size Pattern

I absolutely love this pattern because it turns simple materials into a refined, functional bag that holds its shape. I enjoy the satisfying progression from a flat round base to tall, smooth sides that feel very durable. The I-cord handles are one of my favorite touches β€” they look professional and are practical to carry. I also love teaching the polyester end-hiding trick; it gives a clean finish that elevates the whole project.

Handbag Handbag Handbag Handbag

Switch Things Up

I love how easily you can customize this bag by changing the rope color; try bold stripes or a two-tone base for a modern look.

You can make the bag larger or smaller by using thicker or thinner rope and adjusting the number of base increase rounds; test a small swatch to check size.

If you want a softer bag, use a looser tension and a smaller hook to create more drape; for a firm market bag, tighten your tension and use a larger hook.

I often add a fabric lining with a zipper for extra structure and to prevent small items from slipping through the stitches; cut the lining to the bag measurements and sew in place.

Swap the I-cord handles for wooden or leather handles for a different aesthetic and easier installation if you prefer not to braid or knit handles.

Try decorative accents like a crocheted flower, embroidered initials, or a contrasting tassel to personalize the bag as a gift.

For a beach-ready version, use a bright colored rope and add a water-resistant lining for wet swimsuits or towels; it makes a great summer accessory.

I sometimes create matching small pouches or coin purses with the same rope by working a smaller base and shorter sides to create a nested set.

If you want to make the handles shorter, simply decrease the I-cord length and join closer to each other to create a top-handle bag rather than shoulder straps.

Experiment with carrying hardware like rings or clips to attach detachable straps; this lets you convert the bag into a crossbody or tote for versatility.

I also recommend trying a subtle stitch change on the sides β€” a few rows of reverse single crochet can create a decorative edge that frames the top of the bag beautifully.

When joining ends, practice on scrap rope first so you’re comfortable with the insertion and pulling technique; once you master it, joining looks seamless every time.

Common Mistakes & How to Fix Them

βœ— Skipping a stitch marker or scrap yarn at the last stitch of the round makes counting difficult; mark the last stitch of the base with scrap yarn so you can easily count rounds thereafter. βœ— Working with inconsistent tension causes wavy sides or uneven shaping; keep a steady, firm tension with polyester rope and practice a few rows to stabilize your gauge. βœ— Forgetting to pull the loose strand to tighten the magic loop results in a loose center; after working round 1 over the loop, pull the loose strand firmly to close the opening. βœ— Not hiding ends correctly can make the finish look messy; use the polyester melting method (brief lighter heat) and push the end under nearby yarn to make a nearly invisible finish. βœ— Removing the hook carelessly during I-Cord making can lose loops and stop the process; follow the step-by-step I-Cord instructions and hold loops with your thumb while starting the next row.

Handbag "Dew Drop" M Size Pattern

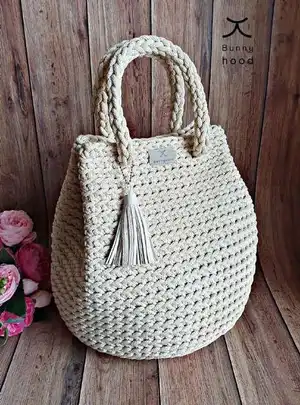
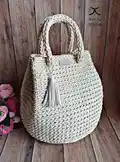
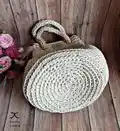
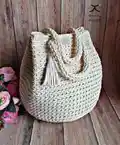
Make a stylish, roomy Dew Drop handbag using durable polyester rope and simple crochet techniques. This pattern guides you through a round base, tall sides worked in back loops, and neat I-cord handles for a polished finish. You will learn easy finishing tips for hiding ends and joining handles so your bag looks store-bought. Perfect for everyday use, beach days, or as a handmade gift you'll be proud to carry.

Intermediate 5-7 Hours

Materials Needed for Handbag "Dew Drop" M Size Pattern

β€” Main Fabric

  • 01
    ~160 meters polyester rope 5-6 mm (color used - light beige)
  • 02
    Tubular knit polyester rope (outer tubular knit surrounding polyester yarn core) - approx 160 m total
  • 03
    Scrap yarn for stitch marking (small amount)
  • 04
    Optional: additional polyester rope for larger size or color accents

β€” Tools Required

  • 01
    7 mm crochet hook
  • 02
    Scissors
  • 03
    Lighter (for hiding ends of polyester rope)
  • 04
    Sewing needle for sewing on label
  • 05
    Yarn needle for weaving ends
  • 06
    Stitch marker or scrap yarn to mark rounds
  • 07
    Accessories: leather or fabric label (sewn with needle) and favorite tassel

Progress Tracker

0% Complete

β€” Crochet the Bag Body :

Info :

Pattern is worked as one piece in the round, so there's no turning. Work in a spiral and use a stitch marker (or a scrap yarn) to help keep your place. Here is a link to my YouTube channel with full video, which will help you: https://www.youtube.com/watch?v=UBXUsHbX8UQ&t=8s

Infos :

MAKE THE BASE. Start by making a magic loop. First, make a loop. To the up is the skein of yarn. To the down is the end of the yarn. Next, catch the top yarn and pull it under and through the loop, and then chain 1. The hardest part is done. Now work round 1 single crochet over the loop and the strand of yarn behind the loop together. When all the single crochets are done, pull the loose strand of yarn. The opening will be nice and tight.

Round 1 :

6 sc into the magic loop, 1 sl, 1 ch (6)

Round 2 :

*2 sc blo into next stitch*, repeat * * 6 times (12)

Round 3 :

* 1 sc blo, 2 sc blo into next stitch *, repeat * * 7 times (21)

Round 4 :

* 2 sc blo, 2 sc blo into next stitch *, repeat * * 7 times (28)

Round 5 :

* 3 sc blo, 2 sc blo into next stitch *, repeat * * 7 times (35)

Round 6 :

* 4 sc blo, 2 sc blo into next stitch *, repeat * * 7 times (42)

Round 7 :

* 5 sc blo, 2 sc blo into next stitch *, repeat * * 7 times (49)

Round 8 :

* 6 sc blo, 2 sc blo into next stitch *, repeat * * 7 times (56)

Round 9 :

* 7 sc blo, 2 sc blo into next stitch *, repeat * * 4 times (60)

Info :

Base is done.

Info :

I use scrap yarn to mark the last single stitch of the base – it will let you easy count rows for the further crocheting.

β€” Make the Sides :

Info :

The sides are super easy to make, just crochet all the stitches until the bag is as tall as you like.

Round 10 - 29 :

sc blo all stitches for 19 row (or till side is ~25 cm tall). Slip 2 last stitches and weave in end*

Info :

*I always try to hide ends, that it would not be noticeable. So I will show you very easy way to finish this end nicely. But you can skip this tip, if you feel you don't need it.

Infos :

PERFECT ENDING. First, insert hook, catch the yarn end and pull it under and through the stitch as it's shown in 3 pictures on the left. Second, put the hook in the same crochet stitch back loop, catch the yarn and pull it through the loop as it's shown in 3 pictures on your right.

Info :

This yarn is 100% polyester, so it's perfect for hiding ends with lighter, because it can melt. Hide the yarn end a little bit further on your crocheting and cut the rest of the yarn, leaving only very short ending. Then heat this short ending for a few seconds with a lighter and quickly hide it by pushing it under the nearest yarn with a hook.

Info :

That's it! The sides are done.

β€” Crochet the Handles :

Info :

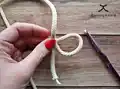
Handles are made by crocheting I-Cord. Knowing how to make I-Cord is helpful in so many ways! It can be used as a lanyard, drawstrings or any other rope or cord. So follow the tutorial below how to make I-Cord. Once you get started, just keep adding rows until you reach your desired length.

Row 1 :

Chain 3. Insert hook into 2nd chain, pull up a loop. Insert hook into 3rd chain, pull up a loop (3 loops on hook). Follow 1 - 5 pictures below.

Row 2 :

desired length: catch the yarn and pull up a loop, then remove it from hook, being careful not to lose it (picture 6-8). I like to pinch the cord with my thumb and finger and it helps me not to lose them. Then yarn over and pull a loop through the second loop, carefully remove it from the hook too (picture 9-10). Yarn over and pull up a loop catch the yarn and pull a loop (picture 11-12). To start next row - insert hook into two next (empty) loops (3 loops on a hook).

Info :

Continue crocheting rows in this manner until the cord is ~90 cm length. Then pull off the hook, cut the yarn (leaving ~ 30 cm ending) and leave it all. Later we will join the ends.

β€” Assembling the Bag :

Info :

The crochet fabric is very strong, so there is not chance the bag will tears away or brake.

Info :

You may get a little stretching in the stitch gap like this and pull the I-Cord throughout it (picture 1).

Info :

Weave the I-Cord you've just crochet in and out of stitches, about two rows down (follow 2 - 8 pictures).

Infos :

JOIN THE ENDS. After you waved the I-Cord, you need to join its endings. This part you can do by ending I-cord (yarn over and pull through all three loops on hook) and tie up both endings together. But I suggest you join the ends nicely, by giving some tips.

Info :

From the first glance it could look complicated, but that is not so hard, just follow the instructions step by step below (pictures 1-28).

Info :

Take the I-Cord end and insert hook into the first loop. Catch the yarn and pull it all throughout. Take the other I-Cord end and insert hook like in picture 5. Then catch the yarn and pull it all throughout. Insert hook in the loop like in picture 9. Catch the yarn and pull it all throughout.

Info :

The first nice joint is done. Two more lose loops are left, so continue joining them in this manner. When finished joining, simply make a double knot and hide the ends into the I-Cord and cut the leftovers, leaving very short ends. Then melt it with a lighter and hide into the I-Cord, pushing with fingers.

Info :

That's it! Now you need to pull handle 1 and handle 2, put your favorite tassel, sew on a label and it's ready to wear.

Assembly Instructions

  • Weave each I-Cord handle in and out of the bag edge stitches about two rows down, following the pictured sequence to keep the handle anchored and neat.
  • Join the I-Cord ends by inserting the cord end into the loose loop on the bag edge, pulling the yarn all the way through, and repeating for the other end to create a clean join.
  • After joining, make a double knot, hide the short ends into the I-Cord, trim close and carefully melt the polyester ends with a lighter to secure them invisibly.
  • Position the two handles opposite each other and pull handle 1 and handle 2 into place so the bag sits evenly; sew on a label and attach a tassel as desired.
  • When finishing the sides, slip the last two stitches and weave in the end to secure the side rows and prevent unraveling.

Important Notes

  • πŸ’‘Use a stitch marker or scrap yarn to mark the last stitch of each round to help you count rows accurately and maintain correct stitch placement.
  • πŸ’‘Keep tension consistent when working with polyester rope to avoid warped or uneven sides; the rope wants firmer tension than standard yarn.
  • πŸ’‘Hide polyester rope ends by cutting close, briefly melting the tip with a lighter, and pushing it under nearby yarn for a smooth, permanent finish.
  • πŸ’‘Work side rows in back loops only (sc blo) as instructed to create the textured, slanted stitch that forms the bag's body.
  • πŸ’‘When making I-Cord handles, work until the desired length (~90 cm recommended) and leave a long tail (~30 cm) for joining cleanly.

This Dew Drop handbag pattern makes a chic, durable everyday bag with a beautiful rounded silhouette and sturdy handles. The polyester rope gives it a strong yet soft texture and the step-by-step photos make finishing simple and satisfying. Perfect as a handmade gift or a stylish addition to your own wardrobe. 🧢✨

You ask,

we answer.

FAQs

What size will the finished piece be?

The finished bag has an approximate round bottom diameter of ~25 cm, a height of ~25 cm, and handles of ~45 cm when using the recommended polyester rope and 7 mm hook.

Can I use different yarn weights for this pattern?

You can use different rope thicknesses, but the final size and structure will change; thicker rope creates a chunkier, firmer bag while thinner rope makes a smaller, softer bag.

Do I need prior crochet experience for this pattern?

This pattern is rated intermediate because it uses back-loop-only stitches, continuous rounds, and an I-Cord technique; basic knowledge of single crochet and working in the round is recommended.

How long does this project typically take to complete?

Most crocheters finish this project in 5-7 hours, though time may vary depending on experience and whether you make additional handles, tassels, or a lining.

How do I hide the polyester rope ends safely?

Trim the end short, briefly heat the polyester tip with a lighter to melt it slightly, then push the melted tip under nearby yarn with a hook or needle to hide and secure it.