Make a charming set of crocheted hanging baskets to organize and decorate your space. This pattern guides you through three sizes—small, medium, and large—using cord yarn for a sturdy, textured finish. Clear step-by-step rounds and photo references help you learn the BLO technique, crab stitch edging, and a neat hanging loop finish. Perfect for sprucing up shelves, entryways, or gifting as a coordinated set.
Progress Tracker
0% Complete
— Materials :
Info :
4-5 mm cotton, acrylic or polyester cord 250-300 meters for three baskets. Hook 5mm or 6 mm, hook 2,5-3 mm to hide the cord at the end of crocheting. scissors, marker.
— Abbreviations :
Infos :
MR - Magic ring. ch - chain stitch. sc - single crochet. sl st - slip stitch. inc - increase (2 sc in 1 st). sc3inc - increase - 3 sc in 1st. dec - decrease - 2 sc together. BLO - back loops only. (...)n - repeat the sequence in brackets "n" times. (...) - amount of stitch after the row.
— Diagram 1 :
Info :
Work along diagram 1 shown on page 2 for the base increase layout and stitch placement.
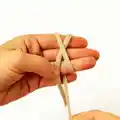
— Magic Ring step by step :
Infos :
Make MR following the illustrated steps on page 3. Use ch1, 6 sc to start as shown in pictures 8-11 and pull the ring (pic.12).
— Small basket :
Round 1 :
work BLO, 6 inc (12) hide the end inside the stitches then cut it off (pic. 17-21)
Round 2 :
work BLO (inc, sc)*6 (18) (pic. 22)
Round 3 :
work BLO (2 sc, inc)* 6 (24) (pic. 23)
Round 4 :
work BLO (inc, 3 sc)* 6 (30) (pic. 24)
Round 5 :
work BLO, 2 sc, (inc, 4 sc)*5, inc, 2 sc (36) (pic. 25)
Round 6 :
work BLO, sc3inc, 35 sc (38) (pic. 26-27)
Round 7 :
work BLO, sc, sc3inc, 36 sc (40) (pic. 28-29)
Round 8 :
work BLO, 2 sc, sc3inc, 37 sc (42) (pic. 30-31)
Round 9 :
work BLO, 3 sc, sc3inc, 38 sc (44) (pic. 32)
Round 10 :
work BLO, 4 sc, sc3inc , 39 sc (46) (pic. 33)
Round 11 :
work BLO, 5 sc, sc3inc, 40sc (48) (pic. 34)
Round 12 :
work BLO, 6 sc, sc3inc, 41 sc (50) (pic. 35)
Round 13 :
work BLO, 7 sc, sc3inc, 42 sc (52) (pic. 36)
Round 14 :
work BLO, 8 sc, sc3inc, 7 sc, 18 dec (pic. 37-43)
Round 15 :
work BLO, 36 sc. (pic. 44-45)
Info :
Cut off the cord. Fasten off (pic. 46-52).
Info :
- hide the end of the cord, cut off (pic. 53-55). - take a new cord. (pic. 56). - find the middle of the top of the basket. (pic. 57). - start crocheting a new round with new yarn (pic. 58-59). - make ch1 (pic. 60).
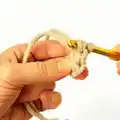
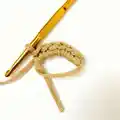
— Crab stitch :
Info :
- insert the hook from front to back in the first single crochet stitch on the right (pic. 61-62). - draw up a loop. You should have two loops on the hook. (pic. 63). - pull the thread through both stitches. There should be one stitch left on the hook. This completes the first crab stitch. (pic. 64-65). - repeat the crab stitch into the next stitch (pic. 66-69).
Info :
- Work one crab stitch in each single crochet stitch until you reach the end (pic. 70-72).
— Hanging loop :
Info :
- make ch14 (pic. 73). - sl st in the stitch at the base (pic. 74). - sc in each stitch of the hanging loop (14) (pic. 75). - sl st in the stitch at the base (pic. 77).
Info :
- cut off the yarn, leaving a tail about 30 inches long.(pic. 78). - pull out the rest of the cord (pic. 79-80). - take a piece of thread about 10 inches, put as it is shown on the picture (pic. 81). - tightly wrap it with the cord first to the upper part, then to the bottom. - insert the 2 ends of the cord into the loop of the thread (pic. 84). - pull the end of the thread up, pull the 2 cords out (pic. 84). - cut the ends (pic. 85).
— Medium basket :
Info :
Make MR: ch1, 6 sc (pic. 8-11). Pull the ring (pic. 12). Crochet in a spiral. Place a stitch marker in the first stitch of the first round (move it each round). Work along diagram 1. When working BLO, grab the jumper of the stitch to make your product tighter (pic. 13-16). For detailed pictures of rounds 1-5, see page 5, pic 17-25.
Round 1 :
work BLO, 6 inc (12) hide the end inside the stitches then cut it off
Round 2 :
work BLO (inc, sc)*6 (18)
Round 3 :
work BLO (2 sc, inc)* 6 (24)
Round 4 :
work BLO (inc, 3 sc)* 6 (30)
Round 5 :
work BLO, 2 sc, (inc, 4 sc)*5, inc, 2 sc (36)
Round 6 :
work BLO, 4 sc, (inc, 5 sc)*5, inc, sc (42) (pic. 87)
Round 7 :
work BLO, sc3inc, 41sc (44) (pic. 88)
Round 8 :
work BLO, sc, sc3inc, 42 sc (46) (pic. 89)
Round 9 :
work BLO, 2 sc, sc3inc, 43 sc (48) (pic. 90)
Round 10 :
work BLO, 3 sc, sc3inc , 44 sc (50) (pic. 91)
Round 11 :
work BLO, 4 sc, sc3inc, 45 sc (52) (pic. 92)
Round 12 :
work BLO, 5 sc, sc3inc, 46 sc (54)
Round 13 :
work BLO, 6 sc, sc3inc, 47 sc (56)
Round 14 :
work BLO, 7 sc, sc3inc, 48 sc (58)
Round 15 :
work BLO, 8 sc, sc3inc, 49 sc (60)
Round 16 :
work BLO, 9 sc, sc3inc, 50 sc (62) (pic. 93)
Round 17 :
work BLO, 10 sc, sc3inc, 9 sc, 21 dec (pic. 94-97)
Round 18 :
work BLO, 41 sc. (pic. 98)
Info :
Cut off the cord. Finish crocheting. (pic. 99-101 or pic. 46-52 page 8)
Info :
Take a new cord. Make a crab stitch in each stitches. For details on how to make a crab stitch, see pages 9-11, pic. 56-72. Make a loop for hanging. The hanging loop is made as in a small size basket. For details, see the pages 11-12, pic. 73-85.
— Large basket :
Info :
Make MR: ch1, 6 sc (pic. 8-11). Pull the ring (pic. 12). Crochet in a spiral. Place a stitch marker in the first stitch of the first round (move it each round). Work along diagram 1. When working BLO, grab the jumper of the stitch to make your product tighter (pic. 13-16). For detailed pictures of rounds 1-5, see page 5, pic 17-25.
Round 1 :
work BLO, 6 inc (12) hide the end inside the stitches then cut it off
Round 2 :
work BLO (inc, sc)*6 (18)
Round 3 :
work BLO (2 sc, inc)* 6 (24)
Round 4 :
work BLO (inc, 3 sc)* 6 (30)
Round 5 :
work BLO, 2 sc, (inc, 4 sc)*5, inc, 2 sc (36)
Round 6 :
work BLO, 4 sc, (inc, 5 sc)*5, inc, sc (42)
Round 7 :
work BLO, (6 sc, inc)*6 (48) (pic. 105)
Round 8 :
work BLO, sc3inc, 47sc (50) (pic. 106-107)
Round 9 :
work BLO, sc, sc3inc , 48 sc (52) (pic. 108)
Round 10 :
work BLO, 2 sc, sc3inc, 49 sc (54) (pic. 109)
Round 11 :
work BLO, 3 sc, sc3inc , 50 sc (56) (pic. 110)
Round 12 :
work BLO, 4 sc, sc3inc, 51 sc (58)
Round 13 :
work BLO, 5 sc, sc3inc, 52 sc (60)
Round 14 :
work BLO, 6 sc, sc3inc, 53 sc (62)
Round 15 :
work BLO, 7 sc, sc3inc, 54 sc (64)
Round 16 :
work BLO, 8 sc, sc3inc, 55 sc (66)
Round 17 :
work BLO, 9 sc, sc3inc, 56 sc (68)
Round 18 :
work BLO, 10 sc, sc3inc, 57 sc (70)
Round 19 :
work BLO, 11 sc, sc3inc, 58 sc (72)
Round 20 :
work BLO, 12 sc, sc3inc, 11 sc, 24 dec
Round 21 :
work BLO, 50 sc.
Info :
Cut off the cord. Finish crocheting. How to finish crocheting beautifully see pic. 46-52 page 8.
Info :
Take a new cord. Make a crab stitch in each stitches. For details on how to make a crab stitch, see pages 9-11, pic. 56-72. Make a loop for hanging. The hanging loop is made as in a small size basket. For details, see the pages 11-12, pic. 73-85.
— Final notes :
Info :
Your finished baskets will vary in size depending on the cord thickness and hook used; thicker cord yields larger baskets. Use stitch markers, count your stitches at each round, and refer to the pictured steps for finishing and wrapping the hanging loop.
Make a beautiful trio of hanging baskets to organize and decorate your home with handmade charm. These sturdy cord baskets are perfect for plants, trinkets, or gifts and finish with a neat wrapped hanging loop. Enjoy the creative process and display your work proudly! 🧶🏡