🧶 Beautiful ✨ Detailed 💝 Adorable

Harry Potter Ear Saver Pattern

Harry Potter Ear Saver Pattern
4.5★ Rating
1-2 Hours Time Needed
1.2K Made This
✂️

Beginner Friendly Level

Perfect for those just starting their crochet journey, with clear instructions and simple techniques

⏱️

Quick Make

Complete in under 2 hours—lightning fast fun for instant gratification and quick gifts.

🧣

Snug Essential

Everyday comfort with practical charm, designed for both functionality and style through changing seasons.

About This Harry Potter Ear Saver Pattern

This pattern creates a decorative and functional ear saver with owl-themed crochet buttons to protect your ears from mask elastic. You can make two styles of buttons: a simple owl face and a full owl body, both of which attach securely to the band. The band is adjustable and quick to work up using basic stitches.

Harry Potter Ear Saver Pattern crochet pattern - detailed view of completed project

The instructions include detailed rounds, materials for medium and fine yarn options, and clear assembly steps for attaching buttons. Perfect for quick handmade gifts or personal use, and easy to customize.

Why You'll Love This Harry Potter Ear Saver Pattern

I absolutely love this pattern because it combines a useful, everyday accessory with a playful, handmade touch. I enjoy how quickly the band works up — you can finish a set in under two hours and make multiples for friends and family. The owl button options let me be creative with small details, whether I want a simple face or a fuller, textured owl. I also appreciate that the pattern is flexible: you can swap yarn weights and adjust the chain length to fit any size. Making these feels rewarding and practical, and they always spark compliments.

Harry Potter Ear Saver Pattern step 1 - construction progress Harry Potter Ear Saver Pattern step 2 - assembly progress Harry Potter Ear Saver Pattern step 3 - details and accessories Harry Potter Ear Saver Pattern step 4 - final assembly and finishing

Switch Things Up

I love experimenting with colorways — try Hogwarts house colors (scarlet and gold for Gryffindor, green and silver for Slytherin) to personalize each ear saver.

You can change yarn weight and hook size to create different sizes; a bulkier yarn with a larger hook will give you a thicker, sturdier band.

I sometimes pair the owl face buttons with embroidery details instead of using gold yarn for the eyes to give a subtler look.

If you want a minimalist version, skip the owl buttons and use simple round motifs in contrasting colors as attachment points.

I like adding a small strip of felt behind buttons for extra durability before sewing them to the band when making sets for frequent use.

Try using cotton yarn if you expect repeated machine washing for better longevity and easier care.

I often make a matching set of multiple bands in different colors so people in a household can quickly distinguish theirs.

For a festive twist, add tiny embroidered stars or initials on the band to make the ear savers perfect gifts.

If you prefer a softer edge, use a decorative border around the band in a complementary color to finish the piece nicely.

I sometimes convert the full owl button into a keychain charm by adding a small loop, so you can carry a spare or give it as a little gift.

Common Mistakes & How to Fix Them

✗ Skipping the stitch marker during the continuous spiral can make rounds hard to follow; place a marker at the last stitch and move it each round. ✗ Forgetting to leave a long tail when fastening off prevents neat sewing and attachment; always leave the recommended tail lengths for sewing and securing buttons. ✗ Using inconsistent tension while working the band causes uneven width and length; maintain consistent tension and check your gauge by measuring length as you go. ✗ Not switching yarn/colors cleanly can leave stray tails and messy edges; change colors neatly and weave in ends or secure them as you change yarns. ✗ Overstuffing or stuffing unevenly (if stuffing is used for any embellishment) will distort shapes; stuff gradually and evenly to maintain form. ✗ Sewing buttons too close to the band edge can obstruct mask elastic; attach buttons slightly inside and test elastic placement before final sewing.

Harry Potter Ear Saver Pattern

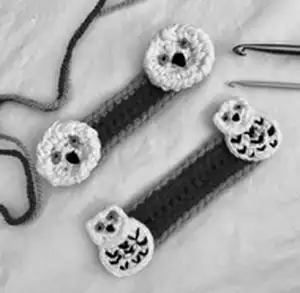
Make a charming Harry Potter-themed ear saver with adorable owl button accents to keep mask elastic comfortable. This quick, adaptable crochet pattern gives you two button styles — a simple owl face and a fuller owl — so you can choose your favorite. Youll find clear rounds, materials, and assembly steps to make matching sets for family and friends. Perfect for gifting or personal use, this project is fast, practical, and full of personality.

Beginner Friendly 1-2 Hours

Materials Needed for Harry Potter Ear Saver Pattern

— Main Fabric

  • 01
    Scarlet - medium weight yarn (#4) - approx 3 yds / 2.7 m - 0.06 oz / 1.7 g (for band)
  • 02
    Gold - medium weight yarn (#4) - approx 2.7 yds / 2.5 m - 0.05 oz / 1.4 g (for band trim and button details)
  • 03
    White - medium weight yarn (#4) - approx 4.6 yds / 4.2 m - 0.09 oz / 2.6 g (Owl Face Buttons version 1, per button)
  • 04
    Gold - medium weight yarn (#4) - approx 1 yd / 0.9 m - 0.02 oz / 0.57 g (Owl Face Buttons version 1, per button)
  • 05
    Black thread - approx 1 yd / 0.9 m (for pupils and beak, version 1)
  • 06
    White - fine weight yarn (#2) - approx 6.5 yds / 5.9 m - 0.07 oz / 2 g (Full Owl Buttons version 2, per head)
  • 07
    Gold - medium weight yarn (#4) - approx 0.5 yd / 0.46 m - 0.01 oz / 0.28 g (Full Owl Buttons version 2, for eye knots)
  • 08
    Black thread - approx 1 yd / 0.9 m (Full Owl Buttons version 2, for pupils, beak, and feather detail)

— Tools Required

  • 01
    Crochet hook size 5.0 mm (for band and owl face buttons version 1)
  • 02
    Crochet hook size 2.5 mm (for full owl buttons version 2)
  • 03
    Scissors
  • 04
    Sewing needle
  • 05
    Tapestry needle
  • 06
    Stitch marker (if desired)
  • 07
    Black sewing thread for details

Progress Tracker

0% Complete

— Finished Measurement :

Info :

Approx 5.5 in/14 cm long and 1.5 in/4 cm wide

— Abbreviations/Terminology (US) :

Infos :

approx - approximately. BLO - back loop only. ch - chain

— Abbreviations/Terminology (US) continued :

Infos :

FL - front loop. inc - increase (2 sc in same st). rnd(s) - round(s). sc - single crochet. sl - slip st. sl inc - increase (2 sl in same st). st(s) - stitch(es)

— Gauge :

Info :

Gauge is flexible, as is the yarn weight you use. Simply adjust the number of stitches in the band so that the ear saver is about 5.5 inches long.

— Notes :

Info :

Continuous Spiral: the yarn buttons are worked in a continuous spiral without joining. Use a stitch marker to mark the last stitch of each round, moving the marker as each round is completed, if desired.

Info :

Yarn: the ear protectors will need to hold up to repeated machine washing, so a cotton yarn is recommended, but certainly not required.

Info :

Sizing: the pattern will work for most, but can easily be adjusted by adding or subtracting ch sts from the band, if needed.

— Buttons - Version 1 - Owl Face (make 2) :

Info :

Working with white medium weight (4) yarn and 5 mm hook:

Round 1 :

4 sc into a magic ring. (4)

Round 2 :

inc in each st around. (8)

Round 3 :

using BLO - inc in each st around. (16)

Round 4 :

using FL left from previous rnd - inc in each st around. (16)

Info :

Fasten off, leaving a tail of approx 12 in/30 cm.

Info :

Using the tail of yarn, whip stitch through both sets of sts created in rnds 3 and 4.

— Buttons - Version 2 - Full Owl (make 2) :

Info :

Working with white fine weight (2) yarn and 2.5 mm hook

Head :

Rnd 1: 4 sc into a magic ring. (4)

Round 2 :

inc in each st around. (8)

Round 3 :

(sc, ch 2, sl) in next st, sl inc in next 3 sts, (sl, ch 2, sc) in next st, inc in each st around. (20)

Info :

Fasten off, leaving a long tail for sewing.

Body :

Rnd 1: 6 sc into a magic ring. (6)

Round 2 :

using BLO - inc in each st around. (12)

Round 3 :

using FL left from previous rnd - inc in each st around. (12)

Round 4 :

working through both sets of sts from rnds 3 and 4 - inc around. (24)

Info :

Fasten off, leaving a long tail for sewing.

— Band :

Info :

Working with scarlet yarn and 5 mm hook:

Round 1 :

ch 21. (21)

Round 2 :

beginning in 2nd ch from hook - sc 19, sc 3 in next st. Moving up the other side of chain - sc 18, inc in last ch. (42)

Info :

Switching to gold yarn:

Round 4 :

inc, sc 18, inc, sc, inc, sc 18, inc, sc. (46)

Info :

Fasten off.

— Assembly :

Owl Face Buttons and Band :

With a double strand of gold yarn, create two french knots for the owl's eyes. With black thread and a sewing needle, create the owl's pupils and beak.

Info :

Using long tails left after fastening off buttons, attach buttons securely at each end of band. Working around the outside of the center indent of the button (containing the eyes and nose) secures the button well while still allowing room for mask elastic to fit under buttons.

Info :

Weave in ends.

Full Owl Buttons and Band :

With head slightly in front of and overlapping the body, attach head to body using long tails left after fastening off head. With a single strand of gold yarn, create two french knots for the owl's eyes. With black thread and a sewing needle, create the owl's pupils, beak, and feather detail.

Info :

Using long tails left after fastening off owl bodies, and working between the feather details so they do not get covered up, attach buttons securely at each end of band. Make sure not to sew edges since mask elastic needs to fit underneath buttons.

Info :

Weave in ends.

Assembly Instructions

  • Attach owl face buttons to each end of the band using long tails left after fastening off, securing around the outside of the center indent so mask elastic will fit under buttons.
  • For full owl buttons, sew the head to the body with long tails so the head sits slightly in front and overlapping the body before attaching to the band.
  • Create owl eye highlights using a double strand of gold yarn for french knots and use black thread with a sewing needle to stitch pupils and beak details.
  • Switch color to gold and work around the center indent of each button when sewing to ensure the button is secure but leaves room for mask elastic.
  • Weave in all ends neatly and test mask elastic placement under buttons before final sewing to avoid sewing edges closed.

Important Notes

  • 💡Use a stitch marker when working the continuous spiral to mark the last stitch of each round for easier counting.
  • 💡Leave long tails when fastening off buttons and heads so you have enough yarn for sewing and attaching to the band securely.
  • 💡Adjust the number of chain stitches in the band to change the length, and test the band length against your mask to ensure proper fit.
  • 💡Weave in ends and secure embroidery details so they withstand repeated machine washing if desired.

This Harry Potter Ear Saver pattern combines practicality with delightful owl details to brighten a daily essential. Make a set for yourself or whip up multiples to gift to friends and family with ease. Quick to crochet and full of charm, these ear savers are as useful as they are adorable. 🧶✨🦉

You ask,

we answer.

FAQs

What size will the finished piece be?

The finished ear saver measures approximately 5.5 in / 14 cm long and 1.5 in / 4 cm wide using the recommended yarn and 5.0 mm hook.

Can I use different yarn weights for this pattern?

Yes, you can use different yarn weights, but the final size and the look of the buttons will change; adjust hook size and chain length accordingly.

Do I need prior crochet experience for this pattern?

This pattern is beginner friendly, so basic knowledge of single crochet, increases, chains, and working in the round is sufficient.

How long does this project typically take to complete?

Most crocheters can complete one ear saver with buttons in under two hours, though time will vary by experience and chosen button version.

How do I attach the buttons so mask elastic will fit?

Sew around the outside of the center indent of the button, leaving room for elastic to pass under the button; avoid sewing edges closed so elastic can fit.