About This Hat and Scarf Only Amigurumi Pattern
This pattern includes step-by-step instructions to crochet a plush pompom hat and two scarf variants sized for plush toys and small dolls. The design uses plush yarn and a 4 mm (G/6) hook for soft, squishy texture and quick progress. Clear rounds, stitch counts, and finishing notes make it accessible and fun to follow.

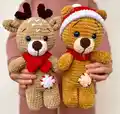
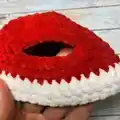
Youll get a red hat with a white trim pompom and two scarf options, one plain and one with a button closure. Perfect for gifting or finishing off your amigurumi with cozy holiday flair.
Why You'll Love This Hat and Scarf Only Amigurumi Pattern
I absolutely love this pattern because it turns simple plush yarn into a delightful accessory set that instantly adds personality to any toy. I enjoy how quickly the hat rounds build up — you see progress fast and get a finished pompom top in no time. The two scarf variants let me choose between a classic strip or a buttoned style for extra detail. I also appreciate that the pattern uses minimal materials and stays beginner-friendly while producing a professional-looking result.
Switch Things Up
I love experimenting with colorways on this pattern; try pastel shades for a softer look or bright contrasting colors for a festive feel.
I sometimes use a thinner yarn and smaller hook to create a tiny set for miniature toys, or a bulkier yarn and larger hook for a chunkier, more dramatic version.
I often swap the pompom for a crocheted flower or small star applique to create a seasonal variation that matches different holiday themes.
I like to add embroidery details on the scarf or hat brim to personalize each piece with initials or simple decorative lines.
Try adding decorative buttons, wooden beads, or a small ribbon to the scarf to make it more unique and secure it as a closure option.
If you want more texture, experiment with alternating rows of dc and sc for the hat trim instead of all dc, which gives a ridged effect.
I sometimes make the scarf longer or shorter by adding or removing rows to suit the toy size or the look I want to achieve.
Consider making a matching set in multiple sizes for a collection—mini, standard toy size, and larger dolls—by adjusting yarn weight and hook size.
I recommend testing the button placement on Variant 2 before sewing so you can adjust for tension and overlap; try different button styles for added charm.
For a washable option, choose a machine-washable plush yarn and secure seams well, then tumble dry low or reshape by hand after washing.
I also enjoy mixing two colors in the pompom for a marbled effect—just alternate strands when working rounds for subtle color blending.
Finally, try pairing these accessories with small crocheted mittens or a tiny bag to create a complete wardrobe for your plush toy as a fun gift set.
Common Mistakes & How to Fix Them
✗ Skipping the instruction to work in a spiral can cause visible seams and misaligned rows; always work continuously in spiral as directed and do not slip stitch at the end of rounds.
✗ Failing to change yarn color exactly at the noted round will disrupt the colorway of the hat trim; follow the instruction '!!! Change yarn to white' before Round 13 to keep the trim neat and even.
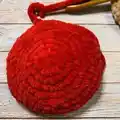
✗ Not leaving a long tail when fastening off the pompom makes sewing it onto the hat difficult; when you fasten off the pompom, leave a long tail specifically for sewing to the hat securely.
✗ Forgetting to make a turning chain at the end of scarf rows will distort the edge and stitch count; for both scarf variants, make the turning chain each row as instructed to maintain row count and neat edges.