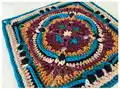
Create a beautifully textured crochet square with intricate rounds, layered stitches, and bold colorways. This pattern guides you step-by-step through each round so you can build a show-stopping motif for blankets, pillows, or decor. Youll enjoy layering stitches like clusters, Y-stitches, and post stitches to create rich texture and visual depth.
Progress Tracker
0% Complete
— Square :
Info :
Hook/Finished and blocked: 4.5 mm, 11" x 11"; 5 mm, 12" x 12". Crochet Terms: US terminology throughout. Skill Level: Ending Intermediate.
Info :
Yarn and Colors Used: I Love This Cotton (Worsted Weight), 100% cotton; Yarn Bee ~ Cotton Et Lin (Worsted Weight), 80% cotton, 20% linen. See colorway lists for exact color placement.
Round 1 :
In a double magic circle, ch 5 (as a dc AND ch 2); [dc, ch 1, dc; ch 2] 3 times; dc, ch 1; Join: slst to 3rd starting ch OR invisible join to 4th ch of rnd, fasten off. Counts: 8 dc, 4 ch-1 sp, 4 ch-2 sp (20 total)
Round 2 :
Note: Before starting, read the information in “Special Instructions” about slst join and starting the next rnd; Start in any ch-2 sp OR slst into ch-2 sp, then ch 2 (as start of 1st 3dc-cluster of rnd), *([3dc-cluster, ch 2] 3 times) in ch-2 sp-place st marker in 1st ch-2 sp only; sk dc, ch 1 AND dc*; REPEAT FROM * TO * 3 MORE TIMES; Join: slst to 1st 3-dc-cluster of rnd OR invisible join to 1st ch of rnd, fasten off. Counts: 12 3dc-cluster, 12 ch-2 sp (36 total)
Round 3 :
Start in marked st of rnd 2 OR slst into ch-2 sp, then ch 3 (as 1st dc of rnd), *[(3 dc) in ch-2 sp-remove marker; sk 3dc-cluster] 2 times; (2 hdc) in ch-2 sp, ch 3; working in rnd 1, FPsc around dc before ch-1 sp; (sc, tr, sc) in ch-1 sp; FPsc around next dc; ch 3, (2 hdc) in ch-2 sp of rnd 2 just worked, sk 3dc-cluster*; REPEAT FROM * TO * 3 MORE TIMES; Join: slst to 3rd starting ch OR invisible join to 2nd dc of rnd, fasten off. Counts: 8 sc, 8 FPsc, 16 hdc, 24 dc, 4 tr, 8 ch-3 sp (84 total) Right-Handed / Left-Handed
Round 4 :
Start in 1st dc of 1st (3 dc) group OR ch 4 (as 1st dc and ch 1 of rnd), *([dc, ch 1] 2 times; dc) in dc; sk dc, [(dc, ch 1, dc) in dc] 2 times; sk dc, [(dc, ch 1] 2 times; dc) in dc; ch 2, sk to next dc*; REPEAT FROM * TO * 3 MORE TIMES; Join: slst to 3rd starting ch, fasten off OR invisible join to 1st ch of rnd if using a standing st, fasten off. Counts: 40 dc, 24 ch-1 sp, 4 ch-2 sp (72 total)
Round 5 :
Start in any ch-2 sp, * (dc, ch 2, dc) in ch-2 sp; sk dc, (2 sc) in ch-1 sp; sk dc, (2 hdc) in ch-1 sp; [sk 2 dc, (3 dc) in ch-1 sp] 2 times; sk 2 dc, (2 hdc) in ch-1 sp, sk dc; (2 sc) in ch-1 sp, sk dc*; REPEAT FROM * TO * 3 MORE TIMES; Join: slst to 1st dc of rnd, fasten off OR invisible join to 1st ch of rnd, fasten off. Counts: 16 sc, 16 hdc, 32 dc, 4 ch-2 sp (72 total)
Round 6 :
Start in sc before any (dc, ch 2, dc), *hdc in sc; ch 2, sk (dc, ch 2, dc); hdc in 2 sc; dc in hdc; (2 dc) in hdc; dc in 6 dc; (2 dc) in hdc; dc in hdc; hdc in sc*; REPEAT FROM * TO * 3 MORE TIMES; Join: slst to 1st hdc of rnd, fasten off OR invisible join to 1st ch of rnd, fasten off. Counts: 16 hdc, 48 dc, 4 ch-2 sp (72 total)
Round 7 :
Start in hdc before any ch-2 sp, *hdc in 3LP of hdc; ch 1, fold ch-2 sp to the back, EXT-puff in ch-2 sp of rnd 5; ch 1, hdc in 3LP of 2 hdc AND 3 dc; BP hdc around 6 dc; hdc in 3LP of 3 dc AND hdc*; REPEAT FROM * TO * 3 MORE TIMES; Join: slst to 1st hdc of rnd, fasten off OR invisible join to 1st ch of rnd, fasten off. Counts: 40 hdc, 24 BPhdc, 4 EXT-puff, 8 ch-1 sp (76 total)
Round 8 :
Note: when working 2dc-clusters, fold ch 1 back to expose ch-2 sp of rnd 6; Start in unworked ch-2 sp of rnd 6 before EXT-puff of rnd 7, *2dc-cluster in ch-2 sp; sk ch-1 sp of rnd 7; FPhdc around EXT-puff of rnd 7; 2dc-cluster in previously worked ch-2 sp; ch 2, sk ch-1 sp AND hdc; hdc in 4 hdc AND BP hdc of rnd 7; (2 hdc) in BP hdc; hdc in 3 BP hdc; (2 hdc) in BP hdc; hdc in 5 hdc, ch 2*; REPEAT FROM * TO * 3 MORE TIMES; Join: slst to 1st 2dc-cluster of rnd, fasten off OR invisible join to 1st FPhdc of rnd, fasten off. Counts: 68 hdc, 8 2dc-cluster, 4 FPhdc, 8 ch-2 sp (96 total) Right-Handed / Left-Handed
Round 9 :
Start in ch-2 sp immediately before any 2dc-cluster, FPhdc AND 2dc-cluster, *(Y st, ch 1, dtr-Y st) in ch-2 sp; ch 1, FPdtr2tog around next 2-2dc-clusters of rnd 8, skipping FPhdc; ch 1, (dtr-Y st, ch 1, Y st) in ch-2 sp; sk 3 hdc, dc in 4 hdc; hdc in 3 hdc; dc in 4 hdc; sk 3 hdc*; REPEAT FROM * TO * 3 MORE TIMES; Join: slst to tr of 1st Y st of rnd OR invisible join to ch of 1st Y st of rnd, fasten off. Counts: 12 hdc, 32 dc, 8 Y st, 8 dtr-Y st, 4 FPdtr2tog, 16 ch-1 sp (80 total)
Round 10 :
Note: When instructed to work in ch sp(s) of Y st or dtr-Y st - sk the dc, tr, or dtr that are incorporated in Y-st and dtr-Y st. Start in ch-1 sp of 1st Y st after 4 dc OR slst into ch-1 sp of Y st, then ch 2 (as 1st hdc of rnd), *(2 hdc) in ch-1 sp of Y st; dc in ch-1 sp; (2 dc) in ch-1 sp of dtr-Y st; (3 tr) in ch-1 sp; ch 2 as a corner, sk FPdtr2tog; (3 tr) in ch-1 sp; (2 dc) in ch-1 sp of dtr-Y st; dc in ch-1 sp; (2 hdc) in ch-1 sp of Y st; BP hdc around 4 dc, 3 hdc AND 4 dc*; REPEAT FROM * TO * 3 MORE TIMES; Join: slst to 2nd starting ch, fasten off OR invisible join to 2nd hdc of rnd, fasten off. Counts: 16 hdc, 44 BPhdc, 24 dc, 24 tr, 4 ch-2 corner sp (108 total/27 per side)
Round 11 :
Start in any ch-2 corner sp, *((2 dc, ch 2, 2 dc) in ch-2 corner sp; dc in 3 tr, 3 dc AND 2 hdc; ch 1, sk 2 BP hdc; [(2dc-cluster, ch 1, 2dc-cluster) in BP hdc; sk 2 BPhdc] 2 times; (2dc-cluster, ch 1, 2dc-cluster) in BPhdc; ch 1, sk 2 BPhdc; dc in 2 hdc; 3 dc AND 3 tr)*; REPEAT FROM * TO * 3 MORE TIMES; Join: slst to 1st dc of rnd, fasten off OR invisible join to 2nd dc of rnd, fasten off. Counts: 80 dc, 24 2dc-cluster, 20 ch-1 sp, 4 ch-2 corner sp (124 total/31 per side)
Round 12 :
Start in any ch-2 corner sp, *(2 dc, ch 2, 2 dc) in ch-2 corner sp; BPdc around 10 dc; ch 2, sk ch-1 sp AND 2dc-cluster; [(4 hdc) in ch-1 sp; ch 2, sk 2 2dc-clusters] 2 times; (4 hdc) in ch-1 sp; ch 2, sk 2dc-cluster AND ch-1 sp; BPdc around 10 dc*; REPEAT FROM * TO * 3 MORE TIMES; Join: slst to 1st dc of rnd, fasten off OR invisible join to 2nd dc of rnd, fasten off. Counts: 48 hdc, 16 dc, 80 BPdc, 16 ch-2 sp, 4 ch-2 corner sp (176 total/44 per side)
Round 13 :
Start in any ch-2 corner sp, *(hdc, ch 2, hdc) in ch-2 corner sp; hdc in 2 dc AND 10 BPdc; When working dc in 2dc-cluster of rnd 11, always work in front of ch-2 sp of rnd 12; dc in 2dc-cluster of rnd 11; ch 1, sk ch-2 sp of rnd 12; [FPhdc around all 4 hdc as one; ch 1, sk 2dc-cluster of rnd 11 AND ch-2 sp of rnd 12; dc in next 2dc-cluster of rnd 11, ch 1] 2 times; FPhdc around all 4 hdc as one; ch 1, sk ch-2 sp of rnd 12 AND 2dc-cluster of rnd 11; dc in ch 1 of rnd 11 - NOT THE SP; hdc in 10 BPdc AND 2 dc*; REPEAT FROM * TO * 3 MORE TIMES; slst to 1st hdc of rnd, fasten off OR invisible join to 1st ch of rnd, fasten off; Counts: 104 hdc, 12 FPhdc, 16 dc, 24 ch-1 sp, 4 ch-2 corner sp (156 total/39 per side)
Round 14 :
Start in 2nd hdc of any side, *sc in 12 hdc, dc AND ch-1 sp; sk FPhdc, sc in ch-1 sp AND dc; sk ch-1 sp, sc in FPhdc; sk ch-1 sp, sc in dc AND 13 hdc; ch 3 as a corner, sk ch-2 corner sp; sc in hdc*; REPEAT FROM * TO * 3 MORE TIMES; Join: slst to 1st sc of rnd, fasten off OR invisible join to 2nd sc of rnd, fasten off. Counts: 140 sc, 4 ch-3 corner sp (140 total/35 per side)
Round 15 :
Start in any ch-3 corner sp, *dc in ch-3 corner sp; (tr, ch 2, tr) in ch-2 corner sp of rnd 13; dc in previously worked ch-3 corner sp of rnd 14; dc in 3LP of sc; NOTE: For those unable to work the 3LP dc into the sc, a BLdc would achieve a similar look. REPEAT FROM * TO * 3 MORE TIMES; Join: invisible join to 1st tr of rnd, fasten off. Counts: 148 dc, 8 tr, 4 ch-2 corner sp (156 total/39 per side)
Info :
Special Instructions: All rnds begin with a standing stitch and end with an invisible join unless another option is available. Some rnds may include instructions for a slst join and if not changing colors, how to start the next rnd. When used, the ch(s) replaces the 1st st shown in the instructions of the rnd. Follow symbol guide and asterisk, parentheses and bracket directions exactly.
This Head Over Heels Square pattern brings textured stitches and colorwork together for a beautiful finished motif. Whether you make a single decorative cushion cover or a full afghan, each square is a little piece of handmade joy. Block and join them with care to create a stunning, cohesive project. 🧶✨