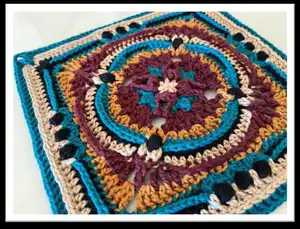
Make a richly textured, colorful crochet square that combines clusters, puff stitches, front- and back-post stitches, Y-stitches and more. This square is written for intermediate crocheters and includes two colorway examples so you can explore contrast and texture. Follow the step-by-step rounds and photos to create a striking motif perfect for blankets, cushions or a statement afghan square.
Progress Tracker
0% Complete
— Rounds :
Info :
STITCHES USED double magic circle rnd (Round) standing stitch sc (Single crochet) invisible join FPsc (Front post single crochet) slst (Slipstitch) hdc (Half double crochet) st(s) (Stitch/stitches) FPhdc (Front post half double crochet) sp (Space) BPhdc (Back post half double crochet) ch (Chain) dc (Double crochet) yo (Yarn over) BPdc (Back post double crochet) 2dc-cluster (2 double crochet cluster) 3dc-cluster (3 double crochet cluster) tr (Treble crochet) FPdtr2tog (Front post double treble crochet 2 together) EXT-puff (Extended puff stitch) Y st (Y Stitch) dtr-Y st (Double treble Y stitch) 3LP (Third loop of stitch)
Info :
Special Instructions: All rnds begin with a standing stitch and end with an invisible join unless another option is available. Some rnds may include instructions for a slst join and if not changing colors, how to start the next rnd. When used, the ch(s) replaces the 1st st shown in the instructions of the rnd.
Round 1 :
In a double magic circle, ch 5 (as a dc AND ch 2); [dc, ch 1, dc; ch 2] 3 times; dc, ch 1; Join: slst to 3rd starting ch OR invisible join to 4th ch of rnd, fasten off. Counts: 8 dc, 4 ch-1 sp, 4 ch-2 sp (20 total)
Round 2 :
Note: Before starting, read the information in "Special Instructions" about slst join and starting the next rnd. Start in any ch-2 sp OR slst into ch-2 sp, then ch 2 (as start of 1st 3dc-cluster of rnd), *([3dc-cluster, ch 2] 3 times) in ch-2 sp-place st marker in 1st ch-2 sp only; sk dc, ch 1 AND dc*; REPEAT FROM * TO * 3 MORE TIMES; Join: slst to 1st 3-dc-cluster of rnd OR invisible join to 1st ch of rnd, fasten off. Counts: 12 3dc-cluster, 12 ch-2 sp (36 total)
Round 3 :
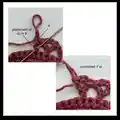
Start in marked st of rnd 2 OR slst into ch-2 sp, then ch 3 (as 1st dc of rnd), *[(3 dc) in ch-2 sp-remove marker; sk 3dc-cluster] 2 times; (2 hdc) in ch-2 sp, ch 3; working in rnd 1, FPsc around dc before ch-1 sp; (sc, tr, sc) in ch-1 sp; FPsc around next dc; ch 3, (2 hdc) in ch-2 sp of rnd 2 just worked, sk 3dc-cluster*; REPEAT FROM * TO * 3 MORE TIMES; Join: slst to 3rd starting ch OR invisible join to 2nd dc of rnd, fasten off. Counts: 8 sc, 8 FPsc, 16 hdc, 24 dc, 4 tr, 8 ch-3 sp (84 total) Right-Handed / Left-Handed
Round 4 :
Start in 1st dc of 1st (3 dc) group OR ch 4 (as 1st dc and ch 1 of rnd), *([dc, ch 1] 2 times; dc) in dc; sk dc, [(dc, ch 1, dc) in dc] 2 times; sk dc, [(dc, ch 1] 2 times; dc) in dc; ch 2, sk to next dc*; REPEAT FROM * TO * 3 MORE TIMES; Join: slst to 3rd starting ch, fasten off OR invisible join to 1st ch of rnd if using a standing st, fasten off. Counts: 40 dc, 24 ch-1 sp, 4 ch-2 sp (72 total)
Round 5 :
Start in any ch-2 sp, * (dc, ch 2, dc) in ch-2 sp; sk dc, (2 sc) in ch-1 sp; sk dc, (2 hdc) in ch-1 sp; [sk 2 dc, (3 dc) in ch-1 sp] 2 times; sk 2 dc, (2 hdc) in ch-1 sp, sk dc; (2 sc) in ch-1 sp, sk dc*; REPEAT FROM * TO * 3 MORE TIMES; Join: slst to 1st dc of rnd, fasten off OR invisible join to 1st ch of rnd, fasten off. Counts: 16 sc, 16 hdc, 32 dc, 4 ch-2 sp (72 total)
Round 6 :
Start in sc before any (dc, ch 2, dc), *hdc in sc; ch 2, sk (dc, ch 2, dc); hdc in 2 sc; dc in hdc; (2 dc) in hdc; dc in 6 dc; (2 dc) in hdc; dc in hdc; hdc in sc*; REPEAT FROM * TO * 3 MORE TIMES; Join: slst to 1st hdc of rnd, fasten off OR invisible join to 1st ch of rnd, fasten off. Counts: 16 hdc, 48 dc, 4 ch-2 sp (72 total)
Round 7 :
Start in hdc before any ch-2 sp, *hdc in 3LP of hdc; ch 1, fold ch-2 sp to the back, EXT-puff in ch-2 sp of rnd 5; ch 1, hdc in 3LP of 2 hdc AND 3 dc; BPhdc around 6 dc; hdc in 3LP of 3 dc AND hdc*; REPEAT FROM * TO * 3 MORE TIMES; Join: slst to 1st hdc of rnd, fasten off OR invisible join to 1st ch of rnd, fasten off. Counts: 40 hdc, 24 BPhdc, 4 EXT-puff, 8 ch-1 sp (76 total)
Round 8 :
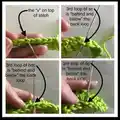
Note: when working 2dc-clusters, fold ch 1 back to expose ch-2 sp of rnd 6; Start in unworked ch-2 sp of rnd 6 before EXT-puff of rnd 7, *2dc-cluster in ch-2 sp; sk ch-1 sp of rnd 7; FPhdc around EXT-puff of rnd 7; 2dc-cluster in previously worked ch-2 sp; ch 2, sk ch-1 sp AND hdc; hdc in 4 hdc AND BPhdc of rnd 7; (2 hdc) in BPhdc; hdc in 3 BPhdc; (2 hdc) in BPhdc; hdc in 5 hdc, ch 2*; REPEAT FROM * TO * 3 MORE TIMES; Join: slst to 1st 2dc-cluster of rnd, fasten off OR invisible join to 1st FP hd c of rnd, fasten off. Counts: 68 hdc, 8 2dc-cluster, 4 FPhdc, 8 ch-2 sp (96 total) Right-Handed / Left-Handed
Round 9 :
Start in ch-2 sp immediately before any 2dc-cluster, FPhdc AND 2dc-cluster, *(Y st, ch 1, dtr-Y st) in ch-2 sp; ch 1, FPdtr2tog around next 2-2dc-clusters of rnd 8, skipping FPhdc; ch 1, (dtr-Y st, ch 1, Y st) in ch-2 sp; sk 3 hdc, dc in 4 hdc; hdc in 3 hdc; dc in 4 hdc; sk 3 hdc*; REPEAT FROM * TO * 3 MORE TIMES; Join: slst to tr of 1st Y st of rnd OR invisible join to ch of 1st Y st of rnd, fasten off. Counts: 12 hdc, 32 dc, 8 Y st, 8 dtr-Y st, 4 FPdtr2tog, 16 ch-1 sp (80 total)
Round 10 :
Note: When instructed to work in ch sp(s) of Y st or dtr-Y st - sk the dc, tr, or dtr that are incorporated in Y-st and dtr-Y st. Start in ch-1 sp of 1st Y st after 4 dc OR slst into ch-1 sp of Y st, then ch 2 (as 1st hdc of rnd), *(2 hdc) in ch-1 sp of Y st; dc in ch-1 sp; (2 dc) in ch-1 sp of dtr-Y st; (3 tr) in ch-1 sp; ch 2 as a corner, sk FPdtr2tog; (3 tr) in ch-1 sp; (2 dc) in ch-1 sp of dtr-Y st; dc in ch-1 sp; (2 hdc) in ch-1 sp of Y st; BPhdc around 4 dc, 3 hdc AND 4 dc*; REPEAT FROM * TO * 3 MORE TIMES; Join: slst to 2nd starting ch, fasten off OR invisible join to 2nd hdc of rnd, fasten off. Counts: 16 hdc, 44 BPhdc, 24 dc, 24 tr, 4 ch-2 corner sp (108 total/27 per side)
Round 11 :
Start in any ch-2 corner sp, * (2 dc, ch 2, 2 dc) in ch-2 corner sp; dc in 3 tr, 3 dc AND 2 hdc; ch 1, sk 2 BPhdc; [(2dc-cluster, ch 1, 2dc-cluster) in BPhdc; sk 2 BPhdc] 2 times; (2dc-cluster, ch 1, 2dc-cluster) in BPhdc; ch 1, sk 2 BPhdc; dc in 2 hdc; 3 dc AND 3 tr*; REPEAT FROM * TO * 3 MORE TIMES; Join: slst to 1st dc of rnd, fasten off OR invisible join to 2nd dc of rnd, fasten off. Counts: 80 dc, 24-2dc-cluster, 20 ch-1 sp, 4 ch-2 corner sp (124 total/31 per side)
Round 12 :
Start in any ch-2 corner sp, *(2 dc, ch 2, 2 dc) in ch-2 corner sp; BPdc around 10 dc; ch 2, sk ch-1 sp AND 2dc-cluster, [(4 hdc) in ch-1 sp; ch 2, sk 2 2dc-clusters] 2 times; (4 hdc) in ch-1 sp; ch 2, sk 2dc-cluster AND ch-1 sp; BPdc around 10 dc*; REPEAT FROM * TO * 3 MORE TIMES; Join: slst to 1st dc of rnd, fasten off OR invisible join to 2nd dc of rnd, fasten off. Counts: 48 hdc, 16 dc, 80 BPdc, 16 ch-2 sp, 4 ch-2 corner sp (176 total/44 per side)
Round 13 :
Start in any ch-2 corner sp, *(hdc, ch 2, hdc) in ch-2 corner sp; hdc in 2 dc AND 10 BPdc; When working dc in 2dc-cluster of rnd 11, always work in front of ch-2 sp of rnd 12, dc in 2dc-cluster of rnd 11; ch 1, sk ch-2 sp of rnd 12; [FPhdc around all 4 hdc as one; ch 1, sk 2dc-cluster of rnd 11 AND ch-2 sp of rnd 12; dc in next 2dc-cluster of rnd 11, ch 1] 2 times; FPhdc around all 4 hdc as one; ch 1, sk ch-2 sp of rnd 12 AND 2dc-cluster of rnd 11; dc in ch 1 of rnd 11 - NOT THE SP; hdc in 10 BPdc AND 2 dc*; REPEAT FROM * TO * 3 MORE TIMES; slst to 1st hdc of rnd, fasten off OR invisible join to 1st ch of rnd, fasten off; Counts: 104 hdc, 12 FPhdc, 16 dc, 24 ch-1 sp, 4 ch-2 corner sp (156 total/39 per side)
Round 14 :
Start in 2nd hdc of any side, *sc in 12 hdc, dc AND ch-1 sp; sk FPhdc, sc in ch-1 sp AND dc; sk FPhdc, sc in FPhdc; sk ch-1 sp, sc in dc AND ch-1 sp; sk FPhdc, sc in ch-1 sp, dc AND 13 hdc; ch 3 as a corner, sk ch-2 corner sp; sc in hdc*; REPEAT FROM * TO * 3 MORE TIMES; Join: slst to 1st sc of rnd, fasten off OR invisible join to 2nd sc of rnd, fasten off. Counts: 140 sc, 4 ch-3 corner sp (140 total/35 per side)
Round 15 :
Start in any ch-3 corner sp, *dc in ch-3 corner sp; (tr, ch 2, tr) in ch-2 corner sp of rnd 13; dc in previously worked ch-3 corner sp of rnd 14; dc in 3LP of 35 sc*; NOTE: For those unable to work the 3LP dc into the sc, a Bldc would achieve a similar look. REPEAT FROM * TO * 3 MORE TIMES; Join: invisible join to 1st tr of rnd, fasten off. Counts: 148 dc, 8 tr, 4-ch 2 corner sp (156 total/39 per side)
This Head Over Heels Square adds bold texture and playful stitchwork to any blanket or cushion project. The detailed round-by-round instructions pair with photos so you can follow along with confidence. Try both colorways or make it your own with a fresh palette — the result is a show-stopping square. 🧶✨🧵