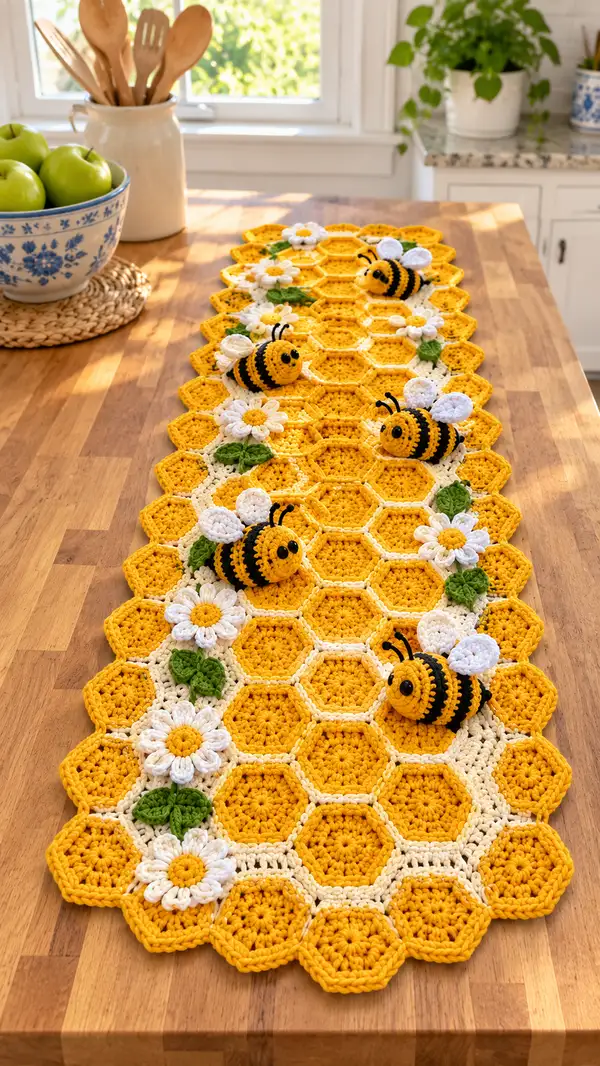
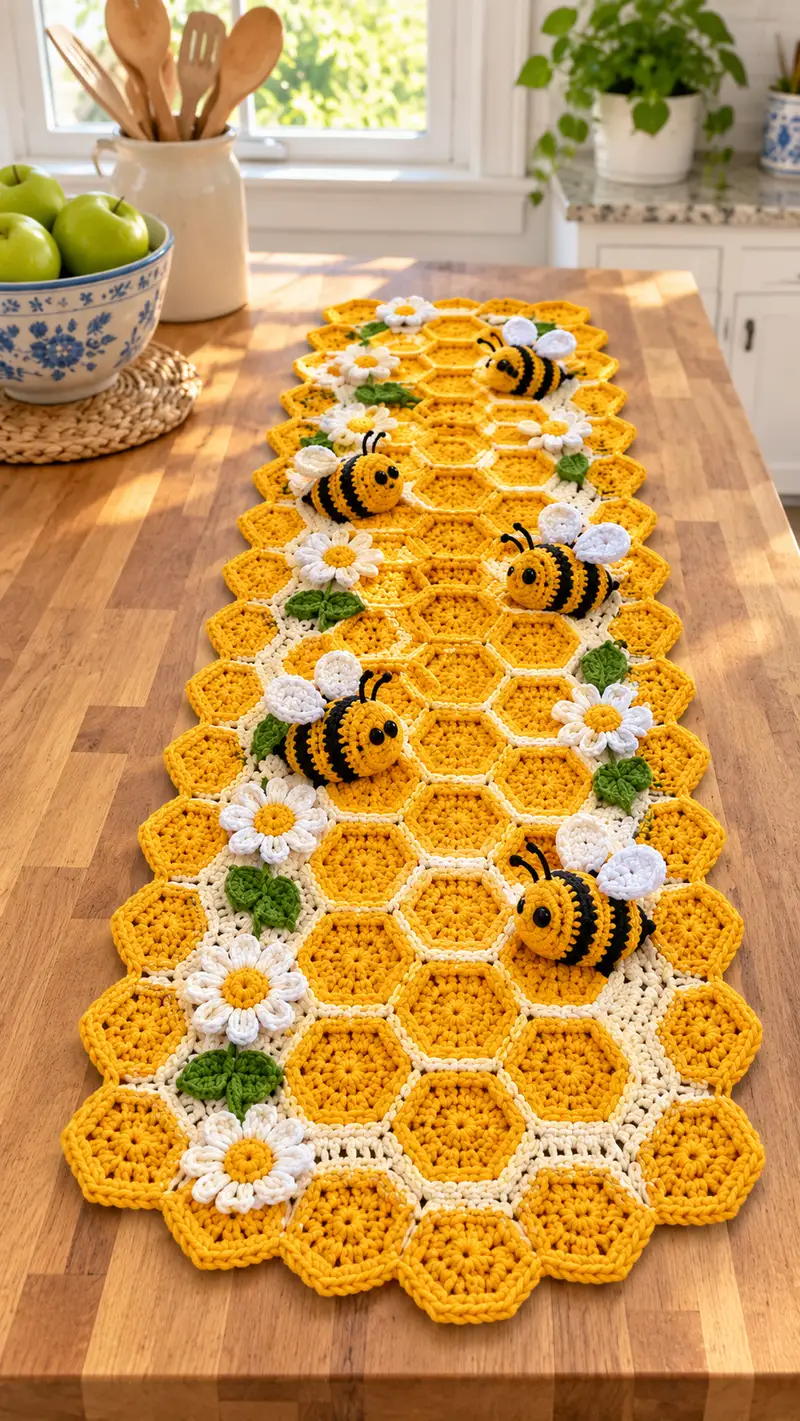
Sunny honeycomb motifs combine with adorable 3D bumblebees, daisies, and leaves to create a cheerful table runner. This pattern uses hexagon motifs joined with a soft cream lattice, plus detachable amigurumi bees and floral appliques for a whimsical centerpiece. Perfect for brightening a kitchen table, mantle or buffet, the runner features textured stitches, raised petals, and playful 3D elements.
Progress Tracker
0% Complete
— Hexagon Motif :
Round 1 :
6 sc in magic ring (6)
Round 2 :
Inc in each st around (12)
Round 3 :
(1 sc, inc) x 6 (18)
Round 4 :
(2 sc, inc) x 6 (24)
Round 5 :
(3 sc, inc) x 6 (30)
Info :
Use Bright Yellow yarn for the main hexagon. Keep tension even so hexagons lie flat; if cupping occurs, tighten tension or reduce hook by one size
Round 6 :
(4 sc, inc) x 6 (36)
Round 7 :
(5 sc, inc) x 6 (42)
Round 8 :
1 sc in each st around (42) Fasten off and weave in ends or leave a short tail for join
Info :
These rounds create a flat hexagon. Trim or neaten the center tail. Make X hexagons to desired runner width and length—in the sample photo the layout is 5 across with 10 across the length (total 50 hexagons). Adjust quantity to fit your table.
— Lattice/Join Rows :
Info :
Use Soft Cream yarn to join hexagons. Decide on layout and pin hexagons in final arrangement. Join-as-you-go (JAYG) or whip-stitch join both work; JAYG gives a tidy connected finish and prevents shifting.
Round 1 (Join pass) :
With cream, join at one point between two adjacent hexagons: ch1, sc in same st, *ch3, skip 2 sts on hex edge, sc in next st of both hexagons to join* repeat across edge. This creates a decorative lattice gap between motifs.
Round 2 :
Once joined across a row, work 1 sc in each exposed edge stitch along the cream lattice to stabilize the join (work even; stitch count varies with layout). Fasten off and weave ends for that row.
Info :
For the runner sample, alternate full hex rows and half-hex offsets to create scalloped edge. Pin carefully before joining and check that honeycomb cells align. Work joining rows from center outward for best control.
— Runner Border and Edge Shaping :
Round 1 :
With Bright Yellow, attach at any outer hex continuing around full runner: ch1, sc evenly around outer edges placing 2 sc in corner points (where two edges meet) to prevent tight corners. Count approximate stitches as you go and aim for even scallop (stitch count depends on runner size).
Round 2 :
1 sc in each st BLO around (this creates a subtle ridge and defines hex edges). Fasten off after full round.
Info :
Use BLO for row 2 to create a defined hex ridge. If you prefer a flatter edge, work regular sc instead.
Round 3 :
Optional scalloped trim: Join cream yarn at a corner, *(ch2, 3 dc in next st, ch2, sl st in next st)* repeat to create decorative scallops. This is purely decorative and helps the runner feel finished.
Info :
Blocking the runner lightly after assembly will help motifs lay flat. Use pins and a steam iron at safe distance or wet-block on a flat surface.
— Daisy (Make multiple) :
Round 1 :
With Bright Yellow, 6 sc in magic ring (6)
Round 2 :
Inc in each st around (12)
Round 3 :
(1 sc, inc) x 6 (18) Fasten off yellow and join White for petals
Info :
Keep daisies lightly stuffed (optional) or leave flat. For raised petals, work petals in front loop only (FLO) of round 3 to create a high center ridge.
Round 4 :
Join white in any st. *Ch2, (3 dc, ch2, sl st) all in same st* - this creates one petal. Sl st to next st, repeat for a total of 8 petals around (18 base stitches = work over alternate stitches to get 8 petals). Fasten off and weave ends.
Round 5 :
For a fuller petal look, work a second row of petals: join in base between petals, *sl st, ch2, 3 dc in same base, sl st* repeat to match petals and offset them slightly. Fasten off.
Info :
Make at least 6-8 daisies for the runner sample. Position daisies on alternating cream lattice spaces for balanced design.
— Leaf (Make multiple) :
Round 1 :
With Leaf Green, ch7, sc in 2nd ch from hook, hdc in next, dc in next 2, hdc in next, sc in last (6 sts) turn to work down other side: sc, hdc, dc, dc, hdc, sc across to the base. Sl st to join to starting st. Fasten off and leave tail for sewing.
Info :
Make small veins by embroidering a central line with green yarn or a contrasting shade for realism. Leaves are placed near daisies and bees for composition balance.
— Bumblebee Amigurumi - Head :
Round 1 :
6 sc in magic ring (6)
Round 3 :
(1 sc, inc) x 6 (18)
Round 4 :
(2 sc, inc) x 6 (24)
Round 5 :
(3 sc, inc) x 6 (30)
Round 6 :
(4 sc, inc) x 6 (36)
Info :
Use Bright Yellow for the head base. Keep stitches tight so stuffing doesn't show. Place safety eyes between rounds 8-9 about 6-7 stitches apart depending on desired face width.
Round 7 :
(5 sc, inc) x 6 (42)
Round 8 :
1 sc in each st around (42)
Round 9 :
1 sc in each st around (42)
Round 10 :
1 sc in each st around (42)
Info :
Insert safety eyes now between rounds 8-9 with approximately 6 stitches between them. If using embroidered eyes, mark positions with pins and embroider later. Start light stuffing now to shape the head.
Round 11 :
(5 sc, dec) x 6 (36)
Round 12 :
(4 sc, dec) x 6 (30)
Round 13 :
(3 sc, dec) x 6 (24)
Info :
Continue stuffing as you decrease. Use small amounts of fiberfill pushed into the face with a stuffing tool or blunt pencil to avoid lumps and ensure smooth roundness.
Round 14 :
(2 sc, dec) x 6 (18)
Round 15 :
(1 sc, dec) x 6 (12)
Round 16 :
6 dec (6) Fasten off leaving long tail for sewing (6)
Info :
Weave the tail through the remaining 6 sts and pull tight to close. Secure with several stitches on the inside. This completes the head. Add small embroidered smile below eyes if desired.
— Bumblebee Amigurumi - Body :
Round 1 :
6 sc in magic ring (6)
Round 3 :
(1 sc, inc) x 6 (18)
Round 4 :
(2 sc, inc) x 6 (24)
Round 5 :
(3 sc, inc) x 6 (30)
Info :
Change to Black yarn for first stripe at the end of Round 5 using an invisible join: finish last sc of Round 5 with new color, carry yarn neatly to next round if you prefer stripes continuous.
Round 6 (Black stripe) :
1 sc in each st around (30) - Black (30)
Round 7 (Yellow) :
Change to Bright Yellow. 1 sc in each st around (30)
Round 8 (Black) :
Change to Black. 1 sc in each st around (30)
Round 9 (Yellow) :
Change to Bright Yellow. 1 sc in each st around (30)
Info :
Alternate 1 round black and 1 round yellow to create stripes. For a slightly longer body add an extra yellow round at the widest center. Keep track of stripe sequence to match bees consistently.
Round 10 (Black) :
1 sc in each st around (30)
Round 11 (Yellow) :
1 sc in each st around (30)
Round 12 :
(4 sc, dec) x 5 + (sc in last 4 sts) (25) - begin shaping (mathematical note: 30 - 5 dec = 25)
Round 13 :
(3 sc, dec) x 5 (20)
Info :
Stuff body firmly but not overfilled; aim for a slightly elongated oval that sits comfortably on the hexagon. Leave the top opening (where head attaches) slightly larger if you will sew the head on rather than joining by stitches.
Round 14 :
(2 sc, dec) x 5 (15)
Round 15 :
(1 sc, dec) x 5 (10)
Round 16 :
5 dec (5) Fasten off leaving long tail for closing and for sewing to head (5)
Info :
Weave tail through remaining 5 sts and close. Use long tail to sew body to head securely, aligning seam where the last yellow stripe meets the head for a natural look.
— Bumblebee Amigurumi - Underbody Striping Details :
Round 1 :
If you want more pronounced stripes, embroider thin black lines over the crocheted rounds using duplicate stitch. Mark evenly spaced lines around the widest part of the body before embroidering.
Info :
When changing color every round, secure ends on the inside of the piece or invisibly weave them into seam to keep bees looking tidy from all angles.
— Bumblebee Amigurumi - Wings (Make 2 per bee) :
Round 1 :
With White, ch5, sc in 2nd ch from hook, hdc in next, dc in next, hdc in next; rotate to work on other side of foundation chain: hdc, dc, hdc, sc to join; sl st to first st and fasten off. Shape and flatten slightly.
Round 2 :
Optional texture: Join white and work 1 sc around wing edge (about 12 sc) to tidy. Fasten off leaving tail for sewing.
Info :
Position wings on top of the bee body approximately two stripes back from the head. Sew through body rounds to anchor wings so they stand up slightly.
— Bumblebee Amigurumi - Antennae (Make 2) :
Round 1 :
With Black, ch7, sl st in 2nd ch from hook through entire chain to create gentle curve (7 loops). Fasten off leaving tail for sewing. Optionally insert a short piece of pipe cleaner or floral wire before sewing and fold wire end securely inside stuffing.
Info :
Antennae can be crocheted thicker by chaining more and working a row of sc back along chain for a sturdier look. Sew into head at top-center between rounds 5-6 and shape gently forward.
— Bumblebee Amigurumi - Stinger :
Round 1 :
With Black, 6 sc in magic ring (6)
Round 2 :
(1 sc, inc) x 3 (9)
Round 3 :
1 sc around (9) Fasten off leaving tail for sewing. Slightly stuff and sew to back end of body before final closing.
Info :
Sew stinger firmly and secure with several passes. If making bees removable, attach with a small loop and button under body instead of permanent sewing.
— Daisy Attachment Prep :
Info :
Arrange daisies along the cream lattice in clusters of 2-3 with leaves beneath. Sew daisies in place through the center yellow disk using matching yarn, taking a few stitches into the lattice to anchor.
Info :
If you prefer removable decorations, sew a small felt circle to the runner and attach daisy centers with a few stitches to the felt rather than the runner itself.
— Final Assembly Notes and Decorative Options :
Info :
Make 3-5 bees for the runner sample and place them spaced along the central line or cluster them near floral groupings. Sew bees securely through body base to the lattice; hide tails and knots inside stuffing where possible.
Info :
For a more playful look, experiment with slightly larger daisies or alternate accent colors (pale pink centers or cream petals). You can also add a few loose crocheted petals or leaves for a more natural scattered look.
Info :
Clean up all ends by weaving tails through inside of motifs or along lattice joins. Block lightly to flatten motifs and help sewn elements sit flush.
Completing this runner is such a rewarding journey—each hexagon clicks into place like a tiny patch of sunshine! The 3D bees and daisies bring joyful personality to the finished piece, and the modular motif layout means you can make it any length you wish. This pattern is perfect for creating a cheerful table centerpiece or a thoughtful handmade gift. 🐝🌼🧶