🧢 Beautiful ✨ Detailed πŸ’ Adorable

Hungry Hamsters Amigurumi Pattern

Hungry Hamsters Amigurumi Pattern
4.9β˜… Rating
5-7 Hours Time Needed
3.8K Made This
βœ‚οΈ

Intermediate Level

Ideal for those with basic crochet experience, featuring slightly more advanced stitches and techniques to expand your skills.

⏱️

Weekend Treat

Takes 5-7 hours, making it an enjoyable project to finish over a couple of days.

🧸

Cute Companion

An adorable friend to cherish, handcrafted with love to bring comfort and joy for years to come.

About This Hungry Hamsters Amigurumi Pattern

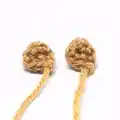
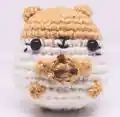
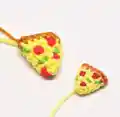
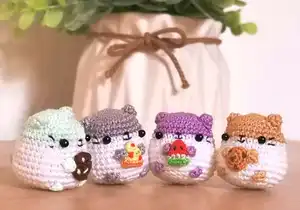
This pattern creates tiny, lovable hamsters in both palm-sized and mini scales, each holding a tiny snack. It includes full round-by-round instructions for the body, legs, ears, tail, and several snack accessories like cookies, pizza, watermelon, strawberry, and acorn. The patterns use US terminology and are worked in continuous rounds with clear stitch counts.

Hungry Hamsters Amigurumi Pattern crochet pattern - detailed view of completed project

You will learn micro-crochet techniques and small accessory embroidery to finish each hamster with personality. Photos and assembly notes guide you through placing eyes, sewing parts, and adding facial details.

Why You'll Love This Hungry Hamsters Amigurumi Pattern

I absolutely love this pattern because it combines simple amigurumi shaping with tiny, satisfying details that really bring each hamster to life. I enjoy designing small accessories that make each piece unique and playful. The pattern is versatile so I can mix and match colors and snacks for different personalities. Sewing the little hands holding snacks is one of my favorite finishing touches because it gives each hamster a charming character.

Hungry Hamsters Amigurumi Pattern step 1 - construction progress Hungry Hamsters Amigurumi Pattern step 2 - assembly progress Hungry Hamsters Amigurumi Pattern step 3 - details and accessories Hungry Hamsters Amigurumi Pattern step 4 - final assembly and finishing

Switch Things Up

I love how easy it is to customize these hamsters by changing color combos; try pastel shades for a softer look or bright contrasting colors for a playful set.

I often make the palm-sized version as a desk buddy and the mini as keychain charms using sturdier hardware and a slightly thicker thread for durability.

I sometimes replace safety eyes with embroidered eyes for baby-safe toys or if I want a softer, handmade expression.

For different sizes, change yarn weight and hook size: bulky yarn with a larger hook gives a chunky, squishy hamster while micro yarn creates pocket-sized minis.

I like adding tiny felt accessories and simple embroidery for cheeks or freckles to give each hamster a unique personality.

Try making seasonal snacks: tiny pumpkins for autumn, mini carrots for spring, or little hearts for gifts to make them festive.

Experiment with posable limbs by inserting thin wire into the arms before stuffing for cute, adjustable poses.

Combine different snack patterns on one hamster for a quirky look, or stitch multiple small snacks together as a garland between two hamsters.

I also recommend mixing yarn textures (smooth cotton for the body, fluffy yarn for a fuzzy variant) to change the tactile feel while keeping the same pattern.

When making sets, label each hamster with a tiny embroidered tag or color-coded eye size to keep track of different personalities in your collection.

Common Mistakes & How to Fix Them

βœ— Skipping stitch markers during rounds can cause you to lose track of the beginning of rounds; place a marker at the first stitch and move it each round. βœ— Adding all the stuffing at once makes shaping difficult and lumpy; stuff gradually and shape as you go for an even, smooth body. βœ— Using the same hook size for snacks as for the hamster body can make accessories too floppy; use a hook 3-4 sizes smaller for snacks to keep them firm. βœ— Placing the safety eyes too low or too high changes the hamster's expression; follow the placement note and place eyes between rounds 8 and 9 about six stitches apart.

Hungry Hamsters Amigurumi Pattern

Make a set of adorable palm-sized and mini hamsters complete with tiny snacks using this detailed crochet pattern. You will find step-by-step rounds, small accessory patterns (cookies, pizza, watermelon, strawberry, acorn) and full assembly instructions. Perfect for gifting, collecting, or practicing micro-crochet techniques. Follow the exact stitch counts and placement notes to create cute, well-shaped hamsters you will love to display.

Intermediate 5-7 Hours

Materials Needed for Hungry Hamsters Amigurumi Pattern

β€” Main Fabric

  • 01
    Monaco Mercerized Cotton Thread (for mini hamster and snacks, used with 1.10mm and 0.75mm hooks)
  • 02
    Monaco Acrylic Yarn (3-ply) for palm-sized hamster (used with 2.25mm hook)
  • 03
    DMC Embroidery threads (for snack details - recommended splitting strands for micro crochet)
  • 04
    Assorted small amounts of yarn/colors for snack details (brown, red, green, yellow, pink as shown)

β€” Tools Required

  • 01
    Crochet hook size 1.10mm (for mini hamster and some snacks)
  • 02
    Crochet hook size 0.75mm (for micro snacks using DMC thread)
  • 03
    Crochet hook size 2.25mm (for palm-sized hamster body)
  • 04
    Safety eyes 3mm (for mini hamster, 2 pieces)
  • 05
    Safety eyes 6mm (for palm-sized hamster, 2 pieces)
  • 06
    Stitch marker
  • 07
    Black embroidery/sewing threads
  • 08
    Tapestry/sewing needle
  • 09
    Toy stuffing (polyfill)
  • 10
    Scissors
  • 11
    Sewing pins for placement

Progress Tracker

0% Complete

β€” Materials & Info :

Infos :

For Mini Hamster: Monaco Mercerized Cotton Thread. 1.10mm Crochet Hook. (2) Safety eyes 3mm. For snacks: DMC Embroidery threads. 0.75mm Crochet Hook. For Palm-sized Hamster: Monaco Acrylic Yarn (3-ply). 2.25mm Crochet Hook. (2) Safety eyes 6mm. For snacks: Monaco Mercerized Cotton Thread. 1.10mm Crochet Hook. General: Stitch Marker. Black embroidery/sewing threads. Tapestry/sewing needle. Toy stuffing. Scissors.

Info :

GAUGE: When crocheting the pattern for the snacks, go for a hook that is 3-4 sizes smaller than the one you're using for the hamsters body.

Info :

TERMINOLOGY: This pattern uses US terminology and is worked in a continuous round.

Info :

FINISHED SIZE: My palm-sized hamsters came out approximately 6cm tall and mini hamsters came out 3 cm tall. For demonstration purposes, the sample pictures are of palm-sized hamster.

Info :

ABBREVIATIONS: MR - Magic ring/circle. R- round. ch - chain. st - stitch. BLO - back loops only. sc - single crochet. inc - increase. dec - invisible decrease. (..) - number of stitches in the round. s2color - switch to *color*.

β€” Head/Body :

Info :

Head/Body - Use 2.25mm hook and start in beige.

Round 1 :

6sc in MR (6)

Round 2 :

inc x6 (12)

Round 3 :

(inc, sc) x6 (18)

Round 4 :

(inc, 2sc) x6 (24)

Round 5 :

(inc, 3sc) x6 (30)

Round 6-7 :

sc around [2 rounds] (30)

Round 8-9 :

s2white sc around [2 rounds] (30)

Info :

Insert eyes between Rounds 8 & 9 (about 6 stitches apart).

Round 10 :

(inc, 4sc) x6 (36)

Round 11-12 :

sc around [2 rounds] (36)

Round 13 :

(inc, 5sc) x6 (42)

Round 14 :

(dec, 5sc) x6 (36)

Round 15 :

(dec, 4sc) x6 (30)

Round 16 :

(dec, 3sc) x6 (24)

Info :

Start filling with polyfill until semi-firm.

Round 17 :

(dec, 2sc) x6 (18)

Round 18 :

(dec, sc) x6 (12)

Round 19 :

dec x6 (6)

Info :

Finish off and add more stuffing until body is well-shaped. Sew close.

Info :

Note: the top of the safety eyes should slightly touch the colored portion. If there are some white gaps between the eyes, use larger sized eyes or insert them higher up between rounds 7 & 8 instead.

β€” Legs :

Info :

Legs - Make 4 in beige. Leave some allowance before you start your chain. Ch 2 and hdc in 2nd ch from hook. Finish off and leave long tail for sewing.

β€” Ears :

Round 1 :

Ch2, 4sc in 2nd ch from hook (4)

Round 2 :

(inc, sc) x2 (6)

Info :

Cut thread and leave long tail for sewing

β€” Tail :

Round 1 :

Ch2, 4sc in 2nd ch from hook (4)

Info :

Cut thread and leave long tail for sewing

β€” Cookie A (using 2.25mm hook) :

Round 1 :

In MR, ch2 then 8 hdc around (8)

Round 2 :

Sl st in each st around (8)

Info :

Leave long yarn tail for sewing. With brown yarn, sew on small chocolate chips

β€” Cookie 2 (using smaller hook and yarn as hamster) :

Round 1 :

6sc in MR (6)

Round 2 :

inc x6 (12)

Round 3 :

(inc, sc) x6 (18)

Round 4 :

sc around BLO (18)

Round 5 :

(dec, sc) x6 (12)

Round 6 :

dec x6 (6)

Info :

Finish off and leave long tail for sewing. With dark brown thread/yarn, sew small triangles to make choco chips. Sew close.

β€” Mini Watermelon/Pizza :

Info :

Note: circle color indicate color change of round for Watermelon or Pizza

Round 1 :

4sc in MR (4)

Round 2 :

(inc, sc) x2 (6)

Round 3 :

(inc, 2sc) x2 (8)

Round 4 :

(inc, 3sc) x2 (10)

Round 5 :

(inc, 4sc) x2 (12)

Round 6 :

(inc, 5sc) x2 (14)

Info :

Finish off and leave long tail for sewing. Flatten triangle, making sure that the yarn tail is situated on the side.

Info :

For the watermelon slice, sew on some black thread to put watermelon seeds (this part is optional).

Info :

For the pizza slice, embroider 3-4 pepperoni slices with red thread. Sew 4-5 times over the same stitch (careful not to make them overlap). Embroider peppers by sewing green thread 2-3 times diagonally randomly on the pizza.

Info :

Sew close the pizza/watermelon slice close by threading the yarn tail through the back loops of the last round.

Info :

Note: for micro crocheting with a 0.75mm hook, I only used 3 strands of DMC embroidery thread. (DMC embroidery threads have 6 strands so I had to split it in half before crocheting.)

β€” Mini Strawberry (using 1.10mm hook) :

Round 1 :

6sc in MR (6)

Round 2 :

sc around (6)

Round 3 :

inc x6 (12)

Round 4 :

(inc, 2sc) x4 (16)

Round 5 :

sc around (16)

Round 6 :

(dec, sc) x4 (12)

Round 7 :

dec x6 (6)

Info :

Stuff lightly and finish off with long tail for sewing. Embroider strawberry seeds with white yarn and sew close. Do not cut off yarn tail so you can use it to sew on to the hamster.

Info :

Strawberry leaf - Make in green: In a magic ring, *ch 2 then sl st in the 2nd ch from hook. Sl st again into the magic ring*. Repeat ** 4 more times. Leave long tail for sewing and sew on top of strawberry.

β€” Mini Acorn (using 1.10mm hook) :

Round 1 :

6sc in MR (6)

Round 2 :

(inc, sc) x3 (9)

Round 3 :

(inc, 2sc) x3 (12)

Round 4 :

sc around (12)

Round 5 :

(inc, 3sc) x3 (15)

Round 6 :

sc around BLO (15)

Info :

Finish off. Do not sew close.

β€” Acorn cap - Make in dark brown :

Round 1 :

6sc in MR (6)

Round 2 :

inc x6 (12)

Round 3 :

(inc, sc) x6 (18)

Round 4 :

sl st around (18)

Info :

Finish off with long thread for sewing and sew the front loops of the acorn cap to the edge of the acorn. Embroider a French knot to the top as the nub.

β€” Assembly :

Info :

Note: Attach the individual parts to the body with sewing pins first to make sure you're happy with the placement.

Mouth :

With black sewing thread or yarn, sew a small dash (-) between the eyes between R7&8. Sew a vertical line ( I ) from the center of the nose down. Sew on 2 diagonal lines (v) to give him a tiny smile.

Whiskers :

Sew two diagonal lines beside the eyes to make the whiskers.

Ears :

Sew the ears to the top of the head about 6 stitches apart.

Sew on the snack of choice :

on the center of the belly.

Sew the hands :

as if they are holding the snack. If you want your sewing to be extra unnoticeable you can use sewing thread in a similar shade to keep it securely in place.

Count 2 rounds down from the hands :

sew the legs horizontally facing towards the belly. They should align with the eyes.

Sew the tail :

on the back of the hamster around R15.

Assembly Instructions

  • Attach the individual parts to the body with sewing pins first to make sure you’re happy with the placement.
  • With black sewing thread, sew a small dash between the eyes between R7 & R8, then a vertical line from the nose center and two diagonal lines to form the smile.
  • Sew the ears to the top of the head about 6 stitches apart for symmetry.
  • Sew the hands to the body so they appear to hold the snack; use matching sewing thread for an invisible finish.
  • Sew the snack in the center of the belly using the long tail left from the snack and secure firmly.
  • Count two rounds down from the hands and sew the legs horizontally facing towards the belly so they align with the eyes.
  • Sew the tail on the back of the hamster around Round 15.

Important Notes

  • πŸ’‘Use stitch markers to keep track of the start of each round, especially when working continuous rounds and color changes.
  • πŸ’‘Stuff gradually while shaping to avoid lumps and to achieve the rounded hamster silhouette described in the pattern.
  • πŸ’‘Pin parts in place before sewing so you can adjust placement and symmetry without permanent stitches.
  • πŸ’‘When making snacks, use a hook 3-4 sizes smaller than the one used for the hamster body to keep accessories firm.

These tiny hamsters are meant to bring joy and a smile to your day β€” a little handmade treat you can gift or collect. Whether you make a palm-sized friend or a tiny mini, each one is packed with personality and tiny details to love. Have fun customizing their snacks and colors to create a whole hungry family of hamsters! 🧢🧑

You ask,

we answer.

FAQs

What size will the finished piece be?

The finished palm-sized hamster measures approximately 6 cm tall and the mini version measures approximately 3 cm tall using the recommended yarn and hook sizes.

Can I use different yarn weights for this pattern?

Yes, you can substitute yarn weights, but the final size will change; adjust your hook size accordingly and note that snacks should be crocheted with a much smaller hook for firmness.

Do I need prior crochet experience for this pattern?

This pattern is rated intermediate, so basic knowledge of single crochet, increases, decreases, and working in continuous rounds is recommended.

How long does this project typically take to complete?

Most crocheters complete a single hamster with snacks in about 5-7 hours depending on experience and whether making the mini or palm-sized version.

What hook sizes do I need for snacks and hamsters?

Use 2.25mm hook for the palm-sized hamster, 1.10mm for mini hamsters, and 0.75mm or a hook 3-4 sizes smaller for tiny snacks (with DMC thread for micro crochet).