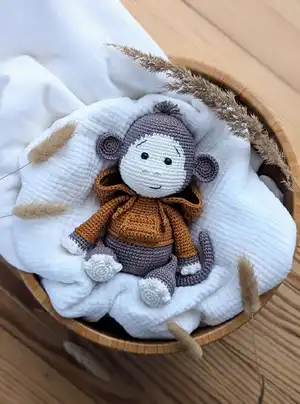
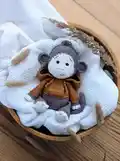
Make Joe the little monkey with this detailed crochet pattern — a cozy, characterful amigurumi with a removable hoodie and cute facial details. Youll learn color changes, bobble stitches for toes and fingers, and invisible decreases for smooth shaping. Suitable for crafters who enjoy step-by-step rounds and photo guidance to assemble a 21 cm monkey.
Progress Tracker
0% Complete
— Head :
Round 3 :
inc x 10 = 20 st
Round 4 :
(1 sc, inc) x 10 = 30 st
Round 5-6 :
30 sc = 30 st (2 rounds)
Round 7 :
(1 sc, inc) x 15 = 45 st
Round 8 :
45 sc = 45 st (1 round)
Round 9 :
(3 sc, inc) x 11, 1 sc = 56 st
Round 10-11 :
56 sc = 56 st (2 rounds)
Info :
The color changes start with the next round. Instructions written behind a letter are crocheted in the respective color. Example: D ((6 sc, inc) x 2, 6 sc), .... The other colors can run alongside or you cut them and knot the ends together.
Round 12 :
D 25 sc, L 6 sc, D 25 sc = 56 st
Round 13 :
D 23 sc, L 10 sc, D 23 sc = 56 st
Round 14 :
D 22 sc, L 12 sc, D 22 sc = 56 st
Round 15-16 :
D 21 sc, L 14 sc, D 21 sc = 56 st (2 rounds)
Round 17 :
D ((6 sc, inc) x 2, 6 sc), L 16 sc, D (6 sc, (6 sc, inc) x 2) = 60 st
Round 18-21 :
D 22 sc, L 16 sc, D 22 sc = 60 st (4 rounds)
Round 22 :
D 21 sc, L (3 sc, inc x 12, 3 sc), D 21 sc = 72 st
Info :
Now insert the security eyes (Diameter: 8 mm) - please see the marked positions on the picture. Orientate yourself towards the color change.
Round 23-29 :
D 21 sc, L 30 sc, D 21 sc = 72 st (7 rounds)
Round 30 :
D (dec x 10, 1 sc), L dec x 15, D (1 sc, dec x 10) = 37 st
Round 31 :
D 11 sc, L 15 sc, D 11 sc = 37 st
Round 32 :
D (dec, 9 sc), L 15 sc, D (9 sc, dec) = 35 st
Round 33 :
D dec x 5, L ((1 sc, dec) x 2, 3 sc, (dec, 1 sc) x 2), D dec x 5 = 21 st
Info :
Fasten off with a slip stitch. Cut the yarn and sew in the yarn tail nicely. Stuff the head with fiber fill. Make sure that the head and the mouth area are well shaped. (At the end the head is sewn to the hoodie with the yarn tail of the hoodie.)
— Facial Features :
Info :
Nose holes are embroidered with a thread (approx. 30 cm / 11.8 inches and face color) between round 23 and 24. Insert the needle from the inside to the outside between stitch 14 and 15 (counted from the right side) and embroider a horizontal stitch - 3 sc in length - to the right and come out where you started. Now wrap the thread about 8 x around the horizontal stitch, insert the needle at the right side of the nose hole and come out at the opening at the bottom of the head. Make a knot, cut the thread, and hide it inside the head. The left nose hole is worked identical with a distance of 1 sc to the right nose hole. The nose holes should be placed centered between the eyes.
Info :
Embroider the eyebrows with embroidery thread 1 round above the eye - slanted over 2- 2 ½ sc in length and 3 rounds high. To form an eye lid, embroider one time from the upper eye halfway downwards with your face color and then embroider from this point downwards to the lower eye. The mouth is embroidered with embroidery thread. It starts centered 4 rounds below the nose holes and is slanted over 4 sc in length and one round high.
Info :
On the center of the head (MR) 3 threads - with a length of approx. 10 cm / 4 inches - are threaded in. Make a knot. And then cut the hair at 1.5 cm / 0,6 inches. Fan the threads out.
— Ears :
Round 3 :
(1 sc, inc) x 6 = 18 st
Round 4 :
(2 sc, inc) x 6 = 24 st
Round 5 :
1 ch, turn the ear and crochet 22 sc back. Cut a long thread for sewing.
Info :
To be able to weave in the yarn tail nicely at the back of the ear leave the beginning tail of the MR a little bit longer.
Info :
The ears are sewn to the head between round 17 and 22 - with a distance of 4 sc to the face. Please orientate yourself again towards the color change.
— Tail :
Round 2 :
(1 sc, inc) x 3 = 9 st
Round 3-40 :
9 sc = 9 st (38 rounds)
Info :
Do not fill the tail with fiber fill. Fold the opening of the tail together and crochet 4 sc across. Cut the yarn and sew in the yarn tail nicely.
— Legs :
Info :
Legs - 1x left, 1x right (Start with Natural White)
Round 3 :
(1 sc, inc) x 6 = 18 st
Round 4 :
(2 sc, inc) x 6 = 24 st
Round 5 (Leg - left) :
2 sc, 4 x BO, 2 sc, 4 x BO, 2 sc, 4 x BO, 13 sc, 5 x BO, 1 sc = 24 st
Round 5 (Leg - right) :
13 sc, 4 x BO, 2 sc, 4 x BO, 2 sc, 4 x BO, 3 sc, 5 x BO = 24 st
Round 6 :
23 sc in Natural White, color change from Natural White to Bronze or Mushroom, 1 sc = 24 st
Round 7 :
(7 sc, inc) x 3 = 27 st
Round 8-9 :
27 sc = 27 st (2 rounds)
Round 10 :
(7 sc, dec) x 3 = 24 st
Round 11 :
24 sc = 24 st (1 round)
Round 12 :
(2 sc, dec) x 6 = 18 st
Info :
Stuff the foot with fiber fill.
Round 13 :
18 sc = 18 st (1 round)
Round 14 :
(4 sc, dec) x 3 = 15 st
Round 15-16 :
15 sc = 15 st (2 rounds)
Round 17 :
(3 sc, dec) x 3 = 12 st
Round 18-19 :
12 sc = 12 st (2 rounds)
Round 20 :
(2 sc, dec) x 3 = 9 st
Round 21 (Bein links) :
9 sc = 9 st
Round 21 (Bein rechts) :
6 sc, the round is not crocheted till the end.
Info :
The upper part of the leg is NOT stuffed with fiber fill. Fold the opening of the leg together and crochet 4 sc across. Cut the yarn and sew in the yarn tail nicely.
— Arm :
Info :
Arm -1x left, 1x right (Start with Natural White)
Round 3 :
(1 sc, inc) x 6 = 18 st
Round 4 (Arm - left) :
1 sc, 4 x BO, 1 sc, 4 x BO, 1 sc, 4 x BO, 9 sc, 5 x BO, 2 sc = 18 st
Round 4 (Arm - right) :
9 sc, 4 x BO, 1 sc, 4 x BO, 1 sc, 4 x BO, 3 sc, 5 x BO = 18 st
Round 5 :
17 sc in Natural White, color change from Natural White to Bronze or Mushroom, 1 sc = 18 st
Round 6-8 :
18 sc = 18 st (3 rounds)
Info :
color change from Bronze to Ginger or Warm Light Gray. 9. 18 sc flo = 18 st. 10. 18 sc blo of round 8 = 18 st. This way a sleeve ribbing is created. From here you work both loops again.
Round 11-13 :
18 sc = 18 st (3 rounds)
Round 14 :
(4 sc, dec) x 3 = 15 st
Info :
Stuff hand with fiber fill.
Round 15-18 :
15 sc = 15 st (4 rounds)
Round 19 :
(3 sc, dec) x 3 = 12 st
Round 20-22 :
12 sc = 12 st (3 rounds)
Round 23 :
(2 sc, dec) x 3 = 9 st
Round 24-27 :
9 sc = 9 st (4 rounds)
Round 28 :
2 sc, this round is not crocheted till the end.
Info :
The upper arm is not stuffed with fiber fill. Fold the opening of the arm together and crochet 4 sc across. Cut the yarn and sew in the yarn tail nicely.
— Body :
Round 3 :
(1 sc, inc) x 6 = 18 st
Round 4 :
1 sc, inc (2 sc, inc) x 5, 1 sc = 24 st
Round 5 :
(3 sc, inc) x 6 = 30 st
Round 6 :
2 sc, inc (4 sc, inc) x 5, 2 sc = 36 st
Round 7 :
(5 sc, inc) x 6 = 42 st
Round 8 :
3 sc, inc (6 sc, inc) x 5, 3 sc = 48 st
Round 9 :
(7 sc, inc) x 6 = 54 st
Round 10 :
4 sc, inc, (8 sc, inc) x 5, 4 sc = 60 st
Round 11 :
54 sc, crochet in the tail with 4 sc, 2 sc = 60 st
Round 12-13 :
60 sc = 60 st (3 rounds)
Round 14 :
9 sc, crochet in the right leg with 4 sc, 26 sc, crochet in the left leg with 4 sc, 17 sc = 60 st (Make sure that the big BO (5x) is pointing inwards when crocheting in. The legs are 26 sc apart at the front as well as at the back. The legs should be attached nicely to each side of the body.)
Round 15-17 :
60 sc = 60 st (3 rounds)
Round 18 :
18 sc, (dec, 1 sc) x 3, (1 sc, dec) x 3, 24 sc = 54 st (The decreases should be placed centered above the belly)
Round 19 :
50 sc, do not crochet the round till the end - this way the color change will be centered at the back.
Info :
Color change from Bronze or Mushroom to Ginger or Warm Light Gray. Now you start crocheting the jumper.
Round 20 :
54 sc flo of round 19 = 54 st
Round 21 :
54 sc blo of round 19 = 54 st
Info :
This way a jumper ribbing is created. From here you work both loops again.
Round 22-25 :
54 sc = 54 st (4 rounds)
Round 26 :
(7 sc, dec) x 6 = 48 st
Round 27 :
48 sc = 48 st (1 round)
Round 28 :
3 sc, dec, (6 sc, dec) x 5, 3 sc = 42 st
Round 29 :
42 sc = 42 st (1 round)
Round 30 :
(5 sc, dec) x 6 = 36 st
Round 31 :
36 sc = 36 st (1 round)
Round 32 :
2 sc, dec, (4 sc, dec) x 5, 2 sc = 30 st
Round 33 :
8 sc, crochet in the right arm with 4 sc, 10 sc, crochet in the left arm with 4 sc, 4 sc = 30 st (The arms are 10 sc apart from each other at the front and at the back there are 12 sc in between.)
Round 34 :
(3 sc, dec) x 6 = 24 st
Round 35 :
(6 sc, dec) x 3 = 21 st
Info :
Finish off with a slip stitch. Cut the yarn and weave it in nicely. Now stuff the body with fiber fill.
— Belly patch pocket :
Info :
The belly patch pocket is crocheted in rounds (Ginger or Warm Light Gray).
Round 2 :
12 sc, 1 tch = 12 st
Round 3 :
dec, 8 sc, dec, 1 tch = 10 st
Round 4 :
dec, 6 sc, dec, 1 tch = 8 st
Round 5-9 :
8 sc, 1 tch = 8 st (5 rows)
Info :
Now crochet around the edge of the belly patch pocket (approx. 44 sc). In doing this crochet 3 sc in each corner. Cut the yarn leaving a long tail for sewing the belly patch pocket to the jumper. Attach the belly patch pocket with pins centered above the ribbing and to round 29. Then sew the upper and lower edge to the belly.
— Hoodie :
Info :
First the hoodie is crocheted in rounds. With the beginning of round 12 start crocheting in rows. (Ginger or Warm Light Gray)
Round 2 :
hdc inc x 8 = 16 st
Round 3 :
(1 hdc, inc) x 8 = 24 st
Round 4 :
(2 hdc, inc) x 8 = 32 st
Round 5 :
(3 hdc, inc) x 8 = 40 st
Round 6 :
(4 hdc, inc) x 8 = 48 st
Round 7 :
(5 hdc, inc) x 8 = 56 st
Round 8 :
(6 hdc, inc) x 8 = 64 st
Round 9-10 :
64 hdc = 64 st (2 rounds)
Round 11 :
64 hdc, 1 tch = 64 st
Round 12 :
Turn the hoodie and start crocheting in rows. 59 hdc, 1 tch (59 st) (1 row)
Round 13 :
11 hdc, 6 cm (skip 6 st), 25 hdc, 6 ch (skip 6 st), 11 hdc, 1 tch = 59 st (1 row) (ear holes are crocheted)
Round 14 :
59 hdc, 1 tch (59 st) (1 row)
Round 15 :
59 hdc (59 st) (1 row)
Info :
If the hoodie is too short at the front crochet one more row. Now you crochet along the inner edge (approx. 20 sc). Cut the yarn leaving a long tail for sewing the hoodie to the head later. (At the end the head is sewn to the body using this yarn tail.)
Section :
Attach the hoodie to the head: Pin the hoodie to the head using pins. Leave an opening of 4 sc at the front (O = 1 st). Sew the hoodie to the head. Now sew the head to the body.
— Chord of the Jumper :
Item Name (P1) :
Work a double chain with 16 st. Cut the yarn leaving a long tail for sewing. Pull the tail through the last stitch. Make a knot at the beginning of the chord. Repeat these steps. Sew both chords at each side of the hoodie. Cut the yarn and weave in the yarn tail nicely.
This adorable Joe the Monkey pattern makes a cuddly companion perfect for gifting or display. The removable hoodie, embroidered face and bobble toes give Joe delightful personality and handcrafted charm. Have fun stitching, assembling and personalizing your own little Joe — he will bring smiles! 🧶🧵