Make a lovable handmade kangaroo amigurumi with detailed step-by-step instructions, photos, and clear stitch counts. This pattern guides you through crocheting the legs, tail, crotch, body, hands, and head using plush velvet yarn and provides assembly tips for a sturdy finished toy. Perfect for makers who enjoy shaping, stuffing, and adding small details like wired arms for posability. Follow the full instructions to create a cuddly 55 cm kangaroo or a smaller 19 cm baby version.
Progress Tracker
0% Complete
— Legs :
Info :
Take Himalaya Dolphin Baby yarn, color 80330 (brown color), crochet hook №3.5 (US E).
Round 1 :
make a foundation chain 21ch, work 2 sc into the second chain from the hook, work 9 sc more, next 9 hdc, work 4 hdc into one chain, turn and work on the other side 9 hdc more, 9 sc, work 2 sc into one ch (44)
Info :
x - single crochet (sc). τ - half double crochet (hdc).
Round 2 :
2 inc (sc), 9 sc, 9 hdc, 4 inc (hdc), 9 hdc, 9 sc, 2 inc (sc) (52)
Round 3 :
(1 sc, 1 inc (sc))*2, 9 sc, 9 hdc, (1 hdc, 1 inc (hdc))*4, 9 hdc, 9 sc, (1 sc, 1 inc (sc))*2 (60)
Round 5 :
60 sc in BLO (60)
Round 6-8 :
60 sc (60) - repeat 3 times
Round 9 :
crochet hook №3 (US D), 24 sc, (1 sc, 1 dec)*4, 24 sc (56)
Round 10 :
crochet hook №3 (US D), 24 sc, 4 dec, 24 sc (52)
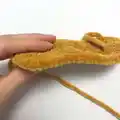
Info :
Please observe the photo located on the upper right-hand side. The positioning of the stitches: there ought to be a total of 18 stitches on the back portion, while the front portion should have 34 stitches.(toes part).
Round 11-12 :
use the crochet hook №3.5 (US E) starting from this round and for the next rounds, 18 sc (18). Proceed to fill the toy with stuffing material at this point.
Round 13 :
(5 sc, 1 inc)*3 (21)
Round 14 :
(6 sc, 1 inc)*3 (24)
Round 15 :
(3 sc, 1 inc)*6 (30)
Round 16 :
(4 sc, 1 inc)*6 (36)
Round 17 :
15 sc, 2 inc, 19 sc (38)
Round 18 :
15 sc, (1 sc, 1 inc)*2, 19 sc (40)
Round 19 :
12 sc, (1 sc, 1 inc)*6, 16 sc (46)
Info :
Fasten off, cut off. Stuff it. The first leg has been completed, and the second leg will be crocheted in a similar manner.
— Tail :
Info :
Take Himalaya Dolphin Baby yarn, color 80330 (brown color), crochet hook №3.5 (US E). Stuff as you go every 3-4 cm (1-2 inch)
Round 9 :
8 sc, 1 inc (10)
Round 11 :
9 sc, 1 inc (11)
Round 13 :
10 sc, 1 inc (12)
Round 15 :
11 sc, 1 inc (13)
Round 17 :
12 sc, 1 inc (14)
Round 19 :
13 sc, 1 inc (15)
Round 21 :
14 sc, 1 inc (16)
Round 23 :
15 sc, 1 inc (17)
Round 25 :
16 sc, 1 inc (18)
Round 27 :
17 sc, 1 inc (19)
Round 29 :
18 sc, 1 inc (20)
Round 31 :
19 sc, 1 inc (21)
Round 33 :
20 sc, 1 inc (22)
Round 35 :
21 sc, 1 inc (23)
Round 37 :
22 sc, 1 inc (24)
Round 39 :
23 sc, 1 inc (25)
Round 41 :
24 sc, 1 inc (26)
Info :
Fasten off, cut off.
— The crotch :
Info :
Take Himalaya Dolphin Baby yarn, color 80330 (brown color), crochet hook №3.5 (US E).
Round 3 :
(1 sc, 1 inc)*8 (24)
Round 4 :
(2 sc, 1 inc)*8 (32)
Round 5 :
(3 sc, 1 inc)*8 (40)
Round 6 :
(4 sc, 1 inc)*8 (48)
— We connect the legs, form the body :
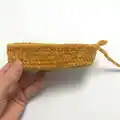
Info :
For sewing the legs, use Kamtex yarn in brown color or any other yarn that matches the color of the toy. Also, prepare four markers. Before beginning the sewing process, ensure that the legs are positioned evenly and attached at the crotch area. Mark the points where the legs will be joined using the markers. The stitch division is depicted in the picture below, with 8 stitches to be joined on each side. Additionally, make sure that the working thread is located at the back.
Round 7-9 :
108 sc (108) repeat 3 times, that is, we crochet 10 sc - on the back, 38 sc - on the left leg, 16 sc - on the crotch, 38 sc - on the right leg, 6 sc - on the back.
Round 10 :
32 sc, (1 sc, 1 dec)*6, 16 sc, (1 sc, 1 dec)*6, 24 sc (96)
Info :
The next step is to "sew" the tail onto the toy. First, mark 10 stitches on the tail from the back and in the middle. If needed, adjust the position of the working thread (by undoing 2 stitches). Then, sew the tail onto the toy using brown Kamtex thread.
Round 11 :
96+26-10-10=102 sc (102)
Info :
Adjust the position of the working thread. It was -> has become (see photos).
Round 12 :
6 sc, 1 dec, (11 sc, 1 dec)*3, 55 sc (98)
Round 13 :
5 sc, 1 dec, (10 sc, 1 dec)*3, 55 sc (94)
Round 14 :
4 sc, 1 dec, (9 sc, 1 dec)*3, 55 sc (90)
Round 15 :
(13 sc, 1 dec)*6 (84)
Round 16 :
(12 sc, 1 dec)*6 (78)
Round 17 :
(11 sc, 1 dec)*6 (72)
Round 18 :
(10 sc, 1 dec)*6 (66)
Round 19 :
(9 sc, 1 dec)*6 (60)
Round 20-32 :
60 sc (60) - repeat 13 times
Info :
Please note the photo above, and ensure that the working thread is positioned in the middle of the side.
Round 32 :
35 sc, (1 sc, 1 inc)*10, 5 sc (70)
Round 33-36 :
70 sc (70) - repeat 4 times
— Hands :
Info :
Take Himalaya Dolphin Baby yarn, color 80330 (brown color), crochet hook №3.5 (US E).
Round 1 :
foundation chain 6ch, work 1 sc into the second chain from the hook, work 4 sc more
Round 2 :
make ch 6, work 1 sc into the second chain from the hook, work 4 sc
Round 3 :
make ch 6, work 1 sc into the second chain from the hook, work 4 sc
Round 4 :
we crochet along the edge 8 sc
Round 5 :
making a ring: we have a round of 8 sts. Next, we crochet 8 sc in FLO, turn, continue crocheting other side 8 sc in FLO. Thus, a round of 16 sc (16)
Round 6 :
(2 sc, 1 dec)*4 (12)
Round 7 :
(4 sc, 1 dec)*2 (10)
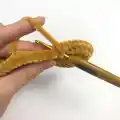
Info :
At this point, it is necessary to insert a wire. To do so, prepare two pieces of wire, each measuring 100 cm/40 inches in length. Twist the two pieces together to obtain a wire with two strands. Wrap the edge of the wire with adhesive tape and insert it into the hand. During the crocheting process, make sure to loosely fill the hand.
Round 9-11 :
10 sc (10) - repeat 3 times
Round 12 :
(4 sc, 1 inc)*2 (12)
Round 13-16 :
12 sc (12) - repeat 4 times
Round 17 :
(5 sc, 1 inc)*2 (14)
Round 18-21 :
14 sc (14) - repeat 4 times
Round 22 :
(6 sc, 1 inc)*2 (16)
Round 23-27 :
16 sc (16) - repeat 5 times
Info :
Fasten off, cut off. Make 2 pieces.
Item Name (P1) :
Connect the hands to the body using three stitches, stitching with a semi-cotton thread that matches the color of the yarn. Refer to the photo diagram for stitch distribution (sew in 3 loops on each side).
Round 37 :
use the crochet hook №3 (US D) starting from this round and for the next rounds, crochet 29 sc on the back, 13 sc on the left arm, 2 sc, (1 sc,1 dec)*10, 2 sc on the chest, 13 sc on the right arm, 1 sc on the back. Stuff the toy as you go (80)
Round 38 :
28 sc, (3 sc, 1 dec)*3, 22 sc, (1 dec, 3 sc)*3 (74)
Round 39 :
28 sc, (2 sc, 1 dec)*3, 22 sc, (1 dec, 2 sc)*3 (68)
Round 40 :
28 sc, (1 sc, 1 dec)*3, (6 sc, 1 dec)*2, 6 sc, (1 dec, 1 sc)*3 (60)
Round 41 :
(13 sc, 1 dec)*4 (56)
Round 42 :
(5 sc, 1 dec)*8 (48)
Round 43 :
(4 sc, 1 dec)*8 (40)
Round 44 :
(3 sc, 1 dec)*8 (32)
Round 45 :
(2 sc, 1 dec)*8 (24)
— Head :
Info :
Don`t cut off, we continue to crochet. From the 46th round we use the hook №3.5 (US E).
This kangaroo amigurumi pattern is full of personality and thoughtful construction to create a cuddly, poseable toy. The plush velvet yarn gives it a soft, huggable finish and the detailed instructions help you achieve professional shaping. Make one for a loved one or keep it as a cozy handmade companion. 🧶🐾