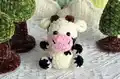
About This Keychain Cow Amigurumi Pattern
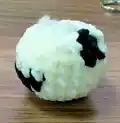
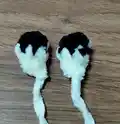
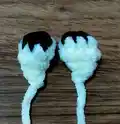
This pattern creates a tiny, plush keychain cow made from soft chenille yarn with easy shaping and simple color changes. You will crochet the head, body, ears, horns, hands, legs and a cute pink nose, then assemble them for a finished mini cow. The instructions include round-by-round details and assembly notes to help you through finishing touches.
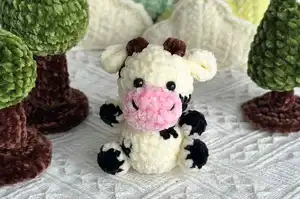
Ideal as a small gift or charm, the design uses straightforward stitches and finishes quickly using a 3.5mm hook. Photos show placement for features to help you assemble the pieces accurately.
Why You'll Love This Keychain Cow Amigurumi Pattern
I absolutely love this pattern because it turns simple stitches into an irresistibly cute little cow that fits in the palm of your hand. I enjoy how quickly the pieces come together, so you can finish a complete toy in a short session. The soft chenille yarn gives a plush, squishy texture that feels wonderful to hold and makes the cow extra huggable. Seeing the finished face and tiny spots appear as you add the nose and eyes always makes me smile — it feels like bringing a small friend to life.
Switch Things Up
I love customizing this little cow by changing the colours to create themed variants, like pastel shades for a nursery or bolder spots for a playful look.
I sometimes swap the chenille yarn for a fine plush yarn and use a smaller hook to make a more delicate mini keychain version.
I also add tiny embroidered eyelashes or freckles for extra personality — small stitches can dramatically change expression.
For a different texture, try using worsted weight yarn and a larger hook to make a chunkier, more huggable version that doubles as a small plush toy.
I like to experiment with eye options: safety eyes, embroidered eyes, or tiny buttons each give a different vibe and safety level for gifts.
If I want the limbs to be poseable, I insert a small wire armature before stuffing and close the opening securely to keep the wire hidden.
I often create a matching keyring or add a metal keychain loop through the top of the head for a secure and functional finish.
To make a set, I stitch different coloured noses or spots on each cow so they read as a family or a themed collection when displayed together.
When gifting, I attach a tiny crocheted scarf or bow to the neck — accessories are quick to make and make the piece feel extra special.
I recommend testing placement of eyes and nose with pins before committing to sewing; moving them a few stitches can alter the cow’s whole expression.
Common Mistakes & How to Fix Them
✗ Not changing yarn color exactly where indicated can make the spots and nose placement look off; follow the font color notes and change yarn at the specified rounds to keep markings accurate.
✗ Forgetting to leave long tails when cutting yarn makes sewing parts together difficult; always leave a long tail after finishing each piece so you have plenty to stitch securely.
✗ Skipping stuffing or stuffing unevenly will result in a misshapen body and head; stuff gradually and evenly, filling firmly but not overstuffing to maintain rounded shapes.
✗ Not attaching safety eyes at the recommended round can misplace facial features; attach 8mm safety eyes at row 6 of the head as directed to keep the face balanced.
✗ Neglecting to use a stitch marker may cause lost counts when working around in continuous rounds; place a marker at the start of each round to track progress and counts accurately.