About This Kirby Hello Kitty Amigurumi Pattern
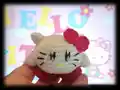
This pattern creates a tiny Kirby-meets-Hello Kitty amigurumi — a pocket-sized plushie with embroidered eyes and whiskers, little ears, arms, legs and a red bow. It uses DK/8-ply yarn and simple crochet rounds so you can complete it quickly. The pattern includes clear stitch counts and photo guidance to help you assemble and finish with a professional look.
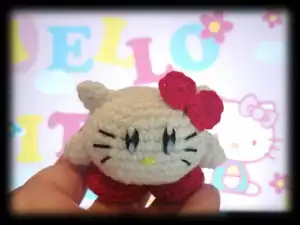
Designed to be approachable for new crocheters while still being satisfying for experienced makers. The finished toy measures about 2 inches (5 cm) tall using the recommended yarn and hook.
Why You'll Love This Kirby Hello Kitty Amigurumi Pattern
I absolutely love this pattern because it turns two iconic characters into one irresistibly cute tiny amigurumi that is quick to make. I enjoyed designing compact shapes that still feel plush and expressive when embroidered. The simple construction and limited pieces mean you can finish it in an afternoon and experiment with color combinations. It makes a perfect little gift or collectible, and I always enjoy seeing how makers add their own personality to the face and bow.
Switch Things Up
I love how easily this tiny pattern can be customized with color swaps; try pastel shades for a softer look or bright colors for a playful version.
You can make the piece larger or smaller by changing yarn weight and hook size; bulky yarn with a bigger hook creates a chunky plush, while finer yarn gives a mini keychain-sized friend.
I sometimes substitute the embroidered eyes for small safety eyes if the toy is for display only, but be mindful that embroidery is safer for children.
Try altering the bow: make a larger bow, a little flower, or a tiny hat to change the character's personality.
Experiment with different facial expressions by adjusting eye placement and whisker angle to create happy, sleepy, or surprised kitties.
I often add a tiny scarf or pocket accessory using leftover yarn to make a mini collection of themed characters.
For a poseable version, consider adding thin wire inside the arms before stuffing, which lets you position them for different looks.
Embellish with beads or felt details for eyes or cheeks if you want a mixed-media finish that stands out on shelves.
If gifting, sew a small loop at the top to turn the toy into an ornament or keychain — perfect for adding hardware like jump rings or lobster clasps.
I recommend trying textured yarn or a bouclé for a furry effect; this changes the feel dramatically and makes each kitty unique.
Common Mistakes & How to Fix Them
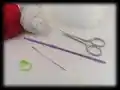
✗ Skipping the stitch marker can make you lose track of the start of the round; always place a marker or scrap yarn at the beginning of each round and move it up as you work.
✗ Not stuffing gradually causes lumps and uneven shaping; add polyester fiberfill little by little and shape as you go for a smooth result.
✗ Pulling the closing yarn too loosely leaves a visible hole at the top; thread through the front loops of the last 6 stitches and pull tightly, then fasten and weave the tail inside.
✗ Embroidering before checking placement can give uneven features; mark the eye position at rounds 6-7 first, then stitch vertically with black thread and layer blue and white for highlights.