🧢 Beautiful ✨ Detailed πŸ’ Adorable

Lady Bunny Amigurumi Pattern

Lady Bunny Amigurumi Pattern
4.2β˜… Rating
5-7 Hours Time Needed
3.3K Made This
βœ‚οΈ

Intermediate Level

Ideal for those with basic crochet experience, featuring slightly more advanced stitches and techniques to expand your skills.

⏱️

Weekend Treat

Takes 5-7 hours, making it an enjoyable project to finish over a couple of days.

🧸

Cute Companion

An adorable friend to cherish, handcrafted with love to bring comfort and joy for years to come.

About This Lady Bunny Amigurumi Pattern

This pattern creates a delightful Lady Bunny amigurumi complete with a removable dress, tiny basket of carrots, and floral crown. The design features worked-in shaping, color changes, and simple embellishments to bring personality to your bunny. You'll make separate parts β€” head, ears, arms, legs, dress, basket and carrots β€” and assemble them for a polished finish.

Lady Bunny Amigurumi Pattern crochet pattern - detailed view of completed project

Clear round-by-round instructions and photos guide you through every step for accurate shaping and assembly. Ideal for makers who know basic stitches and want a charming finished toy.

Why You'll Love This Lady Bunny Amigurumi Pattern

I absolutely love this pattern because it combines classic amigurumi shaping with sweet, wearable details like a little dress and flowers. I enjoy that the design is compact but still full of personality β€” every tiny flower and stitch adds charm. The separate parts allow you to customize colors and accessories, which keeps the project creative and fun. Sewing and finishing bring the doll to life, and I always find that final assembly is so rewarding. I hope you feel the same joy making and gifting this little companion.

Lady Bunny Amigurumi Pattern step 1 - construction progress Lady Bunny Amigurumi Pattern step 2 - assembly progress Lady Bunny Amigurumi Pattern step 3 - details and accessories Lady Bunny Amigurumi Pattern step 4 - final assembly and finishing

Switch Things Up

I love to change yarn colors to make each bunny feel unique; try pastels for a nursery-friendly version or jewel tones for a bold look.

I sometimes swap the yarn weight and use a larger hook to create a huggable, chunky bunny or use finer yarn for tiny keychain versions.

I like to replace embroidered eyes with small safety eyes for a different expression, but always consider safety for gifts to children.

For more texture, work some dress rounds in front loop only (flo) to create a ribbed skirt edge or add a picot trim for a lacy finish.

Change the flower style by crocheting tiny rosettes, using ribbon bows, or adding tiny felt leaves for variety and detail.

You can embroider different mouth shapes and eyebrow placements to change the bunny's personality from sleepy to playful.

Mix yarn fibers like cotton for a crisp finish or acrylic for an easier-care toy depending on your intended use.

If you want a posable toy, insert a thin wire core into the arms or legs before stuffing and secure the ends well when sewing closed.

Try adding clothing variations like a tiny sweater, vest, or headband to create a little wardrobe for imaginative play.

I often stitch pearls or tiny buttons to the dress front as shown, but you can swap for embroidered dots or small beads for a handmade look.

Experiment with tiny accessories like a crocheted carrot keychain, miniature bag, or a tiny hat to create sets and add gift appeal.

Don't be afraid to adapt the pattern by shortening or lengthening the dress rounds to create different silhouettes and personalities for your bunnies.

Common Mistakes & How to Fix Them

βœ— Skipping stitch markers during rounds with increases and decreases causes lost stitch counts; use a marker at the start of each round and move it as you go to maintain accuracy. βœ— Not stuffing gradually leads to lumpy limbs and uneven shapes; stuff little by little and shape the stuffing as you crochet for smooth results. βœ— Pulling stitches too tight when changing colors can distort edges and joins; keep a consistent, relaxed tension and catch your yarn neatly on color changes. βœ— Forgetting to leave long thread tails for sewing makes assembly difficult; always leave generous tails when finishing pieces for secure stitching and hiding ends. βœ— Ignoring front-loop/back-loop instructions (flo/blo) will alter shaping and texture; follow the specified flo or blo rounds exactly to preserve final shape.

Lady Bunny Amigurumi Pattern

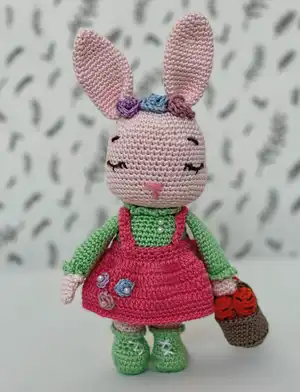
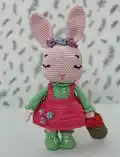
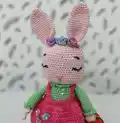
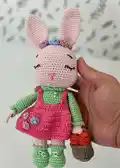
Create a sweet handmade Lady Bunny with this detailed crochet pattern. You will find clear round-by-round instructions, helpful photos, and assembly tips to guide you. Perfect for gifting or decorating, this charming bunny has a removable dress, tiny accessories, and delicate floral details. Follow along and enjoy a satisfying crochet project that brings a little friend to life.

Intermediate 5-7 Hours

Materials Needed for Lady Bunny Amigurumi Pattern

β€” Main Fabric

  • 01
    Yarn (small amounts of multiple colors as listed in pattern)
  • 02
    Main Color: Soft Pink (A) - used for head, ears, hands, legs
  • 03
    Soft Green (B) - used for torso, arms, socks
  • 04
    Dark Pink (C) - used for dress and accents
  • 05
    Smoked color (C) - used for dress flowers (labelled C in pattern)
  • 06
    Orange color (D) - used for carrots and small accents
  • 07
    Note: The pattern lists colors by letter (A, B, C, D) but does not specify exact gram amounts; use small skeins or scraps for details.

β€” Tools Required

  • 01
    2.5 mm hook size or a size that fits your yarn
  • 02
    Scissors
  • 03
    Polyester stuffing
  • 04
    Tapestry needle for sewing
  • 05
    Stitch marker
  • 06
    Pins for assembly

Progress Tracker

0% Complete

β€” Legs and Torso :

Round 1 :

8 sc in a magic ring

Round 2 :

8 sc inc(16 sc)

Round 3 :

5 sc into sc(5 sc inc)6 sc into sc(21 sc)

Round 4-6 :

(3 ring)sc into sc(21 sc)

Round 7 :

6 sc into sc(5 sc dec)6 sc into sc(16 sc)

Round 8 :

6 sc into sc(2 sc dec)6 sc into sc(14 sc)

Round 9-11 :

(3 ring)sc into sc(14 sc) Ana color

Round 12 :

Only in flo sc into sc(14 sc)

Round 13-21 :

(9 ring)sc into sc(14 sc)

Round 22 :

Put the legs together, make 2 ch together. sc into sc(30 sc)

Info :

Tightly stuff the legs. Keep filling as you go.

Round 23 :

14 sc into sc(2 ch into 4 sc )14 sc into sc(32 sc)

Round 24-26 :

(3 ring)sc into sc(32 sc)

Info :

A COLOR

Round 27 :

(4 times)6 sc into sc next inc(36 sc)

Round 28-35 :

(8 ring)sc into sc (36 sc)

Round 36 :

(6 times)5 sc into sc next dec(30 sc)

Round 37 :

Sc into sc (30 sc)

Round 38 :

(6 times)5 sc into sc next dec(24 sc)

Round 39 :

Sc into sc(24 sc)

Round 40 :

Only in flo sc into sc(24 sc)

Round 41 :

Only in blo sc into 3 ch fo

β€” Ears :

Info :

EARS (Make 2). Main color

Round 1 :

6 sc in a magic ring

Round 2 :

(3 times)1 sc into sc next inc(9 sc)

Round 3 :

(3 times)2 sc into sc next inc(12 sc)

Round 4 :

(2 times)5 sc into sc next inc(14 sc)

Round 5 :

(2 times)6 sc into sc next inc(16 sc)

Round 6 :

(2 times)7 sc into sc next inc(18 sc)

Round 7 :

(2 times)8 sc into sc next inc(20 sc)

Round 8-17 :

(10 ring)sc into sc(20 sc)

Round 18 :

(4 times)4 sc into sc next dec(16 sc)

Round 19 :

Sc into sc(16 sc)fo.

Info :

Leave a long thread end for sewing.

β€” Arms :

Info :

ARMS (Make 2). Main Color

Round 1 :

5 ch.ch into sc(10 sc)

Round 2-5 :

(4 ring)sc into sc(10 sc)

Round 6 :

5 sc into sc 2 ch. 2 ch into sc 5 sc into sc

Round 7 :

2 ch out next 10 sc into sc

Round 8 :

(4 times)2 sc into sc next dec (6 sc)

Round 9 :

(4times)2 sc into sc next inc(10 sc)

Round 10 :

(4 times)3 sc into sc next inc(14 sc)

Info :

A COLOR

Round 11 :

Only in flo sc into sc(14 sc)

Round 12-22 :

(11 ring)sc into sc(14 sc)fo.

Info :

Straighten. Dip the crochet in both layers. (7 sc) fo.

Info :

Leave a long thread end for sewing.

β€” Head :

Info :

Main Color

Round 1 :

6 sc in a magic ring

Round 2 :

6 sc inc(12 sc)

Round 3 :

1 sc into sc next inc(18 sc)

Round 4 :

2 sc into sc next inc(24 sc)

Round 5 :

3 sc into sc next inc(30 sc)

Round 6 :

4 sc into sc next inc(36 sc)

Round 7 :

5 sc into sc next inc(42 sc)

Round 8 :

6 sc into sc next inc(48 sc)

Round 9-14 :

(6 ring)sc into sc(48 sc)

Round 15 :

11 sc into sc(3 sc inc)20 sc into sc(3 sc inc)11 sc into sc(54 sc)

Round 16 :

Sc into sc(54 sc)

Round 17 :

13 sc into sc(3 sc inc)22 sc into sc(3 sc inc)13 sc into sc(60 sc)

Round 18-21 :

(4 ring)sc into sc(60 sc)

Round 22 :

8 sc into sc next dec(54 sc)

Round 23 :

7 sc into sc next dec(48 sc)

Round 24 :

6 sc into sc next dec(42 sc)

Round 25 :

5 sc into sc next dec (36 sc)

Round 26 :

4 sc into sc next dec(30 sc)

Info :

Fill the head tightly.

Round 27 :

3 sc into sc next dec(24 sc)

Round 28 :

2 sc into sc next dec(18 sc)

Round 29 :

Sc into sc (18 sc)fo.

Info :

Leave a long thread end for sewing.

β€” Rabbit's Dress :

Info :

B COLOR

Round 1 :

40 ch.

Round 2 :

40 ch into sc(40 sc)

Round 3-4 :

(2 ring)sc into sc (40 sc)

Round 5 :

Sc into 2 ch(80 cr)

Round 6-8 :

(3 ring)cr into cr (80 cr)

Round 9-10 :

(2 ring)cr into sc(80 sc)

Round 11 :

Only in blo sc into sc(80 sc)fo.

Info :

CLOTHES HANGERS (Make 2). 30 ch.ch into sc (30 sc) fo.

Info :

Leave a long thread end for sewing.

β€” Basket & Carrots :

Round 1 :

8 sc in a magic ring

Round 2 :

8 sc inc(16 sc)

Round 3 :

1 sc into sc next inc(24 sc)

Round 4 :

2 sc into sc next inc(32 sc)

Round 5 :

Only in flo sc into sc(32 sc)

Round 6-11 :

(6 ring)sc into sc(32 sc)

Round 12 :

Basket hanger - 20 ch.

Round 13 :

20 ch into 20 sc fo.

Info :

CARROT. D COLOR

Round 1 :

8 sc in a magic ring

Round 2-8 :

(7 ring)sc into sc(8 sc)

Round 9 :

1 sc dec(7 sc)

Round 10 :

1 sc dec(6 sc)

Round 11 :

1 sc dec(5 sc)

Round 12 :

1 sc dec (4 sc)

Round 13 :

1 sc dec(3 sc)fo.

β€” Making of the Parts :

Info :

Sew ears to the head, embroider facial features, and attach head to torso using a tapestry needle and long thread ends.

Info :

Sew arms to the sides of the torso, position slightly forward for a natural pose, and secure with tight stitches.

Info :

Sew legs to the bottom of the torso, spacing evenly and checking stability before finishing stitches.

Info :

Attach the dress straps and hangers; sew small flowers and pearls to decorate the dress as shown in photos.

β€” Flowers :

Dress Flower (Make 3) :

8 sc in a magic ring fo. Leave a long thread end for sewing.

Coronet (Make 3) :

10 ch. 1 ch into 3 cr 1 ch into 1 sc(15 cr 5 sc) Fo. Leave a long thread end for sewing.

Assembly Instructions

  • Sew ears to the top of the head using the long thread tails, positioning them symmetrically and securing with small, even stitching.
  • Embroider the eyes, eyelashes and nose on the face before attaching the head to the torso to ensure proper placement and avoid bulk.
  • Attach the head to the torso by sewing through the neck rounds, using ladder stitch or whipstitch and pulling tight for a secure join.
  • Sew arms to the sides of the torso between the specified rounds, angling slightly forward and using hidden stitches for a neat finish.
  • Sew legs to the bottom of the torso, spacing them evenly for balance; attach the basket to one hand with a few tight stitches.

Important Notes

  • πŸ’‘Use stitch markers to mark the beginning of each round, especially when working increases and decreases for accurate shaping.
  • πŸ’‘Stuff pieces gradually and evenly; overstuffing can distort the shape while under stuffing can leave the toy floppy.
  • πŸ’‘Leave long thread ends when finishing pieces so you have enough length to sew parts together securely and weave in ends neatly.
  • πŸ’‘Follow flo and blo instructions precisely to keep texture and shaping consistent where specified.

This Lady Bunny amigurumi brings a charming handmade touch to any shelf or gift box. The pattern includes full rounds, color changes, and small accessory instructions for a polished finish. Make her in your favorite colors and add tiny pearls or embroidery for personality. 🧢🐰✨

You ask,

we answer.

FAQs

What size will the finished piece be?

The finished amigurumi measures around 20 cm in circumference and about 10 cm in length as noted in the pattern.

Can I use different yarn weights for this pattern?

Yes, you can use different yarn weights but this will change the final size; adjust your hook size accordingly for correct tension and proportions.

Do I need prior crochet experience for this pattern?

This pattern is rated intermediate, so basic knowledge of single crochet, increases, decreases, and working in rounds is recommended.

How long does this project typically take to complete?

Most makers complete this project in about 5-7 hours, depending on experience, speed, and time spent on assembly and embellishments.