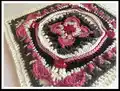
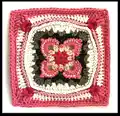
Make a beautiful, textured Lauren Rose Square using worsted weight cotton and a 4.5 mm hook. This intermediate square features petals, post stitches, popcorns and decorative shells to create a heirloom-style motif. You can use the mini or large instructions to make a single square or join multiple squares into a blanket. Follow the complete rounds and detailed stitch notes to reproduce the exact look shown in the photos.
Progress Tracker
0% Complete
— Square :
Infos :
Hook/Finished Size: 4.5 mm, 11" x 11". Crochet Terms: US Terminology throughout. Skill Level: Intermediate. Yarns and Colors Used: I Love This Cotton (Worsted Weight), 100% cotton. Mini and Large Square - A = Rosebud; B = Antique Cream; C = Rosy II; D = Black; E = Olive; F = Ivory; G = Warm Blush. Blanket in picture - C = Rosy II; F = Ivory; G = Warm Blush. Additional Items Needed: Stitch markers and darning needle.
Info :
Special Instructions and Symbol Guide: All rounds start with a standing stitch and end with an invisible join to 2nd st of rnd, and fasten off. If not changing colors, you can opt to finish the previous rnd with a slip stitch join and use the appropriate "ch" or "chainless starting stitch" to begin the next round. ASTERISKS: * to repeat instructions after a single asterisk as directed. PARENTHESES: ( ) indicates a group of sts worked together in or around the same st. BRACKETS: [ ] repeat instructions within brackets as directed. COUNT TOTALS: Total chain spaces are included in the st count; corner chain spaces are not included in the total.
Round 1 :
A, Rosebud - Large/Mini. Starting in a double magic ring, ch 4 (counts as a 1st dc of rnd, ch 1); [dc, ch 2 as a corner, dc, ch 1] 3 times; dc, ch 2; cut yarn, invisible join to 4th ch of rnd. Counts: 8 dc, 4 ch-1 sps, 4 ch-2 corner sp (12 total/3 per side)
Round 2 :
B, Antique Cream - Large/Mini. Starting in any ch-2 corner sp, *(2 dc, ch 3, 2 dc) in ch-2 corner sp; sk NEXT dc, 2 dc in NEXT ch-1 sp, sk NEXT dc; repeat from * around; cut yarn, invisible join. Counts: 24 dc, 4 ch-3 corner sp (24 total/6 per side)
Round 3 :
C, Rosy II - Large/Mini. Starting in any ch-3 corner sp, *(6 dc, ch 2, 6 dc) in ch-3 corner sp, sk NEXT 2 dc, FPsc2tog around NEXT 2 dc, sk NEXT 2 dc; repeat from * around; cut yarn, invisible join. Counts: 48 dc, 4 FPsc2tog, 4 ch-2 corner sps (52 total/13 per side)
Round 4 :
D, Black - Large/Mini. Starting around any FPsc2tog, *FPdc around FPsc2tog; working in 3LP, dc in NEXT dc, hdc in NEXT 2 dc, sc in NEXT 3 dc; ch 2, sk NEXT ch-2 corner sp; working in 3LP, sc in NEXT 3 dc, hdc in NEXT 2 dc, dc in NEXT dc; repeat from * around; cut yarn, invisible join. Counts: 8 dc, 16 hdc, 24 sc, 4 FPdc, 4 ch-2 corner sps (52 total/13 per side)
Round 5 :
E, Olive - Large/Mini. Starting in any ch-2 corner sp, *(2 dc, ch 2, 2 dc) in ch-2 corner sp; ch 1, sk NEXT 2 sc; (dc, ch 1, dc) in NEXT sc, ch 1, sk NEXT (2 hdc, dc); (dc, ch 1, dc) in NEXT FPdc, sk (dc, 2 hdc); (dc, ch 1, dc) in NEXT sc; ch 1, sk NEXT 2 sc; repeat from * around; cut yarn, invisible join. Counts: 40 dc, 28 ch-1 sps, 4 ch-2 corner sps (68 total/17 per side)
Round 6 :
F, Ivory - Large/Mini. Starting in any ch-2 corner sp, *(sc, ch 2, sc) in ch-2 corner sp; sc in NEXT 2 dc; hdc in NEXT ch-1 sp; sk NEXT dc, (2 tr) in NEXT ch-1 sp; sk NEXT dc, (3 tr) in ch-1 sp; sk NEXT dc, (2 tr) in ch-1 sp; sk NEXT dc, hdc in NEXT ch-1 sp, sc in NEXT 2 dc; repeat from * around; cut yarn, invisible join. Counts: 28 tr, 16 dc, 8 hdc, 24 sc, 4 ch-2 corner sps (76 total/19 per side)
Round 7 :
G, Warm Blush - Large/Mini. Starting in 2nd sc of any side, BPsc around each st across to NEXT ch-2 corner sp; [ch 2, sk NEXT ch-2 corner sp; BPsc around each st across to NEXT ch-2 corner sp] 3 times; ch 2, sk NEXT ch-2 corner, BPsc around NEXT sc; cut yarn, invisible join. Counts: 76 BPsc, 4 ch-2 corner sps (76 total/19 per side)
Round 8 :
A, Rosebud - Large/Mini. Starting in any ch-2 corner sp of rnd 6, *(4 dc) in ch-2 corner sp of rnd 6; working in rnd 7, ch 1, sk ch-2 sp; BPsc around each st across to NEXT ch-2 corner sp, ch 1; repeat from * around; cut yarn, invisible join. Counts: 16 dc, 76 BPsc, 8 ch-1 sp (100 total/25 per side)
Round 9 :
Large - D, Black / Mini - F, Ivory. Start in 1st BPsc of any side, *working in BPsc only, dc in NEXT 4, hdc in NEXT 3, sc in NEXT 5, hdc in NEXT 3, dc in NEXT 4, ch 6; repeat from * around; cut yarn, invisible join. Counts: 32 dc, 24 hdc, 20 sc, 4 ch-6 corner sps (76 total/19 per side)
Round 10 :
Large - F, Ivory / Mini - C, Rosy II. Starting in any ch-6 sp, *dc in ch-6 sp, FOLD ch-6 away from you, work a shallow BPtr2tog in first 2 corner dcs of rnd 8; (dc, ch 2, dc) in ch-6 sp of rnd 9 just worked, FOLD ch 6 away from you, work a shallow BPtr2tog in last 2 corner dcs of rnd 8; dc in ch-6 sp of rnd 9 just worked; working in NEXT 19 sts, 3 hdc, 13 sc, 3 hdc; repeat from * around; cut yarn, invisible join. Counts: 16 dc, 24 hdc, 52 sc, 8 BPtr2tog, 4 ch-2 corner sps (100 total/25 per side)
Item Name (P1) :
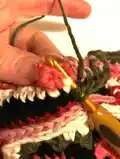
FOR MINI SQUARE ONLY, FINISH AS FOLLOWS: C, Rosy II – In any ch-2 corner sp, *(sc, ch 2, sc); sc across each st to NEXT ch-2 corner sp; repeat from * around; cut yarn, invisible join. Mini Square Counts: 108 sc, 4 ch-2 corner sp (108 total/27 per side). To embellish petals, turn to back and surface slst around inside edges of petals.
Round 11 :
C, Rosy II - Large. Starting in any ch-2 corner sp, *(sc, ch 2, sc) in ch-2 corner sp; sc in NEXT 2 sts; ch 1, sk NEXT 2 sts; work shell in NEXT st; ch 1, sk NEXT 2 sts; [sc in NEXT 2 sts, ch 1, PC in NEXT sc, ch 1] 3 times, sc in NEXT 2 sts; ch 1, sk NEXT 2 sts; work shell in NEXT st; ch 1, sk NEXT 2 sts; sc in NEXT 2 sts; repeat from * around; cut yarn, invisible join. Counts: 56 sc, 8 shells, 12 PC, 40 ch-1 sps, 4 ch-2 corner sps (164 total/41 per side)
Round 12 :
B, Antique Cream - Large. Starting in any ch-2 corner sp, *(dc, ch 1, dc; ch 2, dc, ch 1, dc) in ch-2 corner sp; ch 3, sk across each st to NEXT shell; BPsc in 3rd, 4th and 5th tr of shell; ch 3; dc in sc, ch 3; [sk across each st to 2nd sc after PC, dc in sc, ch 3] 3 times; sk across each st to NEXT shell; BPsc in 3rd, 4th and 5th tr of shell; ch 3, sk across each st to NEXT ch-2 corner sp; repeat from * around; cut yarn, invisible join. Counts: 32 dc, 24 BPsc, 28 ch-3 sps, 4 ch-2 corners (140 total/35 per side)
Round 13 :
E, Olive - Large. Starting in any ch-2 corner sp, *(dc, ch 1, dc, ch 2; dc, ch 1, dc) in ch-2 corner sp; sk NEXT dc, (2 dc) in NEXT ch-1 sp, sk NEXT dc; (dc, 2 hdc) in NEXT ch-3 sp; sc in NEXT 3 BPsc; (2 hdc) in NEXT ch-3 sp, sk NEXT dc; [hdc in NEXT ch-3 sp; working in front of ch-3 sp, tr2tog in worked scs of rnd 10 before and after PC of rnd 11; hdc in ch-3 sp of rnd 13 just worked, sk NEXT dc] 3 times; (2 hdc) in NEXT ch-3 sp; sc in NEXT 3 BPsc; (2 hdc, dc) in NEXT ch-1 sp, sk NEXT dc; repeat from * around; cut yarn, invisible join. Counts: 24 sc, 56 hdc, 40 dc, 12 dc2tog, 8 ch-1 sps, 4 ch-2 corner sps (140 total/35 per side)
Round 14 :
F, Ivory - Large. Starting in any ch-2 corner sp, *(dc, ch 2, dc) in ch-2 corner sp; dc in 3LP of NEXT dc; dc in NEXT ch-1 sp; working in 3LP, dc in NEXT 31 sts; dc in NEXT ch-1 sp; dc in 3LP of NEXT dc; repeat from * around; cut yarn, invisible join. Count: 148 dc, 4 ch-2 corner sps (148 total/37 per side)
Round 15 :
F, Ivory - Large. Starting in any ch 2 corner sp, *(sc, ch 2, sc) in ch-2 corner sp; sc across each st to NEXT ch-2 corner sp; repeat from * around; cut yarn, invisible join and weave in ALL yarn ends. Large square count: 156 sc, 4 ch-2 corner sps (156 total/39 per side)
Info :
Blocking and Finishing: The pattern recommends blocking this square to achieve final shape and size. Blocking will make stitches even and more defined; use wet block or steam block but be careful when steam blocking acrylic yarn. Weave in all ends and, if sharing your finished square, please link to the designer's website or social pages as noted in the pattern.
This Lauren Rose Square was designed as a little heirloom — perfect for blankets, cushions, or standalone decor. The layered textures and floral details make each square a joy to stitch and display. Try different colorways to create entirely new personalities for your squares. 🧶🌸✨