🧶 Beautiful ✨ Detailed 💝 Adorable

Lavender Pattern

Lavender Pattern
4.3★ Rating
2-3 Hours Time Needed
2.3K Made This
✂️

Beginner Friendly Level

Perfect for those just starting their crochet journey, with clear instructions and simple techniques

⏱️

Bite-Sized Project

Finishes in 2-4 hours—perfect for an afternoon of creative relaxation.

🏡

Cozy Accent

A warm touch for your space that transforms ordinary corners into inviting nooks filled with handmade charm.

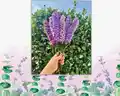
About This Lavender Pattern

This pattern creates delicate crochet lavender stems that can be bundled into a bouquet or used singly as decor. It uses weight 4 yarn and simple stitches to make detailed lavender spikes. The design includes optional leaves and a clear assembly guide to attach flowers to floral wire.

Lavender Pattern crochet pattern - detailed view of completed project

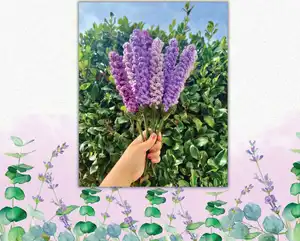
Ideal for beginners, the pattern is written in US terms and uses a 4.0mm hook. Step-by-step photos and assembly instructions help you finish each stem professionally.

Why You'll Love This Lavender Pattern

I absolutely love this pattern because it turns simple stitches into a charming bouquet that brightens any room. I designed it to be beginner friendly so you can complete a lovely stem quickly and confidently. I love how customizable the stems are—you can change colors, lengths, and how many blossoms you combine. Making these lavender stems always feels calming and rewarding, and they make wonderful handmade gifts.

Lavender Pattern step 1 - construction progress Lavender Pattern step 2 - assembly progress Lavender Pattern step 3 - details and accessories Lavender Pattern step 4 - final assembly and finishing

Switch Things Up

I love experimenting with color palettes to create different moods—try pastel purples for a soft look or deep plums for a dramatic bouquet.

I often change the chain length to make longer or shorter stems; mixing lengths in one bouquet creates a more natural arrangement.

I like to substitute floral wire with wooden skewers for a rustic look; just wrap tightly and secure with hot glue as directed.

I sometimes add a tiny dab of fabric stiffener to the lavender tips if I want the loops to hold a very sculpted shape.

I recommend trying variegated yarn for each spike to give a lively, textured appearance—each spike will look unique.

For a mini keychain version, use a thinner yarn and smaller hook to scale the pattern down to portable sizes.

I enjoy adding beads or tiny felt accents to simulate dew drops or pollen for a whimsical finish.

If you want a posable stem, slip a thinner gauge floral wire inside the wrapped wire and wrap as normal for added structure.

I sometimes make coordinating leaves in different shades of green and attach more than one leaf per stem for fuller foliage.

To create a full arrangement, mix in other crocheted flowers or dried real foliage; I often tie everything together with a matching ribbon for a polished look.

Try gifting single stems in a small box or grouping several in a mason jar—simple presentation changes can make the same stems feel brand new.

Common Mistakes & How to Fix Them

✗ Choosing the wrong yarn weight will change the final size and texture of the lavender; use a Weight 4 yarn as recommended to keep the details crisp and pretty. ✗ Not leaving the center hole of the magic ring large enough will prevent the floral wire from fitting through; when closing the MR, make sure the hole stays big enough for your stem. ✗ Skipping the hot glue steps or rushing the glue can cause the lavender to slip on the stem; apply glue carefully and hold pieces in place until fully set. ✗ Forgetting to make the chain length measurement consistent will produce uneven lavender spikes; count chains carefully and measure stems as you go to keep lengths uniform.

Lavender Pattern

Create a beautiful, everlasting lavender bouquet with this easy-to-follow crochet pattern. You will make delicate lavender spikes and optional leaves, then assemble them onto floral stems for a charming handmade arrangement. Perfect for gifting or brightening your home, this pattern focuses on simple stitches and quick assembly so you can enjoy crafting right away. Follow the step-by-step instructions for consistent, pretty results every time.

Beginner Friendly 2-3 Hours

Materials Needed for Lavender Pattern

— Main Fabric

  • 01
    Yarn (Weight 4) - Purple for lavender spikes (amount as needed per stem)
  • 02
    Yarn (Weight 4) - Green for stems and leaves (amount as needed)
  • 03
    Floral wire stems (2mm, 15" long) OR wooden skewers if you do not have wire stems
  • 04
    Hot glue (glue sticks) for assembly
  • 05
    Decorative paper + mesh for bouquet wrapping

— Tools Required

  • 01
    Crochet hook size 4.0mm
  • 02
    Darning needle (yarn needle) for weaving ends and sewing
  • 03
    Scissors
  • 04
    Hot glue gun
  • 05
    Stitch markers (optional)
  • 06
    Floral wire stems (2mm, 15" long) or wooden skewers
  • 07
    Ribbon for finishing bouquet
  • 08
    Pins for temporary placement while assembling

Progress Tracker

0% Complete

— Lavender Pattern :

Step 1 :

Ch 63*

Step 2 :

In the fourth chain from the hook, place 4 TR, ch 3, sl st to the same ch you started with.

Step 3 :

Sl st to the next ch. [Ch 7. Sl st back to the same ch you started with. Sl st to the next stitch.] Repeat [_] down the entire length of your chain.

Step 4 :

FO once you reach the last ch. Leave a 6" tail. Using a darning needle, weave in the end.

Info :

* The length of your chain will alter the length of your lavender. If you want a shorter lavender, chain fewer stitches. *

— Lavender Leaf :

Infos :

**OPTIONAL** In green:

Step 1 :

Place 5 HDC in a MR. After the fifth HDC, sl st to the top of your first HDC to form a ring. Pull the end of the MR tail tightly to close the circle. Make sure to leave the center hole large enough for your floral wire to fit through.

Step 2 :

Ch 6. Working down the chain, 4 sl st, 1 sc in the last chain. Sl st to the next stitch from the MR. Repeat this process until you have 5 leaves. FO and leave a tail of a few inches. Using a darning needle, weave in the ends.

Info :

Working down the chain: 4 sl st, 1 sc, sl st to the next st of the MR. Create 5 leaves.

— Lavender Assembly :

Step 1 :

Cut your floral wire to your desired length.

Step 2 :

Put a small amount of hot glue on one end of the floral wire. Before the glue dries, place your green yarn on the glue to attach it.

Step 3 :

Twist the floral wire to wind the green yarn around the entire length of the wire.

Step 4 :

Place a small amount of hot glue on the other end of the wire, cut your green yarn, and glue it down.

Step 5 :

Place a small amount of hot glue on the end of the lavender where you made the 4 treble crochet stitches. Attach the lavender to the end of the floral wire.

Step 6 :

Wind the lavender around the floral wire. Make sure the chain loops face outwards. Once you reach the end of the lavender, glue the end down to the floral to secure it.

Step 7 :

**OPTIONAL:** With the correct side of your work facing upwards, insert the stem through the center of the magic ring. Make sure the correct side faces upwards so the leaves curl upwards and inwards.

Step 8 :

**OPTIONAL:** Place a small amount of hot glue in a circle around the MR. Slide the leaf upwards to the bottom of the lavender stalk to glue it in place.

— Photo Gallery :

Info :

Images show finished lavender stems, bouquet arrangements, and styling suggestions for display and gifting.

Assembly Instructions

  • Cut floral wire to desired length for each stem before wrapping to ensure uniform stems.
  • Attach green yarn to one end of the wire with a small dot of hot glue, then wind yarn tightly along the wire to create a realistic green stem.
  • Glue the crocheted lavender spike to the top of the wired stem where the 4 treble crochet stitches are, then wind the spike around the wire with loops facing outward and secure the end with glue.
  • If adding leaves, insert the stem through the center of the magic ring with the correct side facing up so leaves curl up and in; glue the leaf in place around the MR.
  • Trim any excess yarn and weave in ends using a darning needle to tidy the base of each spike.
  • Bundle stems as desired and finish with decorative paper, mesh and ribbon for a polished bouquet presentation.

Important Notes

  • 💡This pattern is suited for beginners with knowledge of basic crochet stitches; read all steps before starting.
  • 💡Pattern is written in US crochet terminology; check abbreviations if you are used to different terminology.
  • 💡Use Weight 4 acrylic yarn such as Big Twist Value or Red Heart Super Saver; thicker yarns will make the lavender too chunky and lose details.
  • 💡Leave the center hole of the magic ring large enough for your floral wire to fit through to make assembly easier.

This Lavender Pattern is designed to help you create pretty, everlasting lavender stems to brighten any space. Make a single stem or a full bouquet to gift or display with pride. Enjoy the simple stitches and satisfying assembly—every stem is a little handmade treasure. 🧶🌿

You ask,

we answer.

FAQs

What size will the finished piece be?

Each lavender stem length will vary depending on your chain length, but using Ch 63 and the recommended materials produces a medium stem about the length of a 15" floral wire before trimming.

Can I use different yarn weights for this pattern?

You can use different yarn weights, but the stitch definition will change; using a thicker yarn will produce chunkier, less detailed lavender while thinner yarn makes smaller, delicate spikes.

Do I need prior crochet experience for this pattern?

This pattern is beginner friendly but assumes familiarity with basic stitches like chain, slip stitch, single crochet, half double crochet, treble, and the magic ring technique.

How long does this project typically take to complete?

Most crocheters can make several stems in a 2-3 hour session depending on speed; individual stems take only a few minutes each once you become familiar with the steps.