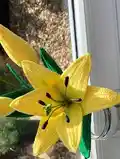
Make a beautiful, realistic crochet lily using detailed charts, step-by-step photos, and written instructions. This pattern guides you through wire-wrapped petals and leaves for natural shaping. You will learn finishing, shading with crayon, and assembling a floral stem to create a stunning handmade bouquet. Perfect for gifting or home decor.
Progress Tracker
0% Complete
— Petal A :
Info :
Petal: Make 3 per bloom. Make 2 per closed bud if making a smaller closed bud.
Info :
Color: Flower color (yellow shown)
Info :
Foundation: Slip knot (leave a 2-3" tail), ch 26
Round 1 :
sc in 2nd ch from hook and next 2 chs, hdc in next 3 chs, dc in next 8 chs, hdc in next 8 chs, sc in next 2 chs, (sc, ch 1, sc inc) in last ch, rotate work (hold the tail along the chain and wrap the new sts around the tail), sc in next 2 chs down opposite side of petal, hdc in next 8 chs, dc in next 8 chs, hdc in next 3 chs, sc in next 3 chs, sl st in turning ch
Round 2 :
ch 1, sc in next 2 sts, hdc in next 2 sts, [dc in next 2 sts, 2-dc inc in next st] x3, dc in next 3 sts, hdc in next 4 sts, sc in next 5 sts, (sc, ch 1, sc inc) in ch 1 space of Round 1, rotate work, sc in next 5 sts, hdc in next 4 sts, dc in next 3 sts, [2-dc inc in next st, dc in next 2 sts] x3, hdc in next 2 sts, sc in next 2 sts, sl st in turning ch
Round 3 :
ch 3, insert .46 mm (25 Gauge US) wire through ch on hook, leaving a 3" tail (work round by wrapping each st around wire all the way around the petal)
Round 3 cont :
sc in 2nd ch from hook and next ch, hdc in next 13 sts, sc in next 16 sts, (sc, hdc, ch 2, sc) in ch 1 space of Round 2, sc in next 16 sts, hdc in next 13 sts, sc in next 2 chs, sl st in turning ch with hook in front of wires and yarn behind wires, cut the wire leaving a second 3" tail.
Info :
Using heavier yarn or a larger hook may require a longer piece of wire - calculate length of wire needed per petal by measuring length of one petal and multiply by 2, add an extra 2-3" for safety and comfort while working. The same can be applied to the leaves, but multiply the length of the leaf by 4 instead of 2. Remember: excess wire can be removed later, but adding more is difficult.
Finishing :
Pull both wire tails through the last st before tightening.
Finishing Steps :
Wrap the tail around the wires a few times and then again so it sits between the two wires. Twist the wires twice so the twists sit right up against the end of the petal. Cut the yarn close to the wire. Trim wire tails near the end of twists.
Shaping :
Pinch the tip of the petal to a point
— Petal B :
Info :
Petal: Make 3 per open bloom. Make 2 per closed bud if making a larger closed bud.
Info :
Color: Flower color (yellow shown)
Info :
Foundation: Slip knot (leave a 2-3" tail), ch 28
Round 1 :
sc in 2nd ch from hook and next 2 chs, hdc in next 3 chs, dc in next 9 chs, hdc in next 9 chs, sc in next 2 chs, (sc, ch 1, sc) in last ch, rotate work (hold the tail along the chain and wrap the new sts around the tail), sc in next 2 chs down opposite side of petal, hdc in next 9 chs, dc in next 9 chs, hdc in next 3 chs, sc in next 3 chs, sl st in turning ch
Round 2 :
ch 1, sc in next 2 sts, hdc in next 2 sts, [dc in next 2 sts, 2-dc inc in next st] x3, dc in next 3 sts, hdc in next 5 sts, sc in next 6 sts, (sc, ch 1, sc) in ch 1 space of Round 1, rotate work, sc in next 6 sts, hdc in next 5 sts, dc in next 3 sts, [2-dc inc in next st, dc in next 2 sts] x3, hdc in next 2 sts, sc in next 2 sts, sl st in turning ch
Round 3 :
ch 3, insert .46 mm (25 Gauge US) wire through ch on hook, leaving a 3" tail (work round by wrapping each st around wire all the way around the petal), hdc in 2nd ch from hook and next ch, hdc in next 15 sts, sc in next 16 sts, (sc, hdc, ch 2, sc) in ch 1 space of Round 2, sc in next 16 sts, hdc in next 15 sts, hdc in next 2 chs, sl st in turning ch with hook in front of wires and yarn behind wires, cut the wire leaving a second 3" tail.
Finishing :
Pull both wire tails through the last st before tightening. Wrap the tail around the wires a few times and then again so it sits between the two wires. Twist the wires twice so the twists sit right up against the end of the petal. Cut the yarn close to the wire. Trim wire tails near the end of twists.
Shaping :
Pinch the tip of the petal to a point
— Leaf :
Info :
Leaf: Make 2 per stem.
Info :
Foundation: Slip knot (leave a 2-3" tail), ch 35
Round 1 :
sc in 2nd ch from hook and in next 2 chs, hdc in next 3 chs, dc in next 15 chs, hdc in next 10 chs, sc in next 2 chs, (sc, ch 1, sc) in last ch, rotate work (hold the tail along the chain and wrap the sts down the 2nd side of the leaf around the tail), sc in next 2 chs, hdc in next 10 chs, dc in next 15 chs, hdc in next 3 chs, sc in next 3 chs, sl st in turning ch
Info :
Insert .46 mm (25 Gauge US) wire through st on hook, leaving a 3" tail. Work Round 2 with the loop of every st around the wire.
Round 2 :
ch 1, sc in next 2 sts, hdc in next 2 sts, dc in next 3 sts, [tr in next 3 sts, 2-tr inc in next st] x2, tr in next 3 sts, dc in next 8 sts, hdc in next 4 sts, sc in next 4 sts, (sc, ch 1, sc) in ch 1 space, rotate work, sc in next 4 sts, hdc in next 4 sts, dc in next 8 sts, [tr in next 3 sts, 2-tr inc in next st] x2, tr in next 3 sts, dc in next 3 sts, hdc in next 2 sts, sc in next 2 sts, sl st in turning ch
Info :
Continue working around the wire in Round 3.
Round 3 :
ch 1, sc in next 37 sts, (sc, hdc, ch 2, sc) in ch 1 space from Round 2, sc in next 37 sts, sl st in turning ch with hook in front of wires and yarn behind wires, cut the wire leaving a second 3" tail.
Finishing :
Pull both wire tails through the last st before tightening. Wrap the tail around both the wires a few times and then place the yarn so it sits between the two wires. Twist the wires twice so the twists sit right up against the end of the wrapped yarn. Cut the yarn close to the wire and trim the tails near the twists.
— Stigma :
Info :
Stigma: Make 1 per bloom.
Info :
Color: Green (light green shown)
Info :
Foundation: Slip knot (leave a 2-3" tail), ch 3
Step 1 :
sc in 2nd ch from hook, sl st in next ch, ch 2, sc in 2nd ch from hook, sl st in same ch as previous sl st, ch 2, sc in 2nd ch from hook, sl st in same ch as previous sl st, cut yarn leaving about a 15" tail. Pull yarn through last st and pull tight to secure.
Step 2 :
Tie both the tails in a knot twice. Trim short tail right up against knots.
— Stamen :
Info :
Stamen: Make 6 per bloom
Info :
Materials: 11" length of .46 mm (25 Gauge US) wire, brown floral tape, green floral tape
Step 1 :
Start wrapping brown floral tape around the wire so that the wire is visible on both sides. Wrap several times around the wire.
Step 2 :
Slide the wrapped tape into the middle of the wire and fold the wire in half so that the ends meet and the wrapped floral tape sits right next to the fold in the wire.
Step 3 :
Continue wrapping the floral tape around the wires several times to build up volume. Then wrap the floral tape away from the ends of the wire a few times to double the length of the brown tape.
Step 4 :
Fold the wrapped brown tape in half.
Step 5 :
Continue wrapping the floral tape around the folded tape about 7 times. Cut the tape and secure the end by wrapping down over the bottom of the stamen head and the wires.
Step 6 :
Start wrapping the green floral tape at the bottom of the stamen head.
Step 7 :
Wrap the green floral tape down and around both wires until the wires are fully covered. Cut the green floral tape and secure the end.
— Assembly :
Info :
If using Acrylic yarn (if using natural fiber, skip this step, down to the shading of the petals): Light the candle and hold each flower part a few inches above (NOT IN) candle flame to let the rising warmth melt the fuzzy stray fibers sticking out. Don't get too close to flame or hold the crochet work in one place for long or the yarn may get smoke stained or burnt.
Leaves Assembly :
For the Leaves, hold the tip of the Leaf over the flame very briefly then pinch the end to form more of a point. Do this for each Leaf.
Stigma Assembly :
For the Stigma, hold a point of the Stigma over the flame very briefly then pinch the end to form more of a point. Repeat for the other two points.
Shading :
For all Petals, take the green crayon and hold it near (NOT IN) the flame to start to soften the wax of the crayon. Rub it on the bottom of each petal as indicated to add some green shading to each petal. The shading should reach a little beyond the widest part of the petal. This side with the green shading is referred to as the right side of the petal. Set aside.
Assemble the Stem Step 1 :
Take a 12-18" length piece of 1.2mm (18 Gauge US) wire for the stem and place a dab of hot glue on the end.
Assemble the Stem Step 2 :
Place the middle of the underside of the Stigma on the glue to secure it to the stem.
This Lily crochet pattern brings elegant, long-lasting blooms to your home that never need watering.🧶
Use the wire-wrapped petals and leaves to shape lifelike flowers for bouquets, centerpieces, or gifts.🌸
Enjoy the satisfaction of combining crochet with floral craft techniques for a truly special handmade arrangement.✨