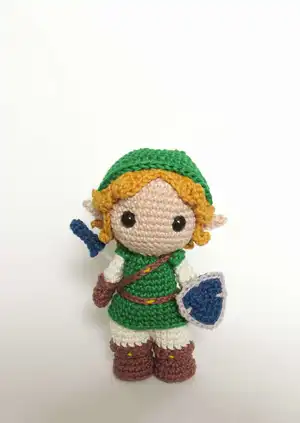
Make your own adorable Link amigurumi with this detailed crochet pattern. You will create a fully dressed little hero complete with hat, wig, sword and shield. The pattern includes step-by-step rounds, assembly notes and helpful photos so you can follow along confidently. Perfect for gift making or adding to your Zelda collection.
Progress Tracker
0% Complete
— Arms :
Info :
brown and off white - slip stitch and single crochet - make two
Round 1 :
6 sc in the magic ring (6)
Round 2 :
(1 sc, inc) around [9]
Info :
Change to off white
Round 5 :
Sc around in back loops only [9]
Round 6 :
(1 sc, dec) around [6]
Round 9 :
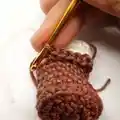
Fold and close the opening with 2 sc (pic 1). Fasten off. Work a round of slst on the loops of round 5 (pic 2).
— Legs :
Info :
brown, off white and yellow - chain, slip stitch and single crochet - make two
Round 1 :
6 sc in the magic ring (leave a tail to sew the button) (6)
Round 3 :
(1 sc, inc) around [18]
Round 4 :
Sc around in back loops only [18] (pic 1)
Info :
Sew a button inside the shoe (pic 2)
Round 6 :
6 sc, 3 dec, 6 sc [15]
Info :
Change to off white
Round 9 :
Sc around in back loops only [15]
Info :
Make the border of the boot, starting in the front center: chain 3, 13 sc, chain 2, slst 1 (pic 3).
Info :
Using yellow yarn, embroider a small line in the front of the boot (pic 4).
— Body :
Info :
off white and green - single crochet
Info :
Using off white, join both legs with a slip stitch (pic 1). Pay attention to the position of the feet: the heels should be facing you when joining.
Round 13 :
Sc around both legs [30] (pic 2)
Round 14 :
6 sc, dec, 6 sc, dec, 6 sc, dec, 6 sc [27]
Round 16 :
6 sc, dec, 5 sc, dec, 5 sc [24]
Round 17 :
Sc around in back loops only [24] (pic 3)
Round 19 :
5 sc, dec, 4 sc, dec, 4 sc, dec, 5 sc [21]
Round 20-21 :
Sc around [21]
Round 22 :
4 sc, dec, 4 sc, dec, 4 sc, dec, 3 sc [18]
Info :
In the next round we are going to join the arms*
Round 23 :
4 sc, 2 sc joining the arm, 7 sc, 2 sc joining the arm, 3 sc [18] (pic 4)
Info :
Fasten off and leave a tail for sewing.
Info :
*Check to see if the arms are aligned on the sides of the body. If necessary, start the round with 5 or 3 sc instead of 4.
— Shirt Border :
Info :
green - single crochet
Info :
Join the yarn in the front loops of round 17
Round 1 :
(5 sc, inc) around [28] (pic 1)
Round 2 :
Sc around [28] (pic 2)
Round 3 :
(6 sc, inc) around [32]
— Belt :
Info :
brown and yellow - chain
Info :
Using brown, make two belts with 25 chains each. Fasten off and leave a tail for sewing. Wrap one of the belts around the waist and sew both ends under the right arm. Wrap the other belt over the shoulder and attach on the waist belt (pic 1).
Info :
Using yellow, embroider a line in the center of each belt and hide the ends (pic 2).
— Sword :
Info :
blue - chain, slip stitch and single crochet
Round 1 :
4 sc in the magic ring (4)
Round 6 :
1 sc, ch 2, slst 1, 2 sc, ch 1, slst 1, 1 sc (pics 1 and 2)
Info :
Protect the hammer with adhesive tape. Hammer the craft wire, leaving 1cm (0,3") for the handle (pic 3). Carefully hit both sides, until you get a flat strip of wire. Glue the blade on the handle (pic 4).
— Head :
Info :
beige - chain, slip stitch, single crochet and half double crochet
Round 1 :
6 sc in the magic ring (6)
Round 3 :
(1 sc, inc) around [18]
Round 4 :
(2 sc, inc) around [24]
Round 5 :
(3 sc, inc) around [30]
Round 6 :
(4 sc, inc) around [36]
Round 7 :
(5 sc, inc) around [42]
Round 8-14 :
Sc around [42]
Info :
Insert safety eyes between rounds 11 and 12, eight stitches apart (pic 1)
Round 15 :
(5 sc, dec) around [36]
Round 16 :
(4 sc, dec) around [30]
Round 17 :
(3 sc, dec) around [24]
Round 18 :
(2 sc, dec) around [18]
Info :
Pin and sew the head on the body (pics 2 and 3).
— Ears :
Info :
Chain 6, skip 1 chain
Round 1 :
Slst 1, 1 sc, 2 hdc, slst 1
Info :
Fasten off and leave a tail for sewing.
Info :
Attach them on the sides of the head, between rounds 12 and 13, five stitches apart from the eyes (pic 4).
Info :
Obs.: the curve should be on the top of the ear, and sew the first hdc to the head, to raise the ear a little bit.
— Sleeves :
Info :
green - chain, slip stitch, single crochet and half double crochet - make two
Info :
Chain 7, skip 1 chain
Round 1 :
1 sc, 3 hdc, 1 sc, slst 1 (pic 1)
Info :
Fasten off and leave a tail for sewing.
Info :
With the wrong side of the piece showing, sew them over Link's arms (pic 2).
Info :
Obs.: only one stitch on each end is enough.
— Hair :
Info :
mustard - chain, slip stitch, single crochet, half double crochet and double crochet
Round 1 :
6 sc in the magic ring (6)
Round 3 :
(1 sc, inc) around [18]
Round 4 :
(2 sc, inc) around [24]
Round 5 :
(3 sc, inc) around [30]
Round 6 :
(4 sc, inc) around [36]
Round 7 :
(5 sc, inc) around [42]
Round 8-11 :
Sc around [42]
Info :
Try on the wig (pic 1). It should end right behind the ears. If necessary, add one or two extra rounds.
Info :
From now on, start working on the strands.
Rounds 1-4 :
Chain 4, slst 1, 2 hdc, skip 1 stitch, slst 1 on the base: 4 sc, slst 1 (pic 2)
Round 5 :
Chain 10, slst 1, 8 sc on the base: slst 1
Round 6 :
Chain 7, slst 1, 2 hdc, 3 dc, 1 dc in the same stitch you started the chains (pic 3) on the base: 2 hdc, slst 1 (pic 4)
Round 7 :
Chain 6, slst 1, 2 hdc, 2 dc, 1 dc in the same stitch you started the chains (pic 5) on the base: 2 hdc, slst 1, 2 hdc, 1 dc (pic 6)
Round 8 :
Chain 6, slst 1, 2 hdc, 2 dc, slst 1 in the same stitch you started the chains (pics 7 and 8) on the base: 2 hdc, 1 dc
Round 9 :
Chain 7, slst 1, 2 hdc, 3 dc, slst 1 in the same stitch you started the chains on the base: slst 1
Round 10 :
Chain 10, slst 1, 8 sc, slst 1
Round 11-14 :
Chain 4, slst 1, 2 hdc, skip 1 stitch, slst 1
Info :
Pin the wig on the head.
Info :
The 4-sc spaces should be placed over the ears, and the 10-ch strands should be on the front (pic 9).
Info :
The tips of the wide strands on the front should be curved to the sides (pics 10 and 11).
Info :
Glue the wig in place, with the ends loose (pic 12).
— Hat :
Info :
green - slip stitch, single crochet and half double crochet
Round 1 :
4 sc in the magic ring (4)
Round 2 :
(1 sc, inc) x2 [6]
Round 3 :
(2 sc, inc) x2 [8]
Round 4 :
Slst 2, 1 sc, inc, slst 3, inc [10]
Round 5 :
Slst 2, 2 sc, inc, slst 4, inc [12]
Round 6 :
Slst 2, 3 sc, inc, slst 5, inc [14]
Round 7 :
Slst 2, 4 sc, inc, slst 6, inc [16]
Round 8 :
Slst 2, 5 sc, inc, slst 7, inc [18]
Round 9 :
Slst 2, 6 sc, inc, slst 8, inc [20]
Round 10 :
Slst 2, 7 sc, inc, slst 9, inc [22]
Round 11 :
Slst 2, 8 sc, inc, slst 10, inc [24]
Round 12 :
Slst 2, 9 sc, inc, slst 11, inc [26]
Round 13 :
Slst 2, 10 sc, inc, slst 12, inc [28]
Round 14 :
Slst 2, 11 sc, inc, slst 13, inc [30]
Round 15 :
3 inc, 24 sc, 3 inc [36]
Round 16 :
(5 sc, inc) around [42]
Round 17 :
(6 sc, inc) around [48]
Round 18-21 :
Sc around [48]
Round 22-23 :
12 sc, 24 hdc, 12 sc [48]
Info :
Make a crease, fold the tip of the hat and try it on the head. It should end right behind the ears and very close to the slst on the center part of the hair (pics 5 and 6).
Info :
If necessary, add one or two extra rounds of sc. Fasten off.
— Shield :
Info :
blue and grey - slip stitch, single crochet and half double crochet
Info :
In the magic ring, make:
Round 1 :
1 sc, ch 2, 2 sc, ch 2, 2 sc, ch 2, 1 sc (pics 1 and 2). Close the ring
Round 2 :
1 sc, {1 sc, ch 2, 1 sc} in the chain space, 2 sc, {1 sc, ch 2, 1 sc} in the chain space, 2 sc, {1 sc, ch 2, 1 sc} in the chain space, 1 sc (pic 3)
Round 3 :
2 sc, {1 sc, ch 2, 1 sc} in the chain space, 1 sc, 3 hdc, {1 hdc, ch 2, 1 hdc} in the chain space, 3 hdc, 1 sc, {1 sc, ch 2, 1 sc} in the chain space, 2 sc (pics 4)
Info :
Fasten off and leave a tail to make the handle.
Round 4 :
Slst 4, ch 1*, slst 2, 1 hdc on round 3, Slst 5, ch 1*, slst 5, 1 hdc on round 3, Slst 2, ch 1*, slst 4, 1 hdc on round 3 (pics 5 - 8)
Info :
*The chains should be stitched over the chains of the previous round.
Info :
Make a handle big enough to attach to Link's wrist (pic 9).
This charming Link amigurumi brings a tiny hero to life with a layered outfit, wig, and tiny accessories that burst with character. Make one for a nostalgic gift, a collector, or a playful display piece — it stitches up into a lovely keepsake. Enjoy the details like the embroidered boots, sword and shield, and that iconic slouched hat. 🧶✨