About This Lion Fair Isle Hat Pattern
This knit hat pattern creates a warm, worsted-weight beanie with a striking lion fair isle chart around the body. You will work the brim in ribbing, follow the provided color chart for the body, then shape the crown with decreases. The pattern uses standard knitting shaping and stranded colorwork techniques to achieve a clean, professional result.
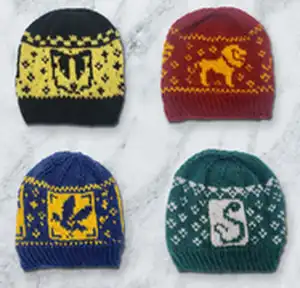
The included chart is 30 stitches wide by 26 rows high and is worked in the round after casting on and ribbing. Materials are minimal: two contrasting worsted weight skeins, double-pointed needles or a short circular needle, and a yarn needle for finishing.
Why You'll Love This Lion Fair Isle Hat Pattern
I absolutely love this pattern because the lion motif brings a playful, bold statement to a classic winter beanie. I enjoy stranded colorwork, and this chart is satisfying to knit while still being manageable for intermediate knitters. The shaping for the crown is straightforward and creates a neat top that highlights the motif. Making this hat feels quick and rewarding, and the finished result is a warm, well-structured piece that's great for gifting.
Switch Things Up
I love changing the color palette to make the lion hat feel fresh; try muted earth tones for a vintage feel or bold contrasting colors for a playful look.
I often substitute the main and contrast colors to match team colors or favorite palettes to make a personalized gift.
If you want a larger hat, I change yarn weight and needle size and re-check gauge so the chart proportions remain pleasing.
I sometimes add a faux fur pompom at the crown for a fun winter accessory that kids especially adore.
To make the hat smaller for a child, I reduce overall stitch count proportionally and adjust brim rows for a snugger fit.
I like to line the hat with fleece for extra warmth; sew the lining carefully inside after finishing and weaving in ends.
For a different look, try duplicate stitch to add small accents after knitting rather than working more colorwork during the round.
If stranded floats feel bulky, I occasionally switch to intarsia for the large motif section, working it flat and seaming, though stranded is faster in the round.
I recommend blocking the finished hat differently depending on yarn fiber; wool benefits from steam blocking while acrylic shapes well with gentle wet blocking.
For ears or earflaps, I graft small extensions onto the sides after finishing the main body, then pick up and knit an earflap pattern that matches the ribbed brim.
I sometimes experiment with twisted rib or different brim styles (folded brim, 1x1 vs 2x2) to adjust the hat's fit and look while keeping the chart intact.
Common Mistakes & How to Fix Them
✗ Not checking gauge before starting; always knit a swatch to match 16 stitches and 24 rows = 4 inches in stockinette to ensure proper hat size.
✗ Forgetting to increase evenly for the chart body; use m1 every 12 stitches on the first chart row as instructed to reach 90 stitches total.
✗ Carrying floats too tight across the back causes puckering in the fair isle section; catch floats loosely at regular intervals to maintain elasticity.
✗ Skipping the rib brim length recommendation can make the hat too short or too long; work k1p1 until the brim reaches your preferred length or the suggested 8 rows.