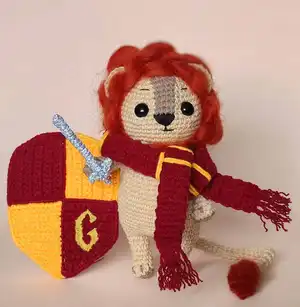
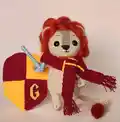
Make a charming Gryffindor lion amigurumi with this detailed crochet pattern. You will create a cuddly lion with a felted mane, posable wire tail, shield crest and tiny sword — perfect for gifting or display. The pattern includes step-by-step rounds, photos and assembly tips so you can follow along easily. Ideal for adding personality with embroidery and small accessories.
Progress Tracker
0% Complete
— Hands :
Info :
Use: brown & beige yarn, hook 1.75
Round 1 :
start with brown yarn 8sc in MR(pic 1), join the beige yarn (pic 2), brown yarn don’t cut off.
Round 2 :
2sc, inc*3, 3sc (11)
Round 3 :
3sc, claw, 1sc, claw, 1sc, claw, 3sc (11) (pic 5)
Round 4 :
2sc, dec*3, 3sc (8)
Round 5-10 :
8sc in the each round
Round 11 :
(2sc, dec*2 (6), close the round with sl st/ Fasten the yarn and cut off. Repeat for the second paw (pic 6).
Info :
HOW TO make claws: Grab brown yarn, pull out, complete sc with beige yarn (pic 3-4)
— Tail :
Info :
Use: beige yarn, hook 1.75; ginger wool, felting needle
Info :
Cut 15cm/5,9" of wire. Wrap both ends of the wire as shown in the (pic 7-8). Wrap the wire with beige yarn and glue in one layer (pic 9).
Round 2-31 :
6sc in the each yarn
Round 32 :
(2sc, inc)*2 (8)
Round 33 :
(crochet 4sc taking over the wire, 4sc (8)
Round 34 :
8sc, close the round with sl st. Fasten the yarn and cut off.
Info :
Cut wool 15cm/5,9" long and 5cm/2" wide. Thread 20cm/7,9" of beige yarn into the needle (pic 14). Put the wool in and place the yarn with the needle in the center folded in half. Roll up the wool and start felting with needle (pic 15-18). When the base of the tail is tight enough, insert the needle into the ring amigurumi tail and pull out (pic 19-20). Keep felting (pic 21). Cut off the excess part of the tail and leave about 3cm/1"(pic 22-23). Make incisions with scissors and felt some more. The tail is done!
— Legs-Body :
Info :
Use: brown & beige yarn, hook 1.75; filler; teddy joints; wire, glue
Round 1 :
3ch, crochet 10sc on both sides, close the round with sl st. Fasten the yarn and cut off (pic 26). Join the beige yarn.
Round 2 :
inc*4, 4sc (12) (pic 27)
Round 4 :
1sc, dec*4, 3sc (8)
Round 5-6 :
8sc in the each round
Round 7 :
2sc, inc, 5sc (9)
Round 9 :
3sc, inc, 5sc (10), close the round with sl st. Fasten the yarn and cut off for the fist leg (pic 28).
Info :
Repeat all steps for the second leg, but don’t cut off (pic 29).
Round 10 :
make 2 sl st, crochet 7ch, join to the 9th stitch of the first leg’s last round. Crochet around the resulting piece, making two increases to the sides (pic 30-32).
Round 12 :
(5sc, inc)*6 (42)
Round 14 :
35sc, crochet 4sc grabbing the stitches of the last tound of tail, 2sc (42) (pic 33-34)
Round 15 :
35sc, crochet 4sc grabbing the stitches of the last tound of tai, 2sc (42) (pic 35-36)
Round 17 :
3sc, inc, (6sc, inc)*5, 3sc (48)
Round 18-23 :
48sc in the each round
Round 24 :
3sc, dec, (6sc, dec)*5, 3sc (42)
Round 26 :
(5sc, dec)*6 (36) (pic 37)
Info :
Set the paws on their sides, focusing on the claws, they should look in the opposite direction from the tail (pic 38).
Round 27 :
7sc, crochet around the paw (6 st), 18sc, crochet around the paw (6 st), 11sc (48) (pic 39-40)
Round 28 :
3sc, dec, (6sc, dec)*5, 3sc (42)
Round 29 :
(5sc, dec)*6 (36)
Round 30 :
(2sc, dec)*9, set the wire (27)
Info :
HOW TO set wire: Measure the length from the nails of one paw to the nails of the other paw with a pencil and thread. Cut the wire and wrap it around with glue and yarn. Insert the wire in the legs (pic 43-48).
Round 31 :
(1sc, dec)*9 (18)
Round 32 :
(1sc,dec)*6 (12). Insert cotter pin into shim (pic 50)
Round 33 :
dec*6 (6), close the ring. Fasten the yarn and cut off.
— Head :
Info :
Use: brown & beige yarn, hook 1.75; black & white floss, needle; safety eyes
Round 3 :
(1sc, inc)*8 (24)
Round 4 :
1sc,inc, (2sc, inc)*7, 1sc (32)
Round 5 :
(3sc, inc)*8 (40)
Round 6 :
2sc, inc, (4sc, inc)*7, 2sc (48)
Round 7-11 :
48sc in the each round
Info :
Put the disk on cotter pin and wrap the ends with pliers (pic 53-55)
Round 12 :
22sc, join the brown yarn, 4sc with brown yarn, beige yarn - 22sc (48) (pic 56-57)
Round 13 :
18sc, 2ch, 2sc, 4sc with brown yarn, beige yarn - 2sc, 2ch, 18sc (48)
Round 14 :
22sc, 4sc with brown yarn, beige yarn - 22sc (48)
Round 15 :
22sc, 4sc with brown yarn, beige yarn - 22sc (48)
Round 16 :
(9sc, dec)*2, 4sc with brown yarn, (9sc, dec)*2 (44)
Round 17 :
4sc, dec, 8sc, dec, 4sc, dec, with brown yarn - 4sc, with beige yarn - 4sc, dec, 8sc, dec, 4sc (40)
Info :
Insert the safety eyes at holes (pic 58-59)
Round 18 :
2sc, dec, (4sc, dec)*2, 2sc, with brown yarn - 4sc, with beige (2sc, dec, (4sc, dec)*2, 2sc (34)
Round 19 :
(3sc, dec)*3, with brown yarn - inc, 2sc, inc, beige yarn - (dec, 3sc)*3 (30). Fasten the brown yarn and cut off.
Round 20 :
(3sc, dec)*6 (24)
Round 21 :
1sc, dec, (2sc, dec)*5, 1sc (18)
Round 22 :
(1sc, dec)*6 (12)
Round 23 :
dec*6, close the ring. Fasten the yarn and cut off. Embroider the muzzle.
Info :
HOW TO embroider muzzle: Embroider a triangle with black floss. Make stitches from the bottom of the nose to the top (pic 61-63). After sewing the nose, take the needle to the bottom of the nose and embroidered mouth. Play with the eyebrows. Notice that when you embroider the brows, the lion’s mood will change (pic 64,66). Detach one warp from the white floss and sew a stitch from the top corner of the eye to the bottom corner (pic 65).
— Ears :
Info :
Use: brown & beige yarn, hook 1,75
Round 1 :
Crochet 6dc in MR with brown yarn. Close the round with sl st. Fasten the yarn and cut off (pic 67).
Round 2 :
Crochet 6dc in MR with beige yarn. Close the round with sl st (pic 68). Next row crochet both the beige and brown parts of the ear (pic 69).
Round 3 :
Turn, 1sc, inc*4, 1sc (10). Close the round with sl st. Fasten the yarn and cut off leaving a long end (pic 70). Crochet two ears.
— Mane :
Info :
Use: ginger wool, felting needle
Info :
Set the ears with pins so that between the brown stripe from the nose and the ears fit a piece of wool (pic 71-73). Sew on the ears. Felting mane (pic 74-76).
Info :
Embroider claws with brown yarn (pic 77-80).
— Sword of Gryffindor :
Info :
Use: silver metallized floss, hook 1.5, needle
Instruction :
Make 20ch (pic 81). Crochet 3sc, 3ch, 2sl st in small chain, 17 sl st in big chain (pic 83). Turn, 17sl st in omther side of chain, 3ch, 2sl st in small chain, 3sc. Close the round with sl st. Fasten the thread and cut off (pic 84). Sew on a red bead or make a small dot with acrylic paint or nail polish (pic 87-88).
— House Crest (P1) :
Info :
Use: burgundy & orange yarn, hook 1.75; canvas, orange floss, needle
Round 1 :
Orange yarn (Yarn E) 1r: 10 ch, turning, 9sc (9)
Round 2 :
1ch, turning, 9sc (9)
Round 3 :
1ch, turning, 8sc, inc (10)
Round 4 :
1ch, turning, 10sc (10)
Round 5 :
1ch, turning, 9sc, inc (11)
Round 6 :
1ch, turning, 11sc (11)
Round 7 :
1ch, turning, 10sc, inc (12)
Round 8-9 :
1ch, turning, 12sc (12) Change the to burgundy (Yarn C).
Info :
To get a beautiful line when changing color in the next row crochet the sc in this way - half of the sc with orange yarn, and the other half with burgundy (pic 89-90).
Round 11-14 :
Burgundy yarn 11-14r: 1ch, turning, 12sc (12)
Round 15 :
1ch, turning, 10sc, dec (11)
Round 16 :
1ch, turning, 11sc (11)
Round 17 :
1ch, turning, 9sc, dec (10)
Round 18 :
1ch, turning, 10sc (10)
Round 19 :
1ch, turning, 8sc, dec (9)
Round 20 :
1ch, turning, 9 sl st (9)
Round 21 :
10sc (burgundy + orange),10 sc (orange + burgundy) (20) Cut the orange yarn.
Round 22 :
1ch, turning, 10sc (burgundy), 10sc (orange)* (20)
Round 23 :
1ch, turning, 10sc (orange), 10sc ((burgundy)) (20)
Round 24 :
1ch, turning, 10sc (burgundy), 10sc (orange) (20)
Round 25 :
1ch, turning, 10sc (orange), 10sc (burgundy) (20)
Round 26 :
1ch, turning, 10sc (burgundy), 10sc (orange) (20)
Round 27 :
1ch, turning, 10sc (orange), 10sc (burgundy) (20)
Round 28 :
1ch, turning, dec, 8sc (burgundy), 8sc, dec (orange) (18)
Round 29 :
1ch, turning, dec, 7sc (orange), 7sc, dec (burgundy) (16)
Round 30 :
1ch, turning, dec, 6sc (burgundy), 6sc, dec (orange) (14)
Round 31 :
1ch, turning, dec, 5sc (orange), 5sc, dec (burgundy) (12)
Round 32 :
1ch, turning, dec, 4sc (burgundy), 4sc, dec (orange) (10)
Round 33 :
1ch, turning, dec, 3sc (orange), 3sc, dec (burgundy) (8)
Round 34 :
1ch, turning, dec, 2sc (burgundy), 2sc, dec (orange) (6)
Round 35 :
1ch, turning, dec, sc (orange), sc, dec (burgundy) (4)
Round 36 :
1ch, turning, dec (burgundy), dec (orange) (2)
Round 37 :
1ch, turning, dec. Next crochet the detail around the perimeter in a counter-clockwise direction from the point «Start» using jacquard technique for changing color – 16sc (burgundy), 19sc (orange), 19sc (burgundy), 16sc, sl st in the 1st dec (orange) (71)
Info :
Embroider the lines with burgundy yarn and fix it with dark red threads to hide the "stages" (pic 94-96).
Info :
On the left is a picture that I used to embroider the letter on the house crest. Add brightness on the screen to maximum, enlarge or reduce the picture so that the size of the letter will be approx. 2.5 cm (1 inch) high. Attach a water soluble cross stitch canvas on it and circle the picture with a pencil (pic 97).
Info :
Fix the canvas to the right lower side of the house crest with the needle for cutting (pic 98). Get 2 threads of yellow thread floss and embroider the outline of the letter using the seam "backstitch" (pic 99). Then embroider the inside of the letter with fill stitches (pic 100). Rinse the embroidery under running water and gently peel off the canvas with your fingers (pic 101).
Info :
Place the crest on the tablecloth and secure with pins in the corners (pic 102). Cut approx 20cm/7,8" orange yarn and join it to the house crest with the hook from both sides (pic 103-104).
— Scarf :
Info :
Use: burgundy yarn, hook 1.75; orange yarn, needle
Round 1 :
5ch, turning, 4sc (4)
Round 2-100 :
1ch, turning, 4sc (4).
Info :
Use pins to mark the location of the stripes (pic 105). For the stripes to be at an equal distance, fold the scarf 2-3-4 times (pic 106), depending on its length. Thread the yellow yarn into the needle and make a knot on one of the ends. Pick the wrong side of the scarf yourself and insert the needle into the center, next to the pin. Insert the needle carefully without piercing the scarf. Make two turns (pic 106-107), wrapping the scarf. Take the needle out in the center of the wrong side. Step back two rows and make two more turns around the scarf (pic 109-110). Step back about 10 rows and make the next turn next to the pin. Repeat all steps next to each pin. Fasten the yarn and cut it off (pic 111). Cut 8 strands of burgundy yarn 6cm/2.4" long for the fringe (pic 112-116).
This little Gryffindor lion is a lovely mix of crochet, felting and tiny accessories that bring so much personality to your amigurumi collection. Make one to celebrate your favorite house or gift a handmade friend to someone special. The detailed steps and photos will guide you from first stitch to finished hero. 🧶🦁✨