About This Little Spark Amigurumi Pattern
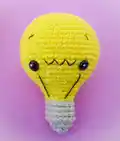
This pattern creates a small, adorable light bulb amigurumi called Little Spark, perfect for gifting or keeping on a shelf. It uses simple single crochet rounds, a change of color for the screw fitting, and basic embroidery for facial details. The finished piece measures approximately 8 cm tall when made with the recommended yarn and hook.

Designed for beginners, the pattern includes full round-by-round instructions and clear notes for assembly. You will learn shaping, back/front loop techniques, and simple surface embroidery.
Why You'll Love This Little Spark Amigurumi Pattern
I absolutely love this pattern because it turns simple stitches into a delightful little character that always brings a smile. I enjoyed designing a compact shape that uses minimal yarn but has big personality through embroidery and the screw-base detail. The construction is straightforward, which makes it relaxing to work on while still feeling rewarding. I adore how quickly one can finish a bulb and gift it or use it as a sweet decoration.
Switch Things Up
I love customizing this pattern by changing the bulb color to create a set of different 'spark' characters.
Try pastel shades for a softer, nursery-friendly look or neon colors for a fun, modern set.
To make a mini keychain version, use thinner yarn and a smaller hook and add a split ring at the top.
If you want a chunkier, cuddlier bulb, use bulky yarn and increase your hook size — the shape will remain the same but larger.
I often embroider different expressions: a sleepy face, a surprised zigzag, or a smiling mouth to change the personality.
Add tiny crocheted accessories like a little hat or a bow for gifting occasions and seasonal variations.
Swap safety eyes for embroidered eyes to make a child-safe toy suitable for small children and babies.
Use metallic or variegated yarn for the screw fitting to give a shiny or textured look without extra stitches.
I sometimes add a small hanging loop at the top to turn the bulb into an ornament or a bag charm.
Experiment with placement of the facial features — moving eyes slightly higher or lower alters the character's expression dramatically.
If you want it sturdier, embroider reinforcement lines inside before stuffing to keep shapes crisp after washing.
Combine multiple colors in the bulb body to create striped or ombre effects for a playful, modern finish.
Common Mistakes & How to Fix Them
✗ Skipping the magic ring and starting with chains can create a hole at the top; use a tight magic ring to avoid gaps and pull it closed securely.
✗ Forgetting to add stuffing as you go causes lumps and difficulty shaping later; stuff gradually during the shaping rounds to maintain an even shape.
✗ Inserting safety eyes too close together will look odd on the face; place safety eyes between rounds 16-17 with 10 stitches visible between them for correct spacing.
✗ Not switching yarn color at the correct round makes the screw fitting messy; change to silver yarn exactly after round 25 and join to the first open front loop of round 26 for a neat finish.
✗ Neglecting to work in the correct loops for the screw detail will hide the texture; join silver yarn to the first grey open front loop of round 26 and work SS in all open front loops of rounds 26-30.