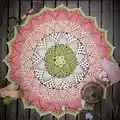
Create a stunning lotus-inspired mandala with this detailed crochet pattern. You will work in rounds to build layered petals and textured stitches that form a beautiful decorative centerpiece. The pattern includes both Catona and Whirl yarn options with color suggestions and clear round-by-round instructions. Perfect for crocheters who enjoy lacework, texture, and a rewarding blocking finish.
Progress Tracker
0% Complete
— Pattern :
Info :
Make a magic loop with Color A or Whirl thread and crochet hook 3.0mm.
Round 1 :
(RS): Ch2 (first hdc), make 11hdc in the same loop. Ss in top of first st to connect. [12hdc]
Round 2 :
Ch3 (first dc), 1dc in same st, (2dc in next st) 11 times. Ss in top of first st to connect. [24dc]
Round 3 :
Ch1 (doesn't count as st here and throughout entire pattern), (1sc in next 3 sts,ch5, sk 2 sts) 4 times. 1sc in next st, 2sc in next st, ch5, sk next 2 sts. Ss in top of first st to connect. Ss to next st. [5 gr of 3sc and 5 times a ch5-sp]
Round 4 :
Starting in the second sc of a 3sc-gr. Ch1,(1sc in second sc of 3sc-gr, sk next st, 4hdc-ch1-4hdc in next ch5-sp, sk next st) 5 times. Ss in top of first st to connect. Ss to next ch1-sp between the hdc's. [5sc and 5 gr of 4hdc-ch1-4hdc]
Round 5 :
Starting in ch1-sp. Ch1, *3sc in ch1-sp, sk first hdc of next 4hdc-gr (which is hard to see due to the 3sc made), 1sc in second and third hdc, ch7, sk next hdc-sc-hdc, 1sc in next 2 sts, sk next st – which will be the last hdc for the next ch1-sp. Rep from * 4 more times. Ss in top of first st to connect. The Whirl version makes an ss in the second sc of a 3sc-gr, and the Catona version fastens off Color A. [5 gr of 3sc/ 5 gr of 2sc-ch7-2sc]
Round 6 :
Take Color B and attach it in the second sc of a 3sc-gr. Or continue with the Whirl version where you already are in this stitch. Ch4 (first dc + ch1), sk next 3 sts, 11tr in next ch7-sp, ch1, sk next 3 sts. *1dc in second sc of next 3sc-gr, ch1, sk next 3 sts, 11tr in next ch7-sp, ch1, sk next 3 sts. Rep from * 3 more times. Ss in the third ch to connect. [5dc/ 10 times a ch1-sp/ 5 gr of 11tr]
Round 7 :
Ch3 (doesn't count as st), *1fptr around the dc of R6, ch3, 1fptr around the same dc you just used, sk next ch1-sp and first tr of next 11tr-gr, (1bpdc around next tr, ch1) 8 times, 1bpdc around next tr, sk last tr of 11tr-gr and next ch1-sp. Rep from * 4 more times. Ss in top of first st to connect. Ss to next ch3-sp between the fptr's. [5 gr of fptr-ch3-fptr and 5 gr of 9bpdc/8 times a ch1-sp]
Round 8 :
Starting in a ch3-sp between two fptr's. *1pc in the ch3-sp, ch3, 1fptr around the fptr out of last Round, sk first bpdc and ch1-sp, (1bpdc around next bpdc, ch1) 6 times, 1bpdc around next bpdc, sk next ch1-sp and last bpdc, 1fptr around the next fptr out of last Round, ch3. Rep from * 4 more times. Ss in top of first st to connect. Ss to next ch3-sp. [5 gr of fptr-ch3-pc-ch3-fptr and 5 gr of 7bpdc/6 times a ch1-sp]
Round 9 :
Starting in ch3-sp after a pc. *1pc in ch3-sp, ch3, 1fptr around next fptr out of last Round, sk next bpdc and ch1-sp, (1bpdc around next bpdc, ch1) 4 times, 1bpdc around next bpdc, sk next ch1-sp and last bpdc, 1fptr around next fptr out of last Round, ch3, 1pc in next ch3-sp, ch3. Rep from * 4 more times. Ss in top of first st to connect. Ss to next ch3-sp. [5 gr of fptr-ch3-pc-ch3-pc-ch3-fptr and 5 gr of 5bpdc/4 times a ch1-sp]
Round 10 :
Starting in ch3-sp after the second pc. *1pc in ch3-sp, ch3, 1fptr around next fptr out of last Round, sk next bpdc and ch1-sp, (1bpdc around next bpdc, ch1) twice, 1bpdc around next bpdc, sk next ch1-sp and last bpdc, 1fptr around next fptr out of last Round, ch3, 1pc in next ch3-sp, ch3, sk next pc. Rep from * 4 more times. Ss in top of first st to connect. Ss to next ch3-sp. [5 gr of fptr-ch3-pc-ch3-pc-ch3-pc-ch3-fptr and 5 gr of 3bpdc/2 times a ch1-sp]
Round 11 :
Starting in ch3-sp after the third pc. *1pc in ch3-sp, ch3, 1fptr around next fptr out of last Round, sk next bpdc and ch1-sp, 1bpdc around next bpdc, sk next ch1-sp and bpdc, 1fptr around next fptr out of last Round, ch3, (1pc in next ch3-sp, ch3, sk next pc) 3 times. Rep from * 4 more times. Ss in top of first st to connect. Ss to next ch3-sp. [5 gr of fptr-ch3-pc-ch3-pc-ch3-pc-ch3-pc-ch3-fptr and 5 times a bpdc]
Round 12 :
Starting in ch3-sp after the fourth pc. Ch1, *2sc in ch3-sp before the fptr, ch1, 1fpdc2tog over next two fptr's out of last Round (you will close the leaf), ch1, 2sc in next ch3-sp, ch7, sk next pc and ch3-sp, 1sc in next pc (this is the second pc out of four), 5sc in next ch3-sp, 1sc in next pc, ch7, sk next ch3-sp and pc. Rep from * 4 more times. Ss in top of first st to connect. Fasten off the yarn for both versions. [5 times a fpdc2tog/ 10 times a ch1-sp/ 5 gr of 2sc-ch7-7sc-ch7-2sc]
Round 13 :
Take Color C or the Whirl thread and attach it in any fourth sc out of a 7sc-gr made. Ch1, *1sc in fourth sc out of a 7sc-gr, ch1, 11tr in next ch7-sp, ch1, 1fpdc around the next fpdc2tog out of last Round, ch1, 11tr in next ch7-sp, ch1. Rep from * 4 more times. Ss in top of first st to connect. [5sc/5fpdc/20 times a ch1-sp/10 gr of 11tr]
Round 14 :
Ch3 (doesn't count as st), *1fptr around the sc, ch3, make another fptr around the same sc, sk next ch1-sp and first tr of next 11tr-gr, (1bpdc around next tr, ch1) 8 times, 1bpdc around next tr, sk last tr of 11tr-gr and ch1-sp, 1fptr around next fpdc, ch3, 1fptr around the same fpdc you just used, sk next ch1-sp and first tr of next 11tr-gr, (1bpdc around next tr, ch1) 8 times, 1bpdc around next tr, sk last tr of 11tr-gr and next ch1-sp. Rep from * 4 more times. Ss in top of first st to connect. Ss to next ch3-sp. [10gr of fptr-ch3-fptr and 10gr of 9bpdc/8 times a ch1-sp]
Round 15 :
Rep R8 only change the number of repeats from 4 to 9. [10 gr of fptr-ch3-pc-ch3-fptr and 10 gr of 7bpdc/6 times a ch1-sp]
Round 16 :
Rep R9 only change the number of repeats from 4 to 9. [10 gr of fptr-ch3-pc-ch3-pc-ch3-pc-ch3-fptr and 10 gr of 5bpdc/4 times a ch1-sp]
Round 17 :
Rep R10 only change the number of repeats from 4 to 9. [10 gr of fptr-ch3-pc-ch3-pc-ch3-pc-ch3-pc-ch3-fptr and 10 gr of 3bpdc/2 times a ch1-sp]
Round 18 :
Rep R11 only change the number of repeats from 4 to 9. [10 gr of fptr-ch3-pc-ch3-pc-ch3-pc-ch3-pc-ch3-pc-ch3-fptr and 10 times a bpdc]
Round 19 :
Rep R12 only change the number of repeats from 4 to 9. [10 times a fpdc2tog/ 20 times a ch1-sp/ 10 gr of 2sc-ch7-7sc-ch7-2sc]
Info :
The Catona version will now take Color D for the next Rounds.
Round 20 :
Rep R13 only change the number of repeats from 4 to 9 times. [10sc/ 10fpdc/ 40 times a ch1-sp/ 20 gr of 11tr]
Round 21 :
Rep R14 only change the number of repeats from 4 to 9 times. [20gr of fptr-ch3-fptr and 20 gr of 9bpdc/8 times a ch1-sp]
Round 22 :
Rep R8 only change the number of repeats from 4 to 19. [20 gr of fptr-ch3-pc-ch3-fptr and 20 gr of 7bpdc/6 times a ch1-sp]
Round 23 :
Rep R9 only change the number of repeats from 4 to 19. [20 gr of fptr-ch3-pc-ch3-pc-ch3-pc-ch3-fptr and 20 gr of 5bpdc/4 times a ch1-sp]
Round 24 :
Rep R10 only change the number of repeats from 4 to 19. [20 gr of fptr-ch3-pc-ch3-pc-ch3-pc-ch3-pc-ch3-fptr and 20 gr of 3bpdc/2 times a ch1-sp]
Round 25 :
Rep R11 only change the number of repeats from 4 to 19. [20 gr of fptr-ch3-pc-ch3-pc-ch3-pc-ch3-pc-ch3-pc-ch3-fptr and 20 times a bpdc]
Round 26 :
Starting in ch3-sp after the fourth pc. Ch1, *2sc in ch3-sp after the fourth pc, ch1, fpdc2tog over next two fptr's out of next Round (you will close the leaf), ch1, 2sc in next ch3-sp, 1sc in next pc, 2sc in next pc. Rep from * 19 more times. Ss in top of first st to connect. Fasten off the color for both versions. [20gr of 15sc/ 40 times a ch1-sp and 20 times a fpdc2tog]
Round 27 :
Take Color E or the Whirl thread and attach it in the eighth sc of a 15sc-gr. Ch3 (first dc), 1dc-ch2-2dc in same st, 1dc in next 7 sts, ch1, sk next ch1-sp, 1fpdc around next fpdc2tog, ch1, sk next ch1-sp, 1dc in next 7 sts. *2dc-ch2-2dc in next st, 1dc in next 7 sts, ch1, sk next ch1-sp, 1fpdc around next fpdc2tog, ch1, sk next ch1-sp, 1dc in next 7 sts. Rep from * 18 more times. Ss in top of first st to connect. Ss to next ch2-sp. [20fpdc/ 40 times a ch1-sp/ 20 gr of 9dc-ch2-9dc]
Round 28 :
Ch4 (first hdc + ch2), 1hdc in the same ch2-sp, sk next st, 1bpdc around next 7 sts, sk next st, ch1, 1fpdc around next fpdc out of last Round, ch3, 1fpdc around the same fpdc you just used, ch1, sk next st, 1bpdc around next 7 sts, sk next st, ch1, 1fpdc around next fpdc, ch3, 1fpdc around same fpdc you just used, ch1, sk next st, 1bpdc around next 7 sts, sk next st. Rep from * 18 more times. Ss in the second ch to connect. Ss to next ch2-sp. [20 gr of 7bpdc-hdc-ch2-hdc-7bpdc/ 40 times a ch1-sp/ 20 gr of fpdc-ch3-fpdc]
Round 29 :
Ch4 (first hdc + ch2), 1hdc in the same ch2-sp, sk next st, 1bpdc around next 6 sts, sk next st, ch1, 1fpdc around next fpdc out of last Round, ch3, 1sc in next ch3-sp, ch3, 1fpdc around next fpdc out of last Round, ch1, sk next st, 1bpdc around next 6 sts, sk next st. *1hdc-ch2-1hdc in next ch2-sp, sk next st, 1bpdc around next 6 sts, sk next st, ch1, 1fpdc around next fpdc out of last Round, ch3, 1sc in next ch3-sp, ch3, 1fpdc around next fpdc out of last Round, ch1, sk next st, 1bpdc around next 6 sts, sk next st. Rep from * 18 more times. Ss in the second ch to connect. Ss to next ch2-sp. [20 gr of 6bpdc-hdc-ch2-hdc-6bpdc/ 40 times a ch1-sp/ 20 gr of fpdc-ch3-sc-ch3-fpdc]
Round 30 :
Ch5 (first dc +ch2), 1dc in the same ch2-sp, sk next st, 1bpdc around next 5 sts, sk next st, ch1, 1fptr around next fpdc out of last Round, ch4, 1sc in next ch3-sp, 1sc in next sc, 1sc in next ch3-sp, ch4, 1fptr around next fpdc out of last Round, ch1, sk next st, 1bpdc around next 5 sts, sk next st. *1dc-ch2-1dc in next ch2-sp, sk next st, 1bpdc around next 5 sts, sk next st, ch1, 1fptr around next fpdc out of last Round, ch4, 1sc in next ch3-sp, 1sc in next sc, 1sc in next ch3-sp, ch4, 1fptr around next fpdc out of last Round, ch1, sk next st, 1bpdc around next 5 sts, sk next st. Rep from * 18 more times. Ss in the third ch to connect. Ss to next ch2-sp. [20 gr of 5bpdc-dc-ch2-dc-5bpdc/ 40 times a ch1-sp/ 20 gr of fpdc-ch4-3sc-ch4-fptr]
Round 31 :
Take Color F and attach it in any ch2-sp; the Whirl thread is already in this space. Ch5 (first dc + ch2), 1dc in the same ch2-sp, sk next st, 1bpdc around next 4 sts, sk next st, ch1, 1fptr around the next fptr out of last Round, ch3, 2sc in next ch4-sp, 1sc in next 3 sts, 2sc in next ch4-sp, ch3, 1fptr around next fptr out of last Round, ch1, sk next st, 1bpdc around next 4 sts, sk next st. *1dc-ch2-1dc in next ch2-sp, sk next st, 1bpdc around next 4 sts, sk next st, ch1, 1fptr around next fptr out of last Round, ch3, 2sc in next ch4-sp, 1sc in next 3 sts, 2sc in next ch4-sp, ch3, 1fptr around next fptr out of last Round, ch1, sk next st, 1bpdc around next 4 sts, sk next st. Rep from * 18 more times. Ss in the third ch to connect. Ss to next ch2-sp. [20 gr of 4bpdc-1dc-ch2-1dc-4bpdc/ 40 times a ch1-sp/ 20 gr of fptr-ch3-7sc-ch3-fptr]
Round 32 :
Ch5 (first dc + ch2), 1dc in the same ch2-sp, sk next st, 1bpdc around next 2 sts, sk next 2 sts, ch1, 1fptr around next fptr out of last Round, ch3, 2sc in next ch3-sp, 1sc in next 2 sts, sc3tog over next 3 sts, 1sc in next 2 sts, 2sc in next ch3-sp, ch3, 1fptr around next fptr out of last Round, ch1, sk next 2 sts, 1bpdc around next 2 sts, sk next st. *1dc-ch2-1dc in next ch2-sp, sk next st, 1bpdc around next 2 sts, sk next 2 sts, ch1, 1fptr around next fptr out of last Round, ch3, 2sc in next ch3-sp, 1sc in next 2 sts, sc3tog over next 3 sts, 1sc in next 2 sts, 2sc in next ch3-sp, ch3, 1fptr around next fptr out of last Round, ch1, sk next 2 sts, 1bpdc around next 2 sts, sk next st. Rep from * 18 more times. Ss in the third ch to connect. Ss to next ch2-sp. [20 gr of 2bpdc-1dc-ch2-1dc-2bpdc/ 40 times a ch1-sp/ 20 gr of fptr-ch3-4sc-sc3tog-4sc-ch3-fptr]
Round 33 :
Ch4 (first hdc + ch2), 1hdc in same ch2-sp, ch1, sk next 3 sts, 1fptr around the next fptr out of last Round, ch3, 2sc in next ch3-sp, 1sc in next 3 sts, 1sc3tog over next 3 sts, 1sc in next 3 sts, 2sc in next ch3-sp, ch3, 1fptr around next fptr out of last Round, ch1, sk next 3 sts. *1hdc-ch2-1hdc in next ch2-sp, ch1, sk next 3 sts, 1fptr around next fptr out of last Round, ch3, 2sc in next ch3-sp, 1sc in next 3 sts, 1sc3tog over next 3 sts, 1sc in next 3 sts, 2sc in next ch3-sp, ch3, 1fptr around next fptr out of last Round, ch1, sk next 3 sts. Rep from * 18 more times. Ss in the second ch to connect. Ss to next ch2-sp. [20 gr of hdc-ch2-hdc/ 40 times a ch1-sp/ 20 gr of fptr-ch3-5sc-sc3tog-5sc-ch3-fptr]
Round 34 :
Ch4 (first dc + ch1), 1fptr2tog over next two fptr's out of last Round (you close the leaf), ch1, 1dc in the same ch2-sp out of last Round where you also started in, ch3, 1sc in next ch3-sp, ch3, sk next 2 sts, 1sc in next st, (ch3, sk next 2 sts, 1sc in next ch3-sp) twice, ch3, sk next 2 sts, 1sc in next ch3-sp, ch3, sk next 2 sts, 1sc in next ch3-sp, ch3. *1dc in next ch2-sp, ch1, 1fptr2tog over next two fptr's out of last Round (you close the leaf), ch1, 1dc in the same ch2-sp where you already made a dc into, ch3, 1sc in next ch3-sp, ch3, sk next 2 sts, 1sc in next st, (ch3, sk next 2 sts, 1sc in next ch3-sp) twice. Rep from * 18 more times. Ss in the third ch to connect. Ss to next fptr2tog. The Catona version will fasten off Color F. [20 gr of dc-ch1-fptr2tog-ch1-dc/ 20 gr of ch3-sc-ch3-sc-ch3-sc-ch3-sc]
Round 35 :
Take Color B and attach it in any fptr2tog; the Whirl thread is already there. Ch2 (doesn't count as st), *1fpdc around the fptr2tog, sk next ch1-sp, 1hdc in next dc, 5hdc in next ch3-sp, sk next st, 5sc in next ch3-sp, ch1, 1pc in next ch3-sp, sk next st, 5sc in next ch3-sp, sk next st, 5hdc in next ch3-sp, 1hdc in next dc, sk next ch1-sp. Rep from * 19 more times. Ss in top of first st to connect. Fasten off Color B for the Catona version; the Whirl thread can stay at this point. [20 gr of fpdc-6hdc-6sc-ch1-pc-ch1-6sc-6hdc]
Round 36 :
Take Color A and attach it in any fpdc; the Whirl thread is already there. Ch5 (first dc + ch2), 1dc in same st, 1dc in next 12 sts, ch1, 1sc in next pc, ch1, 1dc in next 12 sts. *1dc-ch2-1dc in next fpdc, 1dc in next 12 sts, ch1, 1sc in next pc, ch1, 1dc in next 12 sts. Rep from * 18 more times. Ss in the third ch to connect. Ss to next ch2-sp. Fasten off Color A for the Catona version. [20 gr of ch2-13dc-ch1-1sc-ch1-13dc]
Info :
The Catona version will end this pattern with the following Round. The Whirl version has some extra Rounds to crochet, and skip the Catona Round 37 and continue with the Whirl Rounds.
Catona R37 :
Take Color C and attach it in any ch2-sp. Ch2 (first hdc), make a picot, 1hdc in same ch2-sp, 1bpdc around next 13 sts, 1sc in next ch1-sp, 1sc around the next sc made in the pc, 1sc in next ch1-sp, 1bpdc around next 13 sts. *1hdc-1picot-1hdc in next ch2-sp, 1bpdc around next 13 sts, 1sc in next ch1-sp, 1sc around next sc made in the pc, 1sc in next ch1-sp, 1bpdc around next 13 sts. Rep from * 18 more times. Ss in top of first st to connect. Fasten off Color C. Weave in all ends. [20 gr of hdc-picot-hdc-13bpdc-3sc-13bpdc]
Whirl R37 :
Ch5 (first dc + ch2), 1dc in same ch2-sp, 1bpdc around next 13 sts, sk next ch1-sp, 1sc in next sc, sk next ch1-sp, 1bpdc around next 13 sts. *1dc-ch2-1dc in next ch2-sp, 1bpdc around next 13 sts, sk next ch1-sp, 1sc in next sc, sk next ch1-sp, 1bpdc around next 13 sts. Rep from * 18 more times. Ss in the third ch to connect. Ss to next ch2-sp. [20 gr of 1dc-ch2-1dc-13bpdc-1sc-13bpdc]
Whirl R38 :
Ch5 (first dc + ch2), 1dc in the same ch2-sp, 1bpdc around next 14 sts, ss in next sc, 1bpdc around next 14 sts. *1dc-ch2-1dc in next ch2-sp, 1bpdc around next 14 sts, ss in next sc, 1bpdc around next 14 sts. Rep from * 18 more times. Ss in the third ch to connect. Ss to next ch2-sp. [20 gr of 1dc-ch2-1dc-14bpdc-ss-14bpdc]
Whirl R39 :
Ch2 (first hdc), make a picot, 1hdc in the same ch2-sp, 1hdc in next 15 sts, sk next ss, 1hdc in next 15 sts. *1hdc-1picot-1hdc in next ch2-sp, 1hdc in next 15 sts, sk next ss, 1hdc in next 15 sts. Rep from * 18 more times. Ss in top of first st to connect. Fasten off the yarn. Weave in all ends. [20 gr of 1hdc-picot-1hdc-30hdc]
Info :
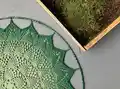
Block the pattern or crochet it into a ring for the best outcome.
This Lotus and Blossom mandala pattern combines delicate lacework with textured popcorns and post stitches for a show-stopping centerpiece. Whether you choose solid Catona colors or a gradient Whirl, the mandala blooms beautifully when blocked and mounted. Enjoy the rhythmic rounds and the satisfaction of a perfectly shaped finished piece. 🧶✨