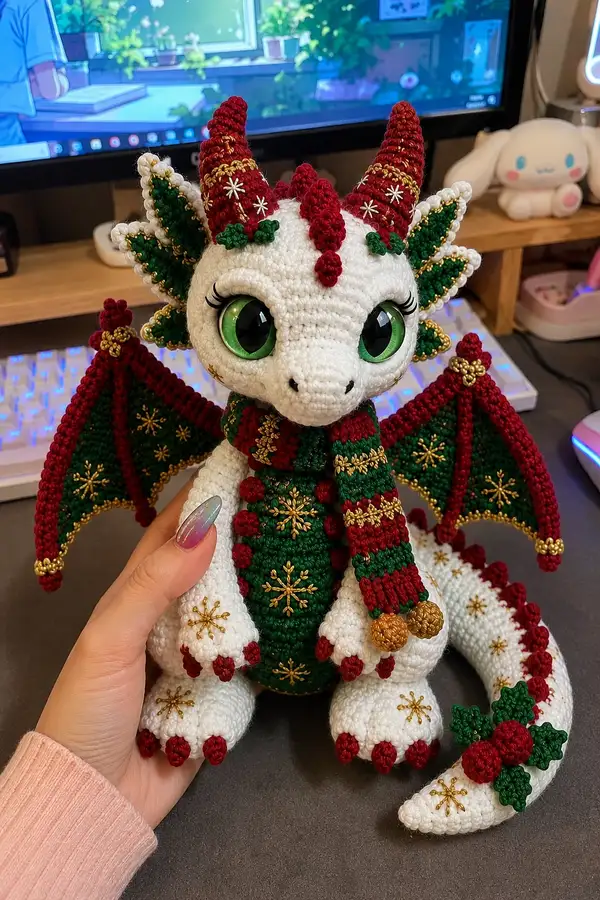
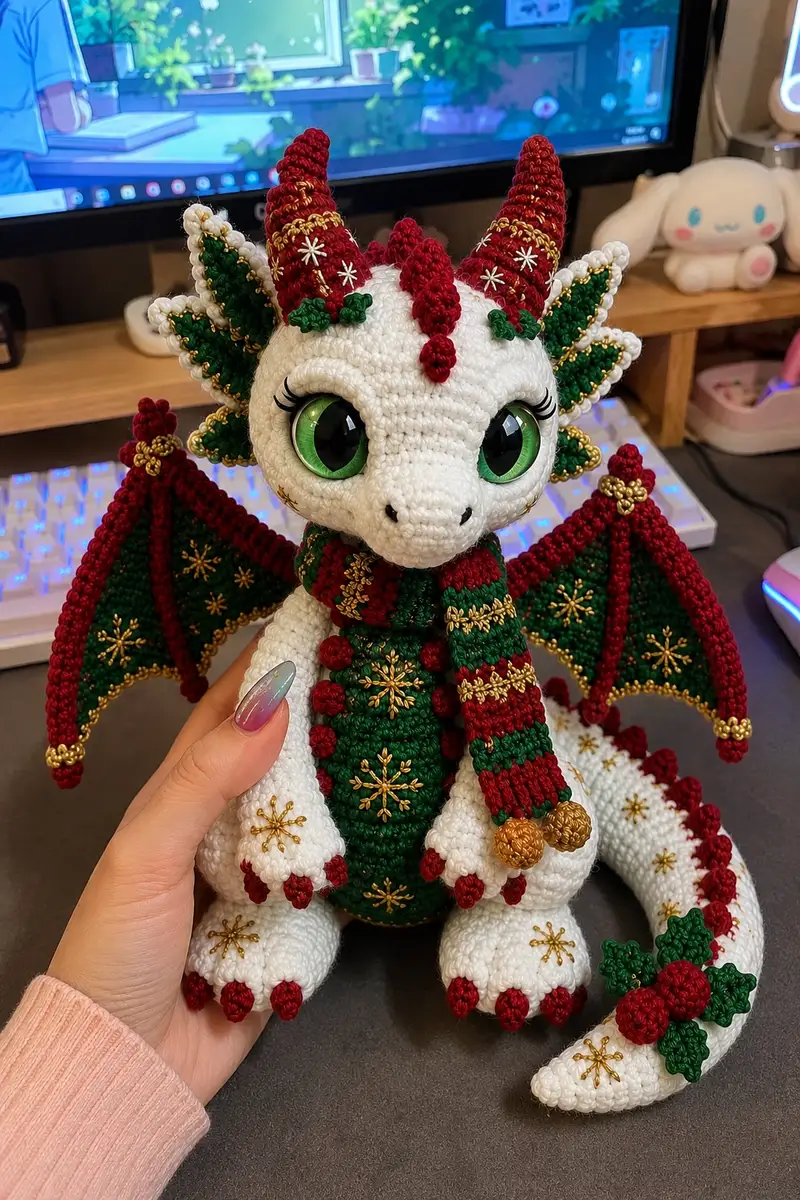
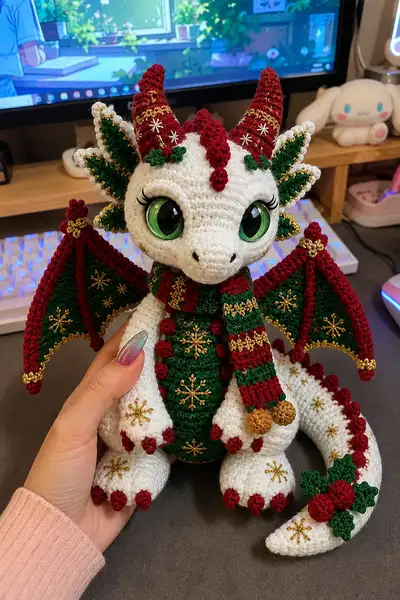
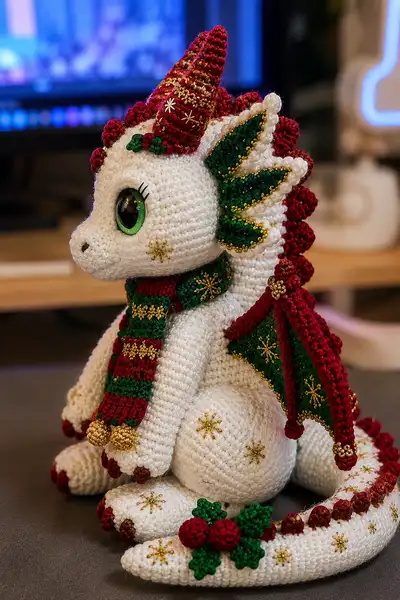
This festive little dragon is crocheted in bright holiday colors — crisp white body, deep red horns and accents, and evergreen wings. Detailed gold embroidery and tiny holly decorations give a luxury holiday look. Plush, poseable-seeming limbs, large expressive green eyes, and a cozy striped scarf complete the Christmas-ready charm.
Progress Tracker
0% Complete
— Head :
Round 1 :
6 sc in magic ring (6)
Round 3 :
(1 sc, 1 inc) x 6 (18)
Round 4 :
(2 sc, 1 inc) x 6 (24)
Round 5 :
(3 sc, 1 inc) x 6 (30)
Round 6 :
(4 sc, 1 inc) x 6 (36)
Round 7 :
(5 sc, 1 inc) x 6 (42)
Round 8 :
(6 sc, 1 inc) x 6 (48)
Round 9-12 :
1 sc in each st (48)
Info :
Place safety eyes between rounds 12-13, approximately 12-14 stitches apart depending on desired expression. Use pins to check spacing before securing eyes. Leave room for eyelid shaping and embroidery.
Round 13 :
(6 sc, 1 inc) x 6 (54) - optional small head top increase to give roundness
Round 14-17 :
1 sc in each st (54)
Info :
If adding eyelid shaping use FLO for two rounds around the eye area to create a subtle ridge. Embroider eyelashes after head is assembled.
Round 18 :
(7 sc, 1 dec) x 6 (48)
Round 19 :
(6 sc, 1 dec) x 6 (42)
Round 20 :
(5 sc, 1 dec) x 6 (36)
Info :
Start stuffing head moderately at round 20 with small amounts of fiberfill. Make sure the face is well shaped around the eyes and snout; use stuffing to push forward the muzzle slightly while maintaining soft roundness.
Round 21 :
(4 sc, 1 dec) x 6 (30)
Round 22 :
(3 sc, 1 dec) x 6 (24)
Round 23 :
(2 sc, 1 dec) x 6 (18)
Round 24 :
(1 sc, 1 dec) x 6 (12)
Info :
Fasten off leaving a long tail for sewing head to body. Finish stuffing to desired firmness; head should be firm but squishy to the touch.
Round 26 :
Neck setup: Join white at the base of head opening and sc in each st around (6) while closing gently to form neck tube
Round 27 :
Inc evenly around neck to reach 12 sts: (inc) x 6 (12)
Round 28 :
1 sc in each st (12)
Info :
This short neck tube will be seamed into the body opening later. Keep last few rounds unstuffed to make sewing easier and flatter seam.
Round 29 :
(1 sc, 1 inc) x 6 (18)
Round 30 :
1 sc in each st (18) - shape upper neck
Round 31 :
(2 sc, 1 inc) x 6 (24)
Round 32 :
1 sc in each st (24)
Round 33 :
(3 sc, 1 inc) x 6 (30)
Round 34 :
1 sc in each st (30)
Round 35 :
Fasten off and leave long tail. Final finishing: add small embroidered nostrils and mouth with black yarn using surface embroidery technique.
Info :
Embroider small star/snowflake marks on cheeks now if you prefer doing face embroidery while head is free. Use gold thread for festive sheen as seen in photos.
— Body :
Round 1 :
6 sc in magic ring (6)
Round 3 :
(1 sc, 1 inc) x 6 (18)
Round 4 :
(2 sc, 1 inc) x 6 (24)
Round 5 :
(3 sc, 1 inc) x 6 (30)
Round 6-9 :
1 sc in each st (30)
Info :
If adding the belly panel in green, change color now. Work the belly as separate oval panel if desired; this pattern works the belly directly in rounds using color change. To change, join green and continue next round in FLO for a subtle texture line.
Round 10 :
Change to green for belly: 1 sc in each st BLO (30)
Round 11-16 :
1 sc in each st (30) - belly panel rows in green
Round 17 :
Change to white: 1 sc in each st (30)
Info :
Begin filling the body lightly starting round 14-16; keep stuffing moderate to allow head seam and limb placement flexibility. Body should be plump but not overfilled to maintain seam room.
Round 18 :
(3 sc, 1 inc) x 6 (36) - slight torso increase
Round 19-21 :
1 sc in each st (36)
Round 22 :
(4 sc, 1 dec) x 6 (30)
Round 23 :
(3 sc, 1 dec) x 6 (24)
Round 24 :
(2 sc, 1 dec) x 6 (18)
Info :
Stop stuffing slightly before final decreases so you can attach legs and close smoothly. Leave a long tail for sewing head to body (we will sew through neck tube to body opening).
Round 25 :
(1 sc, 1 dec) x 6 (12)
Round 26 :
1 sc in each st (12) - neck attachment round, do not fasten off
Round 27 :
Work 1 sc in each st for another round (12) to create a stiff neck opening for sewing
Info :
Align head neck tube with body neck opening. Pin head to body and sew using sturdy yarn and ladder stitch for an invisible seam. Make sure the face orientation is centered relative to arms and wings.
Round 28-30 :
Final shaping rounds: weave tail of body closed or secure with invisible stitch after legs are attached and final stuffing is complete.
— Arms (Make 2) :
Round 1 :
6 sc in magic ring (6)
Round 3 :
(1 sc, 1 inc) x 6 (18)
Round 4 :
(2 sc, 1 inc) x 6 (24)
Info :
Round 1-4 form the hand/ paw. If you'd like claws in red, switch to red now or add raised bobbles later. Keep hand interior strongly stuffed.
Round 5 :
1 sc in each st (24)
Round 6 :
Switch to white if not already: 1 sc in each st (24)
Round 7 :
(3 sc, 1 dec) x 6 (18)
Round 8 :
1 sc in each st (18)
Info :
Stuff the hand firmly ensuring finger shape holds. Use a chopstick or stuffing tool to push fiber into fingertips. If inserting wire for poseable arms, thread wire now before upper arm shaping but leave ends folded and covered.
Round 9 :
(2 sc, 1 inc) x 6 (24)
Round 10-13 :
1 sc in each st (24) - lower arm
Round 14 :
(4 sc, 1 inc) x 4 + (4 sc) x 2 to shape shoulder evenly to 28 (28) - evenly add 4 stitches
Round 15-16 :
1 sc in each st (28)
Round 17 :
(4 sc, 1 dec) x 4 + (4 sc) x 2 to reduce to 24 (24)
Round 18 :
Fasten off leaving long tail for sewing. Lightly stuff upper arm if not using wire and shape seam flat for attachment.
Info :
Sew arms to body at rounds approx. 16-18 of body (check body rounds) so arms sit just below the neck opening. Stitch through multiple stitches for stability.
— Legs (Make 2) :
Round 1 :
6 sc in magic ring (6)
Round 3 :
(1 sc, 1 inc) x 6 (18)
Round 4 :
(2 sc, 1 inc) x 6 (24)
Round 5 :
(3 sc, 1 inc) x 6 (30)
Round 6 :
1 sc in each st (30)
Info :
Feet are rounded and have red toe pads. After round 6, switch to red for the little claw/pad bobbles: make 5 small puff stitches around front of foot for toe pads (work into front quarter).
Round 7 :
Mark front center. 1 sc in each st around (30)
Round 8 :
(4 sc, 1 dec) x 5 + (4 sc) x 1 to shape heel (25)
Round 9 :
(3 sc, 1 dec) x 5 (20)
Round 10 :
1 sc in each st (20)
Round 11 :
(2 sc, 1 inc) x 5 (25) - ankle widening
Round 12-17 :
1 sc in each st (25) - leg shaft
Round 18 :
(3 sc, 1 dec) x 5 (20)
Round 19 :
(2 sc, 1 dec) x 5 (15)
Round 20 :
1 sc in each st (15) - leave opening for sewing onto body
Info :
Stuff feet firmly, legs lightly. Sew legs to bottom front and back of body at rounds 6-9 of body for seated posture. Use extra stitches when attaching for stability—double thread the yarn needle if needed.
Round 21 :
Fasten off leaving long tail for sewing. Trim and weave ends after securely attaching.
— Horns (Make 2 spiral horns and 1 central small horn) :
Round 1 :
6 sc in magic ring with red (6)
Round 3 :
(1 sc, 1 inc) x 6 (18)
Round 4-6 :
1 sc in each st (18)
Info :
To create spiral shape, after round 6 work FLO for 4 rounds and gently twist while stuffing. Add thin stuffing to keep spiral hollow but structured. Embroidery gold bands are worked after horns are sewn on.
Round 7 :
(2 sc, 1 dec) x 6 (12)
Round 8 :
(1 sc, 1 dec) x 4 + 1 sc in remaining sts to close to (8)
Round 9 :
Fasten off leaving long tail for sewing. Make one slightly smaller for center horn by reducing a round earlier to get a 12-st horn shape.
Info :
Sew horns symmetrically onto crown of head. Add a few small green leaf bobbles around horn base for holly decoration. Embroider gold thread in spiral bands after sewing.
— Head Frill Spikes (Make 9 small spikes) :
Round 1 :
5 sc in magic ring (5)
Round 3 :
1 sc in each st (10)
Round 4 :
(2 sc, 1 dec) x 3 + 4 sc across to make teardrop shape (8)
Round 5 :
Fasten off leaving tail for sewing down the back of head to create festival puffy ridge.
Info :
Make half in red, half alternating red/white for layered look. Sew along center-back from crown to neck to form spiky mane.
— Ears/Frill Leaves (Make 4 leaves, 2 per side) :
Round 1 :
7 sc in magic ring with green (7)
Round 2 :
(1 sc, 1 inc) x 3 + 1 sc (10)
Round 3 :
(2 sc, 1 inc) x 3 + 1 sc (13)
Round 4 :
1 sc in each st (13) - shape leaf
Round 5 :
Edge with white: join white and sc evenly around leaf edge (approx 16)
Info :
Add gold embroidery along leaf center vein after sewing leaves to head. Layer leaves so the green shows framed by white edge as in photos. Make inner and outer leaf shapes for layered frill.
— Wings (Make 2) :
Round 1 :
With green, ch 14, join to work in rounds forming small oval tip: sc in 2nd ch from hook and across (13), 3 sc in last ch, sc across opposite chain back (13), 3 sc in last ch to join approx (32)
Round 2 :
1 sc in each st (32)
Round 3 :
(4 sc, 1 inc) x 6 + (2 sc) x 2 to create gentle curve (38)
Round 4 :
Change to red: 1 sc in each st BLO (38) to create inner ridgeline
Round 5-8 :
1 sc in each st (38)
Info :
Edge the wing with red picot-style scallops: join red and work (sc, ch2, sl st in next) across curved outer edge to create decorative ridges. Add seed-bead-like gold chain embroidery later to mimic photo detailing.
Round 9 :
BLO ridgeline: 1 sc in each st BLO for 1 round (38)
Round 10 :
Create central support rib: insert 3 sc columns by working 3 lines of sc across wing with small surface slip-stitches or by folding wing and sewing ribs later
Round 11-14 :
1 sc around to stabilize (38)
Round 15 :
Fasten off leaving long tail for sewing. Repeat for second wing.
Info :
Sew wings to upper back at body rounds approx 18-20, spacing them evenly. Stuff lightly inside wing tips or use a thin flexible insert for structure. Embroider gold snowflakes on green panels before final attachment.
— Tail :
Round 1 :
6 sc in magic ring (6)
Round 3 :
(1 sc, 1 inc) x 6 (18)
Round 4 :
(2 sc, 1 inc) x 6 (24)
Round 5-8 :
1 sc in each st (24) - tail shaft
Round 9 :
Work 1 sc in next 12 sts only, turn to create a slightly flattened tail profile; continue working back along same 12 sts in rows rather than rounds to make a semi-oval shape for the tail tip
Round 10-14 :
Rowed work: sc across 12 sts, ch1, turn - repeat 5 rows adding shape; then join back into rounds (24)
Round 15 :
Start adding red bobble spikes along tail: slip stitch into every 6th st and make small bobble (bobble = 5 dc cluster closed) in red for 6 bobbles along top
Round 16-20 :
1 sc in each st (24)
Round 21 :
Decrease slightly to taper tail: (3 sc, 1 dec) x 4 (20)
Round 22 :
(2 sc, 1 dec) x 4 (16)
Round 23-26 :
1 sc in each st (16)
Round 27 :
(1 sc, 1 dec) x 4 (8)
Round 28 :
Fasten off leaving long tail for sewing. Before closing, add holly cluster: crochet 3 small red spheres (magic ring 6 sc, 2 rounds) and 3 green leaves (ch5, sl st back forming leaf shape) and sew to tail base.
Info :
Insert optional thin wire along center of tail for gentle posing. Fold wire ends and encase inside stuffing to avoid poking. Sew tail to lower back center of body with multiple passes for strength.
— Scarf / Collar Accessory :
Round 1 :
With red, ch 6, sc back along chain twice to create a 5-6 stitch wide strip; work in rows to desired scarf length (approx 60-80 rows depending on size)
Round 2-60 :
Alternate stripes: Row 1-2 red (sc), Row 3-4 green (sc), repeat striping sequence to make festive stripes. For textural ridges use BLO on every alternate color stripe to create ribbing.
Info :
Add small pom-pom gold tips by crocheting 2 small spheres in metallic gold and sewing them to scarf ends. Embroider gold chain stitch motif across green stripes for the embroidered pattern.
Round 61 :
Fasten off and weave in ends. Attach scarf around neck and sew a few stitches to hold in place if desired.
— Decorative Embroidery & Snowflakes :
Info :
Use metallic gold thread or thin embroidery thread to stitch snowflake/star motifs on belly, feet and tail. Basic snowflake: bring thread up at center, make 6 straight stitches radiating out, then add small french knots at ends and crossbars to mimic the photo detail.
Step :
On feet and belly, position snowflakes symmetrically. Secure knots inside fabric with a small dot of fabric glue if necessary.
Info :
For wing gold lines, use chain stitch along seams and small star motifs in the center of panels. Keep embroidery light to maintain plush feel.
— Holly Berries & Leaves (Make 3 berries and 3 leaves cluster) :
Round 1 :
Berry: 6 sc in magic ring in red (6)
Round 3 :
1 sc in each st (12)
Round 4 :
Fasten off leaving tail. Make three, stuff lightly and sew together in cluster on tail tip and scarf.
Leaf :
Ch 6, sl st in 2nd ch, hdc, dc, hdc, sl st. Edge with sc in green or white for the rim. Make 3 leaves and sew under berry cluster.
Info :
Arrange holly cluster on tail as shown in the picture and on base to add seasonal charm. Secure with several strong stitches.
— Finishing Touches :
Info :
Embroider lashes above eyes in black using a few dense short stitches. Add small blushed areas with pastel powder if desired for cheeks. Sew all pieces together with matching yarn, hiding joins and weaving tails securely.
Step :
Check symmetry: head centered, wings aligned, legs even. Adjust by removing a few stitches and resewing if necessary.
Info :
Weave in all ends and trim close. Optionally tack scarf and holly pieces to body so they don't shift when displayed or handled.
This adorable Christmas dragon amigurumi brings holiday sparkle to your handmade gifts and décor. Each carefully crafted detail — from gold embroidered snowflakes to the holly-clustered tail — creates a magical seasonal character. The step-by-step instructions guide you from base shapes to final embellishments so you can savor every stitch. 🧶🎄✨ Happy crocheting and enjoy giving this little dragon a warm home!