🧢 Beautiful ✨ Detailed πŸ’ Adorable

Low Sew Spider Amigurumi Pattern

Low Sew Spider Amigurumi Pattern
4.3β˜… Rating
5-7 Hours Time Needed
3.5K Made This
βœ‚οΈ

Intermediate Level

Ideal for those with basic crochet experience, featuring slightly more advanced stitches and techniques to expand your skills.

⏱️

Weekend Treat

Takes 5-7 hours, making it an enjoyable project to finish over a couple of days.

🧸

Cute Companion

An adorable friend to cherish, handcrafted with love to bring comfort and joy for years to come.

About This Low Sew Spider Amigurumi Pattern

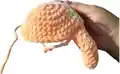
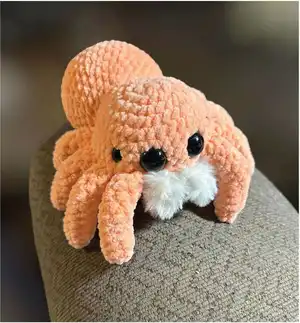
This pattern creates a soft, plush low-sew spider approximately 8 inches tall using chunky plush yarn. You will crochet eight stuffed legs, a head worked from the top down, and a rounded body, then attach them for a charming finished toy. The pattern uses basic amigurumi techniques like magic circle, single crochet, increases, and decreases, with helpful placement notes for eyes and fangs.

Low Sew Spider Amigurumi Pattern crochet pattern - detailed view of completed project

Perfect for those who enjoy quick plush projects, this design is ideal for using Parfait Chunky or Sweet Snuggles Lite yarns. Simple assembly and optional finishing choices let you customize the look and pose of your spider.

Why You'll Love This Low Sew Spider Amigurumi Pattern

I absolutely love this pattern because it turns a handful of simple stitches into a sweet, characterful friend. I enjoy the low-sew construction since it reduces fiddly finishing and still gives a polished look. The plush yarn makes every piece squishy and huggable, which is so satisfying to crochet. I also love that the leg attachment round lets you position the legs exactly where you like, changing the spider's personality easily. Making the fuzzy fangs is one of my favorite tiny details that really brings the face to life.

Low Sew Spider Amigurumi Pattern step 1 - construction progress Low Sew Spider Amigurumi Pattern step 2 - assembly progress Low Sew Spider Amigurumi Pattern step 3 - details and accessories Low Sew Spider Amigurumi Pattern step 4 - final assembly and finishing

Switch Things Up

I love how versatile this pattern is for customization, and I often change colors to create a whole family of spiders.

I sometimes swap the main plush yarn for a brighter or pastel shade to match holidays or nursery themes.

To make a larger or smaller spider, I change yarn weight and hook size; bulky yarn with a larger hook gives a chunky version while thinner yarn makes a mini version.

I like to vary eye sizes for personalityβ€”bigger 20 mm eyes give a cuter look, while smaller 12 mm eyes create a subtler expression.

For poseable legs, I insert thin wire into each leg before closing and leave the end secured inside so the legs can be bent and posed.

I often add embroidered brows or a tiny stitched mouth to alter the spider's expression and mood.

Try different fangs by using felt or crocheting slightly longer fuzzy pieces for a dramatic curve that tucks into the head.

Switching yarn texture for the fangs (faux fur or eyelash yarn) changes the finished look from subtle to very fluffy and expressive.

I sometimes stitch a tiny charm or ribbon to the back of the body for a gift-ready finish and a little extra detail.

When making multiples, I vary stuffing amountsβ€”slightly firmer stuffing helps the legs hold position, while softer stuffing makes the spider cuddlier.

I recommend testing placements before sewing features permanently; pin eyes and legs in place and take a photo to check symmetry and spacing.

If you want a set, I make matching mini spiders with thin yarn and keychain rings to create a playful collection of sizes and colors.

Common Mistakes & How to Fix Them

βœ— Skipping stitch markers during the head and body rounds can make it hard to tell where rounds start; place a marker at the first stitch and move it each round so you keep accurate counts.
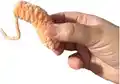
 βœ— Not stuffing the legs as you go can make shaping difficult and lead to lumps; stuff gradually during the leg rounds to keep an even, smooth shape and proper flexibility. βœ— Forgetting to secure leg tails and knot them before final assembly can cause legs to come loose later; tie knots and weave tails inside the body to ensure secure attachment. βœ— Attaching eyes without checking spacing against the leg placement will result in asymmetry; place the legs first, check where the 7-st space is above the legs in rows 7-8, and temporarily mark the eye positions before fixing them.

Low Sew Spider Amigurumi Pattern

Make a cuddly, low-sew plush spider using soft plush yarn and simple crochet techniques. This pattern guides you through making eight stuffed legs, a rounded head, and a plump body with full placement and assembly notes. You will love how quickly this adorable spider comes together and how customizable it is with different yarns and eye sizes. Perfect for gifting or keeping as a quirky handmade friend.

Intermediate 5-7 Hours

Materials Needed for Low Sew Spider Amigurumi Pattern

β€” Main Fabric

  • 01
    Parfait Chunky plush yarn - approximately 75 grams (main color)
  • 02
    Sweet Snuggles Lite plush yarn - alternative (use 6 mm hook)
  • 03
    Small amount of fuzzy/accent yarn for fangs (small scraps, 5-10 g)
  • 04
    Polyfil stuffing (small bag for head, body, and legs)

β€” Tools Required

  • 01
    Crochet hook size 5.0 mm (for Parfait Chunky)
  • 02
    Crochet hook size 6.0 mm (for Sweet Snuggles Lite if used)
  • 03
    Darning/yarn needle for sewing and weaving ends
  • 04
    Safety eyes 20 mm (pair)
  • 05
    Safety eyes 12 mm (pair, smaller outer eyes)
  • 06
    Scissors
  • 07
    Stitch markers
  • 08
    Pins for positioning (optional)

Progress Tracker

0% Complete

β€” Notes :

Infos :

Plush yarn of choice. I recommend parfait chunky or sweet snuggles lite. Yarn Usage: Parfait chunky - 75 grams. Finished size: Approximately 8". Please note this pattern is written in continuous rounds unless otherwise specified. A stitch marker is recommended.

β€” Legs :

Info :

Make 8. Be sure to stuff the leg as you go.

Round 1 :

4 sc in mc (4)

Round 2 :

sc, (inc x3) (7)

Round 3-7 :

sc around (7)

Info :

Start Stuffing and continue as you go.

Round 8 :

2 sc, inc, 2 sc, dec (7)

Round 9-10 :

repeat round 8 (7)

Round 11 :

sc around (7)

Round 12 :

2 sc. (5 sts left unworked)

Info :

sl st, FO

Info :

*Note: if you would like floppy legs that can be easily posed. You can close the legs with 3 sc. This is an option and will make them move more. I like stiffer legs so I leave mine open.

β€” Fangs :

Info :

Make 2 using fuzzy yarn. Leave a yarn tail on both ends because we tie them on later.

Instruction :

Chain 5, starting in second chain from hook sc 4.

β€” Head :

Info :

We will be working from the top of the head down.

Round 1 :

9 sc in mc (9)

Round 2 :

inc x 9 (18)

Round 3 :

(2 sc, inc) x 6 (24)

Round 4 :

(3 sc, inc) x 6 (30)

Round 5 :

(4 sc, inc) x 6 (36)

Round 6 :

(5 sc, inc) x 6 (42)

Round 7-8 :

sc around (42)

Info :

The next round we will attach the legs. Refer to the photos to make sure they are attached correctly so when you flip it over they point down.

Round 9 :

3 sc with first leg, go through the front and back sts of the leg then through the body as shown (3 sts per leg). Repeat till you have attached 4 legs, 7 sc (this is the front where the eyes will be placed), 3 sc with leg x4, sc 11. (42)

Round 10 :

sc around (42)

Info :

Stop and secure the leg tails with knots.

Info :

Attach eyes between row 7-8 above legs in the 7 st space. 3 sts between the center eyes. Smaller outer eyes are placed 2-3 sts back. Some testers liked to place the smaller eyes between rows 6-7.

Round 11 :

(5 sc, dec) x 6 (36)

Info :

Attach the fangs on row 8 below the eyes, 1-2 sts apart. Note they have a natural curve. Place them so they curve into the head. I just slip my yarn tail through and tie a knot on the inside.

Round 12 :

(4 sc, dec) x 6 (30)

Round 13 :

(3 sc, dec) x 6 (24)

Round 14 :

(2 sc, dec) x 6 (18)

Info :

STUFF

Round 15 :

dec x 9 (9)

Info :

sl st, FO

Info :

close.

β€” Body :

Round 1 :

6 sc in mc (6)

Round 2 :

inc x 6 (12)

Round 3 :

sc around (12)

Round 4 :

(sc, inc) x 6 (18)

Round 5 :

(2 sc, inc) x 6 (24)

Round 6 :

sc around (24)

Round 7 :

(3 sc, inc) x 6 (30)

Round 8 :

(4 sc, inc) x 6 (36)

Round 9 :

(5 sc, inc) x 6 (42)

Round 10-13 :

sc around (42)

Round 14 :

(5 sc, dec) x 6 (36)

Round 15 :

sc around (36)

Round 16 :

(4 sc, dec) x 6 (30)

Round 17 :

sc around (30)

Round 18 :

(3 sc dec) x 6 (24)

Info :

sl st & FO. Leave a long yarn tail for attaching.

Info :

STUFF

Info :

Attach the body 4 rounds from the center of head and 4 rounds from the bottom of the head. I attach my body right up against the legs.

Assembly Instructions

  • Attach the legs during head round 9 by doing 3 sc with the leg through the front and back stitches of the leg then through the body; repeat until four legs are attached on each side and the head round count returns to 42.
  • Stop and secure all leg tails with knots after head round 10 and weave them into the inside of the head so legs are firmly attached and will not come loose.
  • Attach eyes between head rows 7-8 above the legs in the 7-st space with 3 sts between the center eyes; place smaller outer eyes 2-3 sts back or between rows 6-7 as preferred.
  • Sew the two fuzzy fangs onto row 8 below the eyes, spacing them 1-2 sts apart and tying yarn tails inside to secure the natural curve into the head.
  • Attach the body to the head by aligning it 4 rounds from the center of the head and 4 rounds from the bottom, then sew around the attachment edge using the long yarn tail left when fastening off the body.

Important Notes

  • πŸ’‘Use stitch markers to keep track of your rounds, especially during the leg attachment and head shaping rounds.
  • πŸ’‘Stuff legs and head gradually as you work to avoid lumps and to maintain consistent shape and firmness.
  • πŸ’‘Leave long yarn tails when finishing pieces intended for sewing so you have enough length to attach them securely.

You have now completed a charming Low Sew Spider that is soft, squishy, and full of personality. This little handmade friend is perfect for gifting or brightening your own shelf and is easy to customize with yarn and eye choices. Enjoy finishing touches and have fun making more color variations! πŸ§ΆπŸ•·οΈ

You ask,

we answer.

FAQs

What size will the finished piece be?

The finished amigurumi measures approximately 8 inches tall when using the recommended Parfait Chunky yarn and a 5.0 mm hook.

Can I use different yarn weights for this pattern?

Yes, you can use different plush yarns but size will vary; Sweet Snuggles Lite is listed as an alternative (use a 6.0 mm hook). Adjust stuffing and eye sizes accordingly.

Do I need prior crochet experience for this pattern?

This pattern is rated intermediate, so basic knowledge of single crochet, increases, decreases, and working in the round is recommended for best results.

How long does this project typically take to complete?

Most crocheters complete this project in 5-7 hours, though time may vary based on experience, yarn choice, and how many customizations you add.