About This Magic Potion Amigurumi Pattern
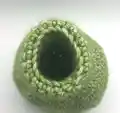
This pattern creates a small stuffed potion bottle with a removable cork stopper and decorative hanging tendrils. It uses worsted/medium weight yarn and a 3.5mm hook for a sturdy, compact finish. Perfect for gifts, props, or whimsical home decor, the finished bottle measures about 6 inches tall and 4 inches wide.
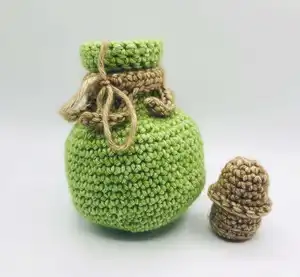
Includes full row-by-row instructions for the bottle, cork, and decoration with photo references. The pattern uses simple shaping techniques like increases, decreases, and BLO/FLO stitches for definition.
Why You'll Love This Magic Potion Amigurumi Pattern
I absolutely love this pattern because it turns simple stitches into a delightful miniature prop that feels magical to hold. I enjoyed designing the removable cork and little tendrils so the bottle has personality and movement. I love how quick it is to make—you can finish one in an afternoon and gift it the same day. The instructions and photo examples make it easy to get consistent results, and its perfect for using up small amounts of special yarn.
Switch Things Up
I love experimenting with different colorways for the bottle — try deep jewel tones for a mysterious potion or pastels for a whimsical look.
I often change yarn weight and hook size to make miniature or jumbo versions; use thicker yarn and a larger hook for a chunky home-decor piece.
You can add metallic or sparkly yarn accents on the neck or tendrils to make the bottle look enchanted and eye-catching.
I sometimes embroider a small label on the bottle using duplicate stitch or surface slip stitch to personalize each potion.
Try adding beads or tiny charms to the hanging tendrils for extra movement and interest when the bottle sits on a shelf.
I recommend swapping the cork shape: make a flatter stopper or a taller tapered one to change the silhouette of the bottle.
For a keychain, make a mini version, add a keyring and reinforce seams; its a fun gift idea for friends who love fantasy themes.
I like to sew in a tiny bell or a bit of lavender inside the bottle for a scented, tactile surprise.
If you want a set, vary the stitch counts slightly to create matching bottles in graduated sizes for a display.
Dont be afraid to mix fibers—cotton gives crisp stitches while acrylic gives a fluffier, softer finish; choose based on the look you want.
Common Mistakes & How to Fix Them
✗ Not checking gauge or hook size can make the bottle too large or too small; use the recommended 3.5mm hook and worsted/medium yarn or adjust hook size to match the approximate finished dimensions.
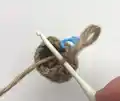
✗ Forgetting to stuff the cork as you go will make it hard to fit the bottle opening; stuff the cork gradually and test the fit in the bottle frequently to get a snug stopper.
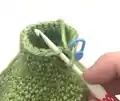
✗ Ignoring BLO or FLO instructions will change the look of the neck detail; work in the specified back or front loops only where indicated for the intended rolled edge effect.
✗ Skipping stitch counts during increases and decreases often causes misshapen rounds; count stitches at the end of each round and use a marker at the start of the round.
✗ Pulling yarn too tightly when closing the cork can flatten the stopper incorrectly; weave through loops and pull gradually to shape and preserve the rounded bottom appearance.