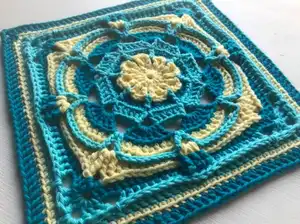
Make a beautiful Margaret Square — a richly textured crochet motif that combines post stitches, puffs and 3rd-loop details for a striking square. This intermediate pattern guides you round-by-round with clear stitch explanations and helpful photos so you can follow along with confidence. Perfect for afghans, cushions, or as a standout motif in larger projects. The pattern includes yarn/color suggestions and blocking notes to get a crisp finished square.
Progress Tracker
0% Complete
— Stitches Used :
Info :
magic circle (Double magic circle); standing stitch; Invisible join (Join); st(s) (Stitch/stitches); sp (Space); ch (Chain); yo (Yarn over); rnd (Round); slst (Slip stitch); sc (Single crochet); hdc (Half double crochet); FPhdc (Front post half double crochet); BPhdc (Back post half double crochet); dc (Double crochet); FPdc (Front post double crochet); BPdc (Back post double crochet); BLdc (Back loop double crochet); tr (treble crochet); BPtr (Back post treble crochet); dtr (Double treble crochet); puff (Puff stitch); 3LP (3rd loop of st); BL (Back loop)
— Stitch Techniques & Definitions :
Info :
magic circle: Video at Oombawka Design
Info :
standing stitch: Start with a slst on hook; Insert hook into designated st or ch sp and finish st as normal. Video at Moogly
Info :
Invisible join: Do not join after completing last st of rnd; cut yarn and pull yarn tail through st; remove hook and insert from back-to-front of 2nd st of rnd; grab yarn and gently pull through; from the back, insert hook from bottom-to-top of the center of last st of rnd; pull yarn gently through st; anchor join by drawing through any back loop of first and last sts of rnd, and weave in ends. Video at Heart Hook Home uses a needle instead of hook.
Info :
FPhdc: Yo, insert hook from front-to-back-to-front around post, so post is in front of hook; yo, pull up a loop; yo, pull through all 3 loops on hook.
Info :
BPhdc: Yo, insert hook from back-to-front-to-back around post, so post is in back of hook; yo, pull up a loop; yo, pull through all 3 loops on hook.
Info :
FPdc: Yo, insert hook from front-to-back-to-front around post, so post is in front of hook; yo, pull up a loop; [yo, pull through 2 loops on hook] 2 times.
Info :
BPdc: Yo, insert hook from back-to-front-to-back around post, so post is in back of hook; yo, pull up a loop; [yo, pull through 2 loops on hook] 2 times.
Info :
BLdc: Yo, insert into BL of st; yo, pull up a loop; [yo, pull through 2 loops on hook] 2 times.
Info :
tr: Yo 2 times, insert hook into st; yo, pull up a loop; [yo, pull through 2 loops on hook] 3 times.
Info :
BPtr: Yo 2 times, insert hook from back-to-front-to-back around post, so post is in back of hook; yo, and pull up a loop; [yo, pull through 2 loops on hook] 3 times.
Info :
dtr: Yo 3 times, insert hook into st; yo, pull up a loop; [yo, pull through 2 loops] 4 times.
Info :
puff: Yo, insert hook in st AND pull up a long loop; yo, insert hook in same st AND pull up a long loop; yo AND pull through all 5 loops on hook.
Info :
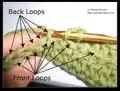
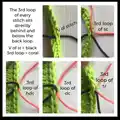
3LP of hdc, dc, tr: hdc, dc and tr sts all have 2 main loops; the V on top of each st is known as the FL (front loop) and BL (back loop); the yo at beginning of hdc, dc and tr sts creates the 3rd loop.
— Symbol Guide :
Info :
ASTERISKS: * to* means that the steps between the asterisks are repeated in order, the number of times indicated. Example: *(2 dc, ch 2, 2 dc); ch 1, sk 2 sts; [dc, ch 1, dc in next st, ch 1, sk 3 sts] 2 times; (dc, ch 1, dc), ch 1, sk 2 sts*; REPEAT FROM * to* 3 MORE TIMES. PARENTHESIS: ( ) indicates a group of sts that are worked together in or around the same st. Example: (2 dc, ch 2, 2 dc). BRACKETS: [ ] Work the sts between the brackets the number of times indicated. Example: [dc, ch 1, d] in dc; ch 1, sk 3 sts] 2 times. COUNT TOTALS: Total chain spaces are included in the st count; corner chain spaces are not included in the total. Example: Counts: 48 dc, 36 FPtr, 8-ch 2 sp, 4-ch 2 corner sp (100 total/25 per side).
— Special Instructions :
Infos :
All rnds begin with a standing stitch and end with an invisible join unless noted otherwise. To avoid ending a rnd with a ch sp, some rnds will begin with the 2nd st of a group (ex. 5 tr), and the repeat will end with the 1st st of that group. Example: *(4 tr) in ch 3 sp, ch 1; sk to next ch 3 sp, tr in next ch 3 sp* I’ve added a new feature that allows users to click on a link - an underlined word or picture, to move quickly between written instruction, stitch definitions, videos and/or rnd-by-rnd pictures. To see how this works, click here to see the picture of this square, then click the picture and it will bring you back to this link; click here to see yarn and colors used, then click the "Yarn and Colors Used" link and it will bring you back to this link. Please note: Some mobile phone users may have difficulty accessing links. Round-by-round pictures are also found at the end of the written pattern.
— Pattern Rounds :
Round 1 :
In magic circle, ch 5 (as a dc AND ch 2); [dc, ch 1, dc, ch 2] 7 times; dc, ch 1; Invisible join to 4th ch of rnd, fasten off. Counts: 16 dc, 8 ch-1 sp, 8-ch 2 sp (40 total)
Round 2 :
Starting in any ch 2 sp, * (3 dc) in ch 2 sp; FPdc around dc; ch 1, sk ch 1 sp; FPdc around dc *; REPEAT FROM * TO * 7 MORE TIMES; Join: invisible join to 2nd dc of rnd, fasten off. Counts: 24 dc, 16 FPdc, 8-ch 1 sp (48 total)
Round 3 :
Starting in any ch 1 sp of rnd 1, * fold your work to the front and work behind rnd 2; dc in ch 1 sp of rnd 1, ch 3; sk to next ch 1 sp of rnd 1 *; REPEAT FROM * TO * 7 MORE TIMES; Join: invisible join to 1st ch of rnd, fasten off. Counts: 8 dc, 8-ch 3 sp (32 total)
Round 4 :
Starting in any ch 3 sp, * (3 dc) in ch 3 sp; ch 1, sk st; dc in next ch 3 sp *; REPEAT FROM * TO * 7 MORE TIMES; Join: invisible join to 2nd dc of rnd, fasten off. Counts: 32 dc, 8-ch 1 sp (40 total)
Round 5 :
Starting in 1st dc after any ch 1 sp, * sc in 4 sts; tr in ch 1 sp of rnd 2; sk ch 1 sp *; REPEAT FROM * TO * 7 MORE TIMES; Join: invisible join to 2nd sc of rnd, fasten off. Counts: 32 sc, 8 tr (40 total)
Round 6 :
Starting in 2nd sc of any group of 4, * BLdc in 3 sts; (dc, ch 3, dc) in tr AND 3LP; BLdc in next st *; REPEAT FROM * TO * 7 MORE TIMES; Join: invisible join to 2nd dc of rnd, fasten off. Counts: 16 dc, 32 BLdc, 8-ch 3 sp (72 total)
Round 7 :
Starting in any ch 3 sp; * (6 tr) in ch 3 sp, ch 1; sk to next ch 3 sp, tr in next ch 3 sp *; REPEAT FROM * TO * 7 MORE TIMES; Join: invisible join to 2nd tr of rnd, fasten off. Counts: 56 tr, 8-ch 1 sp (64 total)
Round 8 :
Starting in 2nd tr of any group of 7, * [ (2 dc) in BL AND 3LP of tr; dc in BL AND 3LP of tr ] 3 times; ch 1, sk ch 1 sp; dc in BL AND 3LP of tr *; REPEAT FROM * TO * 7 MORE TIMES; Join: invisible join to 2nd dc of rnd, fasten off. Counts: 80 BLdc, 8-ch 1 sp (88 total)
Round 9 :
Starting in 2nd BLdc after any ch 1 sp, * dc in BL AND 3LP of 9 sts; working in front of rnd 8, (tr, ch 2, tr) in ch 1 sp of rnd 7; sk ch 1 sp, dc in BL AND 3LP of dc *; REPEAT FROM * TO * 7 MORE TIMES; Join: invisible join to 2nd dc of rnd, fasten off. Counts: 80 BLdc, 16 tr, 8-ch 2 sp (112 total)
Round 10 :
Starting in any ch 2 sp, * (2 dtr, ch 2, 2 dtr) in ch 2 sp, sk st; BPtr around 2 sts; BPdc around 2 sts; BPhdc around 6 sts; ch 1, sk st, ( [puff, ch 1] 2 times; puff ) in ch 2 sp; ch 1, sk st, BPhdc around 6 sts; BPdc around 2 sts; BPtr around 2 sts; sk st *; REPEAT FROM * TO * 3 MORE TIMES; Join: invisible join to 2nd dtr of rnd, fasten off. Counts: 48 BPhdc, 16 BPdc, 16 BPtr, 16 dtr, 12 puff, 16-ch 1 sp, 4-ch 2 corner sp (124 total/31 per side)
Round 11 :
Starting in any ch 2 corner sp, * (2 dc, ch 2, 2 dc) in ch 2 corner sp; dc in 3LP of 5 sts; hdc in 3LP of 4 sts; sc in 3LP of 2 sts; ch 1, sk st AND ch 1 sp, [ (FPdc, ch 1) 2 times around puff ] 3 times; sk ch 1 sp AND st; sc in 3LP of 2 sts; hdc in 3LP of 4 sts; dc in 3LP of 5 sts *; REPEAT FROM * TO * 3 MORE TIMES; Join: invisible join to 2nd dc of rnd, fasten off. Counts: 16 sc, 32 hdc, 24 FPdc, 56 dc, 28-ch 1 sp, 4-ch 2 corner sp (156 total/39 per side)
Round 12 :
Starting in any ch 2 corner sp, * (2 tr, ch 2, 3 tr) in ch 2 corner sp; ch 1, sk 4 sts; dc in 9 sts; [ FPhdc around (FPdc, ch 1, FPdc) ] 3 times; dc in 9 sts; ch 1, sk 4 sts; tr in ch 2 corner sp *; REPEAT FROM * TO * 3 MORE TIMES; Join: invisible join to 2nd tr of rnd, fasten off. Counts: 12 FPhdc, 72 dc, 24 tr, 8-ch 1 sp, 4-ch 2 corner sp (116 total/29 per side)
Round 13 :
Starting in any ch 2 corner sp, * (2 dc, ch 2, 2 dc) in ch 2 corner sp; BPdc around 3 sts; dc in ch 1 sp; BPdc around 9 sts; BPhdc around 3 sts; BPdc around 9 sts; dc in ch 1 sp; BPdc around 3 sts *; REPEAT FROM * TO * 3 MORE TIMES; Join: invisible join to 2nd dc of rnd, fasten off. Counts: 24 dc, 96 BPdc, 12 BPhdc, 4-ch 2 corner sp (132 total/33 per side)
Round 14 :
Starting in any ch 2 corner sp, * (sc, ch 2, sc) in ch 2 corner sp; sc in 33 sts *; REPEAT FROM * TO * 3 MORE TIMES; Join: invisible join to 1st ch of rnd, fasten off. Counts: 140 sc, 4-ch 2 corner sp (140 total/35 per side)
Round 15 :
Starting in any ch 2 corner sp, * (2 dc, ch 2, 2 dc) in ch 2 corner sp; BLdc in 35 sts *; REPEAT FROM * TO * 3 MORE TIMES; Join: invisible join to 2nd dc of rnd, fasten off. Counts: 16 dc, 140 BLdc, 4-ch 2 corner sp (156 total/39 per side)
Info :
I highly recommend you block this square to achieve your final shape and size. Blocking will also make your stitches even, more defined and give your square a more professional appearance. You can either wet block or steam block, but always make sure you are careful when steam blocking acrylic yarn.
This Margaret Square was designed to celebrate texture, color and stitch play in a single square. It combines 3rd-loop work, post stitches and puff clusters for a dimensional, modern motif. Whether you use it as a stand-alone piece, a cushion front, or part of a blanket, it will bring handcrafted charm to your home. 🧶✨