🧢 Beautiful ✨ Detailed πŸ’ Adorable

Mash bag Crochet Pattern

Mash bag Crochet Pattern
4.7β˜… Rating
5-7 Hours Time Needed
1.4K Made This
βœ‚οΈ

Beginner Friendly Level

Perfect for those just starting their crochet journey, with clear instructions and simple techniques

⏱️

Weekend Treat

Takes 5-7 hours, making it an enjoyable project to finish over a couple of days.

✨

Stylish Touch

An elegant detail to elevate any look, combining traditional techniques with contemporary design sensibilities.

About This Mash bag Crochet Pattern

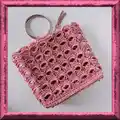
This pattern creates a delicate mash-style bag made with soutache cord and loop stitches, finished with circular handles and optional feet. The design emphasizes texture created by loop stitch arcs and a sturdy crocheted bottom. Clear photographic steps and a linked video make the process easy to follow for beginners.

Mash bag Crochet Pattern crochet pattern - detailed view of completed project

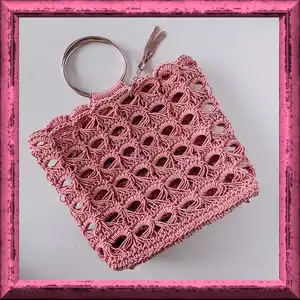
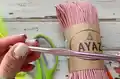
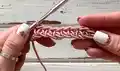
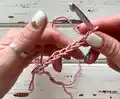
You will crochet the bottom, build the wall-sides with loop-stitch arches, and attach metal ring handles for a professional finish. The pattern includes tips for trimming, steaming, hiding ends and installing optional legs.

Why You'll Love This Mash bag Crochet Pattern

I absolutely love this pattern because it transforms simple soutache cord into a sophisticated textured bag using approachable stitches. I enjoy the contrast between the sturdy crocheted base and the airy loop-stitch arches β€” it gives the bag both structure and delicate detail. The process is meditative and rewarding, and the finished bag is stylish and practical. I also love that the pattern is beginner-friendly yet yields a polished result I am proud to gift or sell.

Mash bag Crochet Pattern step 1 - construction progress Mash bag Crochet Pattern step 2 - assembly progress Mash bag Crochet Pattern step 3 - details and accessories Mash bag Crochet Pattern step 4 - final assembly and finishing

Switch Things Up

I love customizing this Mash Bag by changing cord colors and handle styles to create fresh looks for each season.

I sometimes swap the soutache cord for a thinner cotton cord and a smaller hook to make a delicate mini version perfect for gifts or keychain charms.

I also experiment with bold contrasting colors for the loop stitches and base to highlight the arches as a design feature.

I add embroidered initials or small crocheted flowers to the front for a personalized touch when making a gift.

For a sturdier bag I line the interior with fabric and hand-sew it in place for extra structure and protection of the cordwork.

If I want a more polished finish I use gold or wooden handles instead of metal rings to change the bag's character.

I occasionally add a detachable strap by sewing small D-rings into the inner top corners and attaching a long crocheted or leather strap.

To create a more open, beachy look I leave the arches slightly longer before steaming, making a relaxed, airy silhouette.

I recommend trying different finishing methods: secure ends with heat for synthetic cords, or overcast and weave for natural fibers to preserve look and strength.

When I want a deluxe version I add small metal feet (legs) to the bottom and use a thin interfacing inside the base to keep the bag upright and durable.

Common Mistakes & How to Fix Them

βœ— Skipping stitch markers at the corners will make aligning the wall-sides and handles difficult; place markers in the middle loops at each corner and reference them when joining and adding legs. βœ— Pulling the soutache cord too tightly can warp the arches and shape of the bag; maintain even, moderate tension and test a small swatch before continuing. βœ— Forgetting to steam the bottom and arches will result in a floppy final shape; steam through a damp cloth at medium setting to set the stitches and improve structure. βœ— Not hiding and strengthening the ends leads to loose or unraveled details; weave in ends, tighten the back by pulling the end through the first loop, and secure with gentle heat where recommended. βœ— Using an incorrect hook size can change the final dimensions and loop spacing; use a 6.0 mm hook as recommended (or 4.0 mm to hide ends) and check gauge before starting.

Mash bag Crochet Pattern

Make a stylish Mash Bag using soutache cord and simple loop stitch techniques. This beginner-friendly pattern guides you through the bottom, wall-side, loop arches and attaching handles with clear step-by-step instructions. Perfect for gifting or adding a handmade accessory to your wardrobe. Follow the included tips for finishing, steaming and optional legs for a polished result.

Beginner Friendly 5-7 Hours

Materials Needed for Mash bag Crochet Pattern

β€” Main Fabric

  • 01
    Soutache cord (any cotton cord, polyester cord or jute) 3 mm, approximately 300 yards (300 meters)
  • 02
    Example cord: Macaroni Ayaz SUPRA (used by designer)
  • 03
    Plastic card (width 2 2/8 inches / 5.5 cm) used to form loop stitches
  • 04
    Handles: 2 round handles, diameter 4 1/2 inches (11 cm)
  • 05
    Optional: 4 small legs (for bag bottom), quantity 4

β€” Tools Required

  • 01
    Crochet hook size 6.0mm (N6)
  • 02
    Alternative hook size 4.0mm (N4) to hide ends if desired
  • 03
    Plastic card (approx 5.5 cm wide) for loop stitch formation
  • 04
    2 round bag handles, diameter 4.5 inches (11 cm)
  • 05
    4 markers (stitch markers) for corner placement
  • 06
    Scissors
  • 07
    Lighter or heat source to process ends (process with fire)
  • 08
    Small Phillips screwdriver (if installing optional legs)
  • 09
    Yarn needle for hiding ends
  • 10
    Iron and damp cloth for steaming and blocking

Progress Tracker

0% Complete

β€” Crochet the bottom :

Start :

Crochet 9 CH.

1 row :

8 SC from the 2nd loop on the hook, CH. Turn.

Note :

Insert the hook through the last SC, pull out the end of the thread. Crochet in the end of the thread in the next row.

Instruction :

Next, turn the canvas after each row.

2 row :

8 SC, CH.

3 row :

8 SC, CH.

4 row :

8 SC, CH.

5-26 row :

8 SC, CH.

27 row :

8 SC. Don't cut the working thread.

Trim :

Crochet 2 SC in the last loop, 24 SC in the each row. Crochet 3 SC in 1 in the corner of bottom, 6 SC, 3 SC in 1, 24 SC, 1 SC in corner. Cut the thread, pull out from the loop. Insert the hook under the 1st loop, pull the end and tighten the back. There are 72 loops in this row now. Place 4 markers in the middle loops at each corner of the bottom.

Finishing :

Strengthen and hide the ends.

Info :

Steam the bottom with an iron through a damp cloth at medium setting.

β€” Crochet the wall-side :

1 row :

Insert the hook on the back loop and jumper only, where the marker is. Pull out the loop, crochet CH. In the same loop crochet SC. Next, crochet this row on the back loop and jumper only.

Wall counts :

26 SC, 3 SC in 1, 8 SC, 3 SC in 1, 26 SC, 3 SC in 1, 8 SC, 2 SC in 1. Bind off the row with the end of the thread. Strengthen and hide the end. Process with fire. There are 80 loops in this row now.

Install the legs :

Count 2 SC and 2 rows from the corners. Insert the screw between the legs of the SC. Tighten with your fingers, then tighten with a small Phillips screwdriver.

2 row :

Insert the hook under the last loop of the previous row. Pull out the loop, crochet CH.

Plastic card row :

Take the plastic card. Crochet this row with the 80 loop stitches: Hold the card in front of work. Make the yarn over the card, crochet SC. Remove the loops from the card in the right, when there is no space left on it. Finish the row with SlSt. Tie-in a new piece of the thread, in case if you run out of the end that is binding off the rows.

3 row :

Crochet 5 CH. Take the 1st 5 LS. Turn over 90 degrees counterclockwise. Crochet 5 SC through LS. Take the 2nd 5 LS, turn over. Insert the hook through 1st LS, pull out the loop. Then, insert the hook through 2nd LS and pull out the loop. There are 3 loops on the hook now. Crochet it. Next, crochet 5 SC through 2nd 5 LS. Repeat to the end of the row. You should have 16 "arcs" of the 5 LS. Finish the row with SlSt. Steam with an iron through a damp cloth at medium setting, after crocheting this row.

4 row :

5 LS, skip 1 loop of the previous row, 5 LS, skip 1 loop of the previous row. Repeat to the end of the row. Finish the row with SlSt. Place the marker in the 1st LS of this row. There are 80 LS in this row now.

5 row :

Crochet 5 CH. Skip the 1st LS (marked with a marker) of the previous row. Crochet it in the end of this row. Take the 5 LS. Crochet 5 SC. Take the next 5 LS. 1 SC between "arcs". 5 SC through next 5 LS. 1 SC between "arcs". Repeat to the end of the row. Finish the row with SlSt. There are 16 "arcs" in this row now.

Repeat :

Repeat the pair of the 4th and 5th row 6 times. Cut the thread, pull out from the loop. Insert the hook under 1st loop, pull the end and tighten the back. Strengthen and hide the end on the wrong side. Process with fire.

Finishing :

Steam the bag with an iron through a damp cloth at medium setting.

β€” Handles :

Prepare handle :

Take the handle. Insert the hook through the handle, yarn over on the hook. Twist clockwise and crochet CH.

Crochet handle :

Crochet 10 SC, crochet in the end. Cut the thread, leaving it about 27-28 inches (70 cm) long. Pull out the end in the loop. Turn over the handle crocheting down.

Join handle :

Join the handle with the bag in the middle of the top. Insert the hook under loop of the last row of the bag in the 2st loop of the "arc". Pull the long end of the thread. Pull out the loop. Insert hook in the next loop of the bag and 2st loop of the handle. Crochet SlSt, repeat. There are 9 SlSt in this row now. Pull out the end from the loop, tighten back on the wrong side. Strengthen and hide the ends. Process with fire.

Second handle :

Crochet in the second handle in the same way.

β€” Finishing :

Decorate :

You can decorate the bag with a pendant-tassel.

Complete :

Congratulations! Your cute mash bag is ready.

Assembly Instructions

  • Attach each handle to the top middle of the bag by inserting the hook under the loop of the last row of the bag in the 2nd loop of the arc, then join handle loop and bag loop with SlSt across 9 SlSt; pull and tighten the long tail on the wrong side and hide the ends.
  • Place 4 markers in the middle loops at each corner of the bottom to align wall-sides and ensure square corners before sewing or joining pieces.
  • If using optional legs, count 2 SC and 2 rows from each corner to position screws, insert between the legs of the SC, tighten with fingers and finish tightening with a small Phillips screwdriver.
  • After forming loop arches and finishing rows, steam the bottom and arches through a damp cloth at medium iron setting to set the shape.
  • Strengthen and hide all ends by inserting hook under the first loop, pulling the end, tightening the back, weaving in tails and processing gently with fire to secure synthetic cord ends.

Important Notes

  • πŸ’‘Use stitch markers to mark the middle loops at each corner of the bottom to ensure accurate placement of wall-sides and handles.
  • πŸ’‘When forming loop stitches with the plastic card, remove loops only after the card is full and work methodically across the row to keep loop height even.
  • πŸ’‘Steam-blocking through a damp cloth at a medium iron setting will greatly improve the finished shape and definition of the arches and base.
  • πŸ’‘Leave long working tails when joining handles so you can pull through, tighten from the wrong side and securely hide the ends.

This Mash Bag pattern gives you a beautiful textured bag made from soutache cord using loop stitch arcs and a stable crocheted base. The pattern is beginner-friendly with step-by-step photos and a linked video to guide you through the process. With optional legs and ring handles, you can customize the look to match your style. 🧢✨

You ask,

we answer.

FAQs

What size will the finished piece be?

The finished bag measures approximately 9.5 inches (24 cm) long, 4 inches (10 cm) wide and 11 inches (28 cm) high using the specified cord and a 6.0 mm hook.

Can I use different cord or yarn for this pattern?

Yes, you can use different cord types but size and texture will change; keep the same hook proportionally and check gauge (8-9 stitches and rows = 4x4 inches / 10x10 cm) before proceeding.

Do I need the plastic card to make the loop stitches?

Yes, a plastic card (about 5.5 cm wide) is used to form consistent loop stitches; without it the loops may be uneven and the arc structure will differ.

How long does this project typically take?

Most crocheters complete this project in 5-7 hours, though time can vary depending on experience, speed and whether you add optional details like legs or tassels.