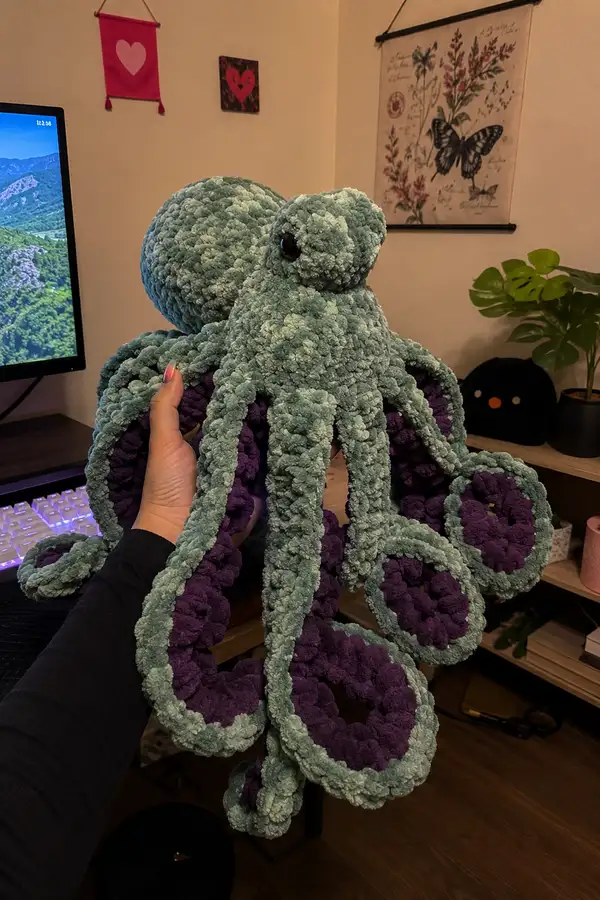
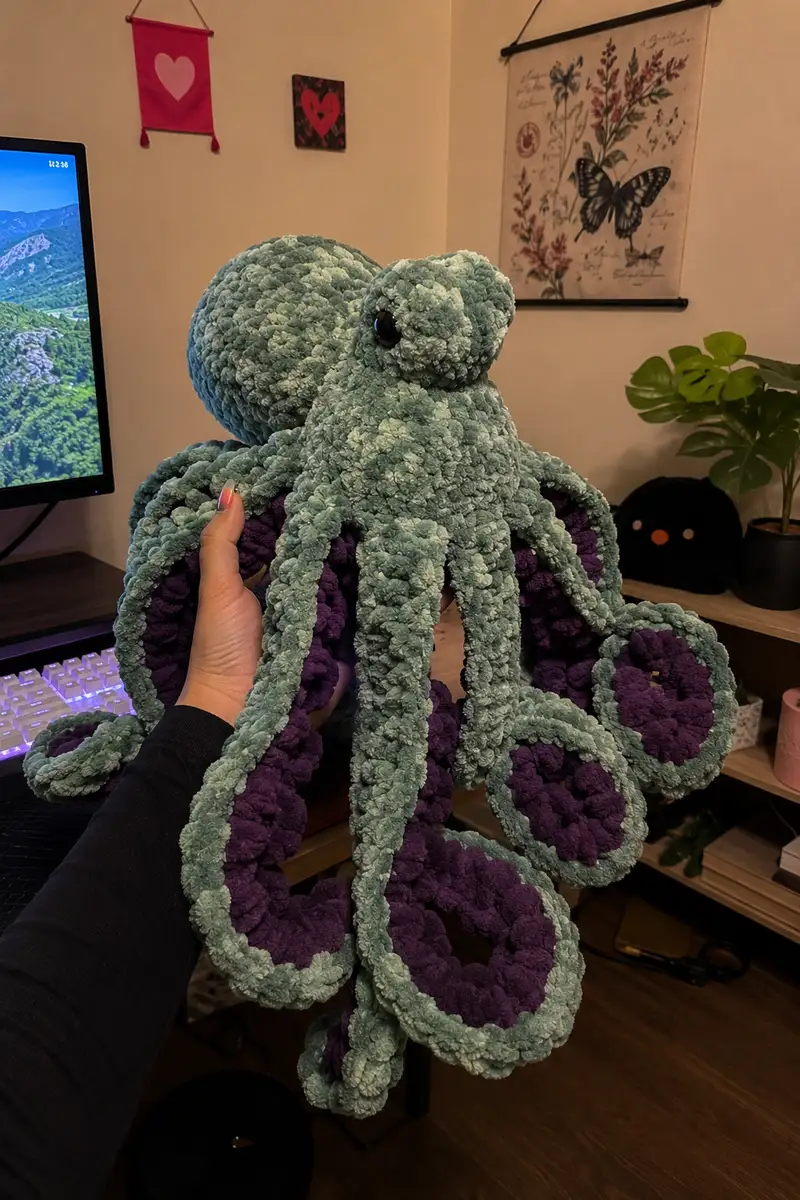
Create a plush, squishy giant octopus with soft chenille yarn and long curling tentacles. This pattern recreates the teal outer body with rich purple inner tentacle detail and large glossy safety eyes as pictured. The finished piece is cuddly, sculptural, and perfect as a statement plush or gift. Detailed step-by-step rounds, stuffing and assembly tips are included to help you reproduce this beautiful, tactile octopus.
Progress Tracker
0% Complete
— Notes and Gauge :
Info :
This pattern is designed for super-bulky chenille yarn worked tightly to hide stuffing. Gauge is not critical for shape but is important for proportion and hiding stuffing. With Bernat Blanket or similar and a 6.5 mm hook, 10 sc x 10 rows = ~7 cm measured as a squishy stockinette-like fabric. Work tightly; if stuffing shows through, switch to a 6.0 mm hook or tighten tension.
Info :
All rounds are worked in continuous spiral unless otherwise noted. Use a stitch marker to mark the first stitch of each round and move it up as you progress. When counts are given in parentheses at round ends they indicate total stitches for that round.
— Mantle (Large Back Bulb) :
Round 1 :
6 sc in magic ring (6)
Round 3 :
(1 sc, 1 inc) x 6 (18)
Round 4 :
(2 sc, 1 inc) x 6 (24)
Round 5 :
(3 sc, 1 inc) x 6 (30)
Round 6 :
(4 sc, 1 inc) x 6 (36)
Round 7 :
(5 sc, 1 inc) x 6 (42)
Round 8 :
(6 sc, 1 inc) x 6 (48)
Round 9 :
(7 sc, 1 inc) x 6 (54)
Round 10 :
(8 sc, 1 inc) x 6 (60)
Info :
By round 10 you should have a large disc that will become the widest part of the mantle. If you prefer a slightly larger mantle, continue increases by (9 sc, 1 inc) x 6 to reach 66 and so on.
Round 11-18 :
1 sc in each st (60) - 8 rounds of even stitching for height (Rounds 11,12,13,14,15,16,17,18)
Info :
These even rounds build the vertical depth of the mantle. Start stuffing the mantle lightly around round 14; add more filling as you approach closure. Stuff firmly enough to hold shape, but avoid overstuffing which can distort decreases later.
Round 19 :
(8 sc, 1 dec) x 6 (54)
Round 20 :
(7 sc, 1 dec) x 6 (48)
Round 21 :
(6 sc, 1 dec) x 6 (42)
Info :
Continue stuffing more firmly as the shape rounds in. Use small pieces of fiberfill and press into areas to keep the profile rounded. Smooth stuffing with your fingers so there are no lumps near the outer edge.
Round 22 :
(5 sc, 1 dec) x 6 (36)
Round 23 :
(4 sc, 1 dec) x 6 (30)
Round 24 :
(3 sc, 1 dec) x 6 (24)
Round 25 :
(2 sc, 1 dec) x 6 (18)
Round 26 :
(1 sc, 1 dec) x 6 (12)
Info :
Fasten off leaving a long tail for joining to the head section. This smaller opening will be used to stitch the mantle to the head; do not over-close — leave enough space to whip stitch pieces together for a secure join.
— Head (Front Smaller Bulb) :
Round 1 :
6 sc in magic ring (6)
Round 3 :
(1 sc, 1 inc) x 6 (18)
Round 4 :
(2 sc, 1 inc) x 6 (24)
Round 5 :
(3 sc, 1 inc) x 6 (30)
Round 6 :
(4 sc, 1 inc) x 6 (36)
Round 7 :
(5 sc, 1 inc) x 6 (42)
Round 8 :
(6 sc, 1 inc) x 6 (48)
Round 9-16 :
1 sc in each st (48) - 8 rounds for head height (Rounds 9,10,11,12,13,14,15,16)
Info :
Place safety eyes between rounds 12 and 13. On a 48-st round, place eyes approximately 8-10 stitches apart edge-to-edge depending on the expression you want. For the pictured look, mark eye placement 6 stitches inward from the left edge and right edge of the head disc and about 6-8 stitches between centers. Insert safety eyes and secure washers now. Re-check placement visually before locking washers in place.
Round 17 :
(6 sc, 1 dec) x 6 (42)
Round 18 :
(5 sc, 1 dec) x 6 (36)
Info :
Begin stuffing the head firmly at this stage. Stuff around the eyes so the area looks rounded and natural; use small pieces of fiberfill to press into small spaces so eyes sit flush and smooth without gaps.
Round 19 :
(4 sc, 1 dec) x 6 (30)
Round 20 :
(3 sc, 1 dec) x 6 (24)
Round 21 :
(2 sc, 1 dec) x 6 (18)
Round 22 :
(1 sc, 1 dec) x 6 (12)
Info :
Leave a long tail to sew the head to the mantle. Lightly stuff the remaining opening and flatten the last stitches slightly (do not overstuff) so the join sits flush when sewn to the mantle opening.
— Neck Join and Shaping :
Info :
Place head and mantle with their openings facing each other. Use pins to line up centers and locate the first stitch of each piece. Whip stitch the opening of the head to the opening of the mantle using the long tail, working through both loops. Use evenly spaced stitches; for the openings left at 6 sts, you will typically take 6-8 small whip stitches to join, tightening as you go so the seam is neat and the two bulbs form a continuous silhouette.
Info :
After joining, check the overall silhouette. Add more stuffing through any remaining gaps by pushing fiber into the seam area and distributing evenly. Sew the remaining last gap closed with ladder stitch or invisible seam if applicable.
— Tentacle Construction Overview (Make 8 Identical Tentacles) :
Info :
The tentacle is constructed as a two-layered long tube: an inner purple suction cup strip formed by joined rounds to create a dense round panel, and an outer teal rim crocheted in continuous rounds that wraps and forms the outer arm. The inner panel remains visible and textured while the outer rim shapes into a curling tentacle edge. Each tentacle is worked in the round but initially begins as a flat disc to build the suction cup column length before joining in a tube.
Info :
For a large plush look, each tentacle will be long (around 35-45 cm depending on gauge), so the rounds below build a thick, slightly flattened tube. We will create the inner purple suction column first (flat rounds that create a long oval strip by joining), then work the teal outer rim around to create final thickness and a raised edge that resembles the octopus curl from the underside.
— Inner Suction Column (Purple) - Make 8 :
Round 1 :
6 sc in magic ring (6)
Round 3 :
(1 sc, 1 inc) x 6 (18)
Round 4 :
(2 sc, 1 inc) x 6 (24)
Round 5 :
(3 sc, 1 inc) x 6 (30)
Round 6 :
(4 sc, 1 inc) x 6 (36)
Round 7-10 :
1 sc in each st (36) - 4 rounds to make a thick disc (Rounds 7,8,9,10)
Info :
At this point you have a dense circular suction cup. To make a long strip, chain 6 after the last round, fasten off and join to the opposite side of the disc with sl st to make a short tube, then continue working additional rounds in the same color to elongate. This approach creates a stacked column of discs that look like suction cups bundled lengthwise. Alternative method: make a long chain and work ribbed rows, but disc stacking gives the puffy textured look from the photo.
Round 11 :
Ch 6, attach to opposite stitch on the disc with sl st to form a bridge, then 1 sc in each st around the disc edge and across the bridge (42) - you now have a short column
Round 12-22 :
1 sc in each st (42) - work 11 rounds to build column length (Rounds 12 through 22)
Info :
You can adjust the number of rounds here to reach your desired tentacle inner length. For the pictured proportions, the column is roughly 20-25 rounds tall after the disc base. Keep notes of how many rounds you made for each tentacle to ensure all are identical.
Round 23 :
Begin to taper inner column slightly by doing (5 sc, 1 dec) around (36)
Round 24 :
(4 sc, 1 dec) x 6 (30)
Round 25 :
(3 sc, 1 dec) x 6 (24)
Round 26 :
(2 sc, 1 dec) x 6 (18)
Round 27 :
Fasten off leaving long tail for join to outer rim. Adjust inner column height to match other tentacles.
— Outer Tentacle Rim / Tube (Teal) - Make 8 :
Info :
The outer rim is worked as a long tube with a raised edge to create the curled look. We will join to the inner suction column by crocheting around its perimeter, then continue in rounds to create a long tube. Work in continuous rounds so the seam is invisible.
Round 1 :
Make a magic ring and work 8 sc (8) - this will be used to start a small oval if you prefer, but easier: join the teal yarn around the outer edge of the purple inner column by placing 8-12 evenly spaced sc along the outermost round of the column, meeting the first sc (12) - this count depends on how many edge stitches you have on the column; space evenly.
Round 2 :
1 sc in each st around (12) - spread evenly across the join to ensure a neat join; if more stitches are needed, add increases evenly to reach 24 by end of round
Round 3 :
If you have 12 sts: (1 sc, 1 inc) x 6 (18). If you adjusted to 24 you can do 1 sc around (24)
Round 4-8 :
1 sc in each st (18 or 24) - 5 rounds to build wall thickness
Info :
Add 2-4 rounds of BLO (back loops only) to create a defined ridge that will act as the outer curling rim. Work 1 sc BLO in each stitch for 2 rounds; this makes a subtle ridge that gives the tentacle its rounded outer edge.
Round 9-28 :
1 sc in each st (18 or 24) - work 20 rounds to build the length of the tentacle tube (Rounds 9 through 28)
Info :
Check tentacle length against other tentacles as you go. For the large specimen pictured, each tentacle runs roughly 30-40 rounds long depending on your gauge. You may add more rounds for extra length; make all tentacles identical in length for symmetry.
Round 29 :
(if working with 24 sts) (3 sc, 1 dec) x 6 (18). If using 18 sts, maintain even rounds until shaping for the curl: 1 sc in each st (18).
Round 30-34 :
1 sc in each st (18) - finish with 5 rounds of even stitching to prepare the end
Round 35 :
Optional small decorative rounding: (1 sc, 1 dec) x 6 (12)
Round 36 :
6 dec (6) - close if desired and fasten off leaving long tail to sew closed. Alternatively leave open partially to stuff and then close.
Info :
Before final closing, stuff the tentacle lightly. The outer rim should be slightly firmer than the inner column so the tentacle keeps a graceful curve. If you want the tentacles poseable, insert a length of craft wire or pipe cleaner down the center before stuffing — fold and bend wire ends, wrap with a small yarn scrap to avoid poking through the plush surface, then stuff around it.
— Suction Cup Rows on Inner Panel (Optional Additional Texture) :
Info :
To increase the visual suction cup texture shown in the photo (puffy purple nubs), you can crochet small puff clusters across the purple inner strip every 2-3 rounds. Use the same purple yarn and make 1-2 puff stitches per side spaced evenly to simulate rows of cups.
Round Add-A :
Puff stitch: (yarn over, insert hook, yarn over, pull loop 3 times) x 3, yarn over and pull through all loops, ch 1 to secure. Make puff stitches across the strip every 6-8 stitches to resemble suction cups. Space rows every 2 rounds down the inner strand.
Info :
Puff stitches with chenille yarn will be subtle but add nice three-dimensional texture. Ensure you keep counts even when adding puffs; place them on the same stitches across tentacles for consistency.
— Small Decorative Head Bump (Make 2 if you want cheek mounds) :
Round 1 :
6 sc in magic ring (6)
Round 3 :
(1 sc, 1 inc) x 6 (18)
Round 4 :
1 sc in each st (18)
Round 5 :
(1 sc, 1 dec) x 6 (12)
Round 6 :
6 dec (6) - fasten off leaving tail for sewing. These small mounds are optional and can be sewn just above the tentacle base to add facial dimension as seen in the photo.
— Eye Details :
Info :
Use 12mm black safety eyes for the large, glossy look shown. Insert eyes between rounds 12 and 13 of the head before major stuffing and secure washers tightly. For extra stability, add a small dab of fabric glue to the back of the washer before securing, or insert a small felt disc behind the washer and glue for reinforcement if the piece will be handled extensively.
Info :
If you prefer embroidered eyes: embroider an oval shape using black yarn and a satin stitch that fills the area between the same rounds. Reinforce the inside of the head with a small felt patch to keep the stitches tidy.
— Tentacle Curl Shaping and Finishing :
Info :
To achieve the large curling tentacles from the photo, after stuffing, lay each tentacle flat and coil it gently. Use a few whip stitches from the outer rim to the inner column to fix the curl at several points (about every 6-8 cm). Do not sew tightly through all layers; pick up both the inner and outer sections to anchor the curve but leave a soft, plush look.
Info :
When attaching to the body, arrange tentacles in a pleasing circular pattern under the mantle so they cascade naturally. Some tentacles should curve forward around the head while others curve downward and backward. Pin tentacles and check symmetry before sewing.
— Assembly and Final Shaping :
Round 1 :
Info: Pin placement guide - Mark 8 evenly spaced anchor points along the underside of the joined mantle/head seam to attach tentacles. On a typical mantle of 60 stitches, place tentacle anchors every 7-8 stitches to achieve equal spacing. Adjust placements visually to accommodate head overlap.
Info :
Sew each tentacle by aligning the first 6-10 stitches of the tentacle base with the anchor points on the body underside. Use small whip stitches through both body and tentacle rim, distributing tension evenly. For a secure hold, go through the adjacent body round as well to create a wide base seam that will support the weight of long tentacles.
Info :
After attaching all tentacles, check the overall balance. If some tentacles flip outward too much, add a few hidden securing stitches to hold the curl. If you used craft wire for poseability, bend gently to create natural curves before securing seam stitches completely.
Info :
Embroider a small, subtle smile or nostril dimples if desired using matching yarn. For a minimal look (as shown), leave the face simple and rely on the large glossy eyes and textured body for personality.
— Trimming and Finishing Touches :
Info :
Weave in all tails at least 6-8 cm into the body using a yarn needle, then trim close to the work. For chenille yarn, pulling threads through helps hide ends inside the fabric. If you find a tail that wants to come out, add a tiny knot inside and weave again.
Info :
Lightly brush the surface with a soft brush or gently steam from a distance to lift fibers and achieve the squishy, plush look. Do not press the steam too close to avoid warping the chenille yarn or melting synthetic fibers.
— Optional Variations :
Info :
Use variegated chenille for a mottled outer texture similar to the pictured teal speckle. Try different inner colors (pink, cream, grey) to create different personalities. For a smaller octopus, use DK yarn with a 3.5-4.0 mm hook and recalculate counts; proportions will follow the same increase/decrease pattern.
Info :
If you wish to add a weighted base so the octopus sits upright, add a small pouch of poly-pellets into the base of the mantle before final closure. Ensure pellets are fully enclosed and pads are well hidden inside stuffing to avoid movement.
This massive octopus amigurumi is a delightful, tactile project that becomes a squishy, sculptural friend when complete. Each tentacle curls with personality, and the plush chenille yarn gives a luxurious surface perfect for hugging or display. Follow the detailed instructions and take your time with assembly — the result is satisfying and impressive. 🧶💜 Bring your octopus to life and enjoy the cozy process — share your finished cuddly sea friend with pride! 🐙