About This Mini Pumpkin Man Amigurumi Pattern
This pattern creates a sweet mini pumpkin doll with a plush velvet/chenille textured head and a soft black body. It uses continuous rounds and simple increases/decreases to shape each piece. The pattern includes a technique to create pumpkin dents for realistic ridges and clear assembly instructions. Youll also learn how to add a tiny stem, blush, and a V-shaped mouth for personality.
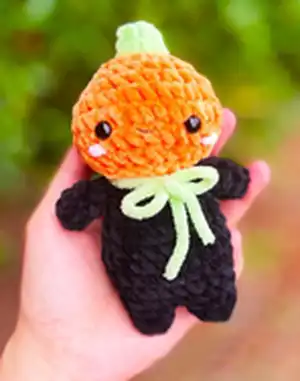
Designed to be quick and satisfying, this amigurumi is great for intermediate crocheters wanting a cozy small project. Use velvet or chenille yarn for a luxurious, squishy finish and sport weight for finer details.
Why You'll Love This Mini Pumpkin Man Amigurumi Pattern
I absolutely love this pattern because it transforms simple stitches into a character full of charm and personality. I enjoy the tactile, plush feel you get when using velvet or chenille yarn, which makes the pumpkin irresistibly squishy. The denting technique is so satisfying and gives the head a professional, realistic look. I also love that it uses basic shaping and a small number of pieces, so you can finish it quickly and customize it with bows or facial expressions.
Switch Things Up
I like to swap the orange velvet yarn for pastel shades to create a soft, whimsical pumpkin friend that is great for nurseries.
You can make the doll larger by using a bulkier yarn and a bigger hook, or create a tiny keychain with thin yarn and a 2.5mm hook.
I often change the eye style, using embroidered eyes for a softer look or safety eyes for a glossy finish; each gives a different personality.
Try adding wire in the arms for posability if you want the pumpkin to hold small props or be posed on a shelf.
Experiment with different stem styles — a taller stem, twisted cord, or a tiny crocheted leaf adds variety and charm.
Swap the black body for brown or green to create seasonal characters like a scarecrow or gnome-inspired pumpkin man.
Customize the face by embroidering open mouths, tiny teeth, or freckles to give each doll a unique expression.
Add accessories like a removable bow, scarf, or tiny hat made from leftover yarn to make gift-ready variations.
I also like to stitch contrasting lines for the denting rather than brown yarn; try dark orange or deep green for bold ridges.
For a more durable toy, use tighter tension and smaller hook, or embroider facial features instead of using safety eyes for baby-safe versions.
Common Mistakes & How to Fix Them
✗ Skipping placement of the safety eyes can ruin the face symmetry; place and check the eyes between R7-R8 and count 5 stitches apart before securing.
✗ Overstuffing the head causes the denting technique to fail; stuff gradually and finish stuffing after placing eyes so you can shape the dents correctly.
✗ Cutting the yarn too early when making the legs will make joining difficult; after the first leg leave the yarn attached for the second leg and join with one sc as instructed.
✗ Not pulling the denting yarn firmly enough results in shallow dents; when creating each dent, pull the yarn firmly before moving to the next dent to form deep ridges.
✗ Forgetting to leave a long tail to sew pieces together makes assembly fiddly; always leave a long tail on head, arms and stem for neat sewing.


