🧢 Beautiful ✨ Detailed πŸ’ Adorable

Minimal Frog Amigurumi Pattern

Minimal Frog Amigurumi Pattern
4.1β˜… Rating
5-7 Hours Time Needed
3.8K Made This
βœ‚οΈ

Intermediate Level

Ideal for those with basic crochet experience, featuring slightly more advanced stitches and techniques to expand your skills.

⏱️

Weekend Treat

Takes 5-7 hours, making it an enjoyable project to finish over a couple of days.

🧸

Cute Companion

An adorable friend to cherish, handcrafted with love to bring comfort and joy for years to come.

About This Minimal Frog Amigurumi Pattern

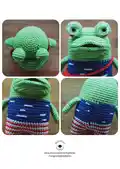
This pattern teaches you how to crochet a minimal frog amigurumi complete with head, body, legs, eyes, snout, arms and a tiny cross bag. It uses worsted weight yarn and clear step-by-step rounds with photos to guide placement and finishing. Color changes are used to create the striped outfit and small details that give the character personality.

Minimal Frog Amigurumi Pattern crochet pattern - detailed view of completed project

You will work continuous rounds, simple increases and decreases, and learn how to divide legs and attach features with clear sewing instructions. The final toy measures approximately 15 cm using fingering weight on a 3mm hook.

Why You'll Love This Minimal Frog Amigurumi Pattern

I absolutely love this pattern because it balances simplicity with delightful details β€” the striped body and tiny cross bag add immediate charm. I enjoy the way the snout and eye placement let you create a range of facial expressions with just a few stitches. The design is playful and makes a quick weekend project that still feels special. Sewing the parts together and seeing the frog take shape is always a rewarding moment for me.

Minimal Frog Amigurumi Pattern step 1 - construction progress Minimal Frog Amigurumi Pattern step 2 - assembly progress Minimal Frog Amigurumi Pattern step 3 - details and accessories Minimal Frog Amigurumi Pattern step 4 - final assembly and finishing

Switch Things Up

I love experimenting with color palettes for this frog; try pastel shades for a softer look or bold primaries for a playful vibe.

I often change yarn weight and hook size to make tiny keychain versions or larger cuddly toys; swap to a 2.5mm hook with fingering yarn for minis or a 4.5mm hook with DK for a bigger plush.

I sometimes embroider a smile or use felt pieces for different facial expressions to give each frog a unique personality.

For a posable toy I add thin wire to the arm cores before assembly so arms can be posed naturally.

Swap the tiny cross bag colors or make removable accessories like a scarf, hat or little bow for seasonal looks.

To create a more realistic amphibian, use gradient yarn for subtle body shading instead of solid light green.

I like to replace safety eyes with embroidered eyes for a toddler-safe version; embroider the iris and pupil with contrasting thread.

Try adding small surface crochet stitches on the body to mimic spots or texture using a contrasting yarn and tiny slip stitches.

Make a matching family by changing soles and stripe colors for siblings β€” alternate blue, red, white stripes across multiple frogs for a set.

When gifting, attach a tiny stitched name tag or mini flag to the cross bag to personalize each frog and make it extra special.

Common Mistakes & How to Fix Them
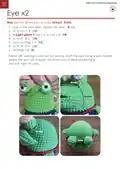
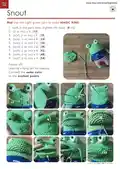
βœ— Skipping stitch markers when dividing the legs can result in misaligned leg openings; mark the 31st stitch and the center gap to ensure accurate leg placement. βœ— Forgetting to change colors according to the symbol chart will scramble the striped pattern; follow the SYMBOL PATTERNS on page 1 exactly and change yarn where indicated. βœ— Overstuffing small pieces like the eyes and snout creates lumpy features; stuff lightly and gradually to keep smooth, rounded shapes. βœ— Not weaving the tail through front loops when closing can leave a visible hole; use a yarn needle and pull the tail through the front loops of remaining stitches to close securely.

Minimal Frog Amigurumi Pattern

Make a charming minimal frog amigurumi with clear, photo-assisted instructions that guide you through head, body, legs, eyes, snout, arms and a tiny cross bag. This pattern uses simple amigurumi techniques and color changes to create a playful, striped outfit and expressive features. Perfect for gifting or displaying, you'll enjoy stitching each component and bringing this little frog to life.

Intermediate 5-7 Hours

Materials Needed for Minimal Frog Amigurumi Pattern

β€” Main Fabric

  • 01
    Worsted weight yarn (#4) - Light green yarn (main color) - amount not specified in pattern
  • 02
    Worsted weight yarn (#4) - Blue yarn (body color) - amount not specified in pattern
  • 03
    Worsted weight yarn (#4) - White yarn (stripe and eye base) - amount not specified in pattern
  • 04
    Worsted weight yarn (#4) - Red yarn (stripes and cross bag) - amount not specified in pattern
  • 05
    Worsted weight yarn (#4) - Orange yarn (bag accent/optional) - amount not specified in pattern

β€” Tools Required

  • 01
    Crochet hook size 5/0 (3mm)
  • 02
    Yarn needle for sewing and weaving ends
  • 03
    Scissors
  • 04
    Stitch markers
  • 05
    Polyester stuffing (fiberfill) for stuffing
  • 06
    Glue (to glue the eyes on the face if desired)
  • 07
    5mm black plastic safety eyes x2
  • 08
    Optional: wooden pin for straightening doll feet

Progress Tracker

0% Complete

β€” Head :

Info :

Use the Light green yarn to make MAGIC RING.

Round 1 :

scx6 in the yarn loop, tighten the loop [6 sts]

Round 2 :

(2-sc inc) x 6 [12]

Round 3 :

(scx1, 2-sc inc) x 6 [18]

Round 4 :

(scx2, 2-sc inc) x 6 [24]

Round 5 :

(scx3, 2-sc inc) x 6 [30]

Round 6 :

(scx4, 2-sc inc) x 6 [36]

Round 7 :

(scx5, 2-sc inc) x 6 [42]

Round 8 :

(scx6, 2-sc inc) x 6 [48]

Round 9~35 :

sc in all 48 st [48]

Info :

*Change the color of the yarn according to the SYMBOL PATTERNS on page 1. Changing the yarn color is not mentioned in the descriptive design below.

Infos :

To make a leg, identify the center space between the legs by the 6 stitches, and each leg identifies the other by 18. (Use stitch markers to help.) Sc at the 31th st of the Rnd 35. This sc is the first st of the first leg (left leg). Continue working on the first leg (left leg).

β€” Legs :

Round 36~39 :

sc in all 18 st [18]

Round 40 :

(scx1, sc2tog) x 6 [12]

Round 41 :

(sc2tog) x 6 [6]

Info :

Fasten off, leaving a long tail. Stuff the leg. Using a yarn needle, weave the yarn tail through the front loop of each remaining st and pull tight to close.

Second Leg (Right leg) :

Rejoin the White yarn to 7th back unworked st of Rnd 35. This sc is the first st for the second leg (right Leg). Continue working the second leg (right leg) the same way as the first leg (left leg), from Rnd 36~41. Using a yarn needle, sew the 6 sts between the legs.

β€” Eye x2 :

Info :

Use the White yarn to make MAGIC RING.

Round 1 :

scx6 in the yarn loop, tighten the loop [6 sts]

Round 2 :

(2-sc inc) x 6 [12]

Round 3 :

< Light green > (scx1, 2-sc inc) x 6 [18]

Round 4 :

sc in all 18 st [18]

Round 5 :

(scx1, sc2tog) x 6 [12]

Round 6 :

sc in all 12 st [12]

Round 7 :

(sc2tog) x 6 [6]

Info :

Fasten off, Leaving a long tail for sewing. Stuff the eye. Using a yarn needle, weave the yarn tail through the front loop of each remaining st and pull tight to close.

β€” Snout :

Info :

Use the Light green yarn to make MAGIC RING.

Round 1 :

scx6 in the yarn loop, tighten the loop [6 sts]

Round 2 :

(2-sc inc) x 6 [12]

Round 3 :

(scx1, 2-sc inc) x 6 [18]

Round 4 :

(scx2, 2-sc inc) x 6 [24]

Round 5 :

(scx3, 2-sc inc) x 6 [30]

Round 6 :

(scx4, 2-sc inc) x 6 [36]

Round 7 :

(scx5, 2-sc inc) x 6 [42]

Round 8 :

(scx6, 2-sc inc) x 6 [48]

Round 9 :

(scx7, 2-sc inc) x 6 [54]

Info :

Fasten off, Leaving a long tail for sewing. Connect the same color to the marked points.

Info :

Stitch on the other side three times.

β€” Mini cross bag :

Info :

Use the Red yarn to make 7 chains.

Round 1 :

scx1 in second ch from hook, scx6 [6 sts]

Round 2~9 :

ch 1, turn, scx6 [6]

Info :

and ch 55

Info :

Fasten off, Leaving a long tail for sewing. Fold the bag in half and sew it. Connect the hand holder of the cross bag to complete it.

β€” Arm x2 :

Info :

Use the Light green yarn to make MAGIC RING.

Round 1 :

scx5 in the yarn loop, tighten the loop [5 sts]

Round 2 :

(2-sc inc) x 5 [10]

Round 3~11 :

sc in all 10 st [10]

Info :

Fasten off, Leaving a long tail for sewing. Flatten the ARM, do not stuff.

Info :

TIP: How to straighten a doll: Plug wooden pin on the back of the doll's feet.

Assembly Instructions

  • Sew the snout to the head aligning marked points and stitch through the marked locations; fasten securely and weave in ends.
  • Attach the two eyes to the top of the head where shown in the photos, stuffing lightly and using the long tail to sew them in place before gluing the safety eyes if needed.
  • Using a yarn needle, sew the 6 stitches between the legs to close and secure the body opening, then weave tails inside and hide ends.
  • Fold the mini cross bag in half, sew its sides and attach the hand holder strap to the bag; sew the completed bag onto the frog's body as shown in photos.
  • Position arms on either side of the body and flatten the arm pieces (do not stuff), then sew them onto the body so they sit naturally at the hip level.

Important Notes

  • πŸ’‘Use stitch markers to keep track of rounds and to mark the center gap for dividing legs before working each leg.
  • πŸ’‘Follow the SYMBOL PATTERNS on page 1 for all color changes; color changes are not repeated in the descriptive rounds.
  • πŸ’‘Stuff pieces gradually and evenly to avoid lumps and to maintain the intended shape of the head and limbs.
  • πŸ’‘Weave tails through front loops when closing small openings to ensure a tidy finish and durable closure.

This minimal frog amigurumi is designed to be fun, fast and full of personality β€” a perfect gift or shelf companion. Make the striped outfit your own by switching colors and enjoy sewing the small details that bring the frog to life. Happy crocheting and enjoy every stitch! 🧢🐸

You ask,

we answer.

FAQs

What size will the finished piece be?

The finished amigurumi measures approximately 15 cm (5.9 inches) when using fingering weight yarn on a 3mm crochet hook, as noted in the pattern.

Can I use different yarn weights for this pattern?

Yes, you can change yarn weight, but the final size and texture will change; adjust your hook size accordingly and expect differences in finished dimensions.

Do I need prior crochet experience for this pattern?

This pattern is rated intermediate and uses continuous rounds, increases, decreases and sewing small pieces, so basic amigurumi experience is recommended.

How long does this project typically take to complete?

Most crocheters complete this project in 5-7 hours, depending on experience, color changes, and how much time is spent on sewing and finishing details.