🧢 Beautiful ✨ Detailed πŸ’ Adorable

Minimals Cat Amigurumi Pattern

Minimals Cat Amigurumi Pattern
4.7β˜… Rating
5-7 Hours Time Needed
1.3K Made This
βœ‚οΈ

Intermediate Level

Ideal for those with basic crochet experience, featuring slightly more advanced stitches and techniques to expand your skills.

⏱️

Weekend Treat

Takes 5-7 hours, making it an enjoyable project to finish over a couple of days.

🎁

Tiny Treasure

Small, sweet, and gift-worthy creations that fit perfectly in the palm of your hand with detailed charm.

About This Minimals Cat Amigurumi Pattern

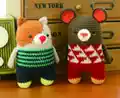
This pattern creates a stylized minimal cat amigurumi approximately 15cm tall when crocheted with the recommended yarn and 3mm hook. It includes clear round-by-round instructions for the head, body, legs, arms, ears and snout, plus placement guides for facial features. Color change symbol charts are provided to recreate the striped body and two-tone head.

Minimals Cat Amigurumi Pattern crochet pattern - detailed view of completed project

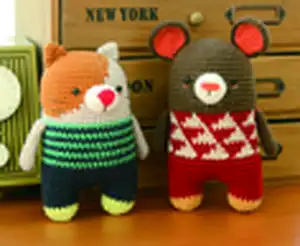
The design uses simple single crochet shaping and standard increases/decreases with specific color-change notes. Full assembly and placement instructions are included to help you finish a neat, professional-looking toy.

Why You'll Love This Minimals Cat Amigurumi Pattern

I absolutely love this pattern because it combines clean minimalist design with playful color changes that make each piece pop. I enjoy how compact and satisfying the project is to complete, giving a finished toy in just a few focused sessions. I love the balance of simple stitches and thoughtful shaping β€” it teaches useful techniques without overwhelming. I also appreciate the clear placement guides for the face, which help the amigurumi look polished and expressive. Making these little cats always brightens my desk and makes a perfect handmade gift.

Minimals Cat Amigurumi Pattern step 1 - construction progress Minimals Cat Amigurumi Pattern step 2 - assembly progress Minimals Cat Amigurumi Pattern step 3 - details and accessories Minimals Cat Amigurumi Pattern step 4 - final assembly and finishing

Switch Things Up

I love to change the color palette to make a whole family of cats β€” try pastel tones for a nursery set or bold primaries for a playful group.

I sometimes substitute fingering weight yarn with a smaller hook to create a mini keychain version that fits on a bag.

I also scale up by using bulky yarn and a larger hook to create a cuddly plush version that is perfect for a child's pillow buddy.

I add embroidered details like freckles, eyebrows, or tiny whiskers to give each cat a unique expression and personality.

I often swap the safety eyes for embroidered eyes when making toys for very young children to make them fully soft and safe.

I like to make removable outfits or tiny crochet scarves to change the look seasonally β€” these are simple rectangles sewn at the back.

I sometimes stuff a bit of lavender or a small sachet inside to make a scented keepsake that smells lovely in a drawer.

I recommend experimenting with different nose shapes: a small felt triangle, embroidered nose, or crocheted nose can dramatically change the face.

I will sometimes add wire to the arms for a posable effect, inserting thin floral wire before finishing and sewing the ends securely.

I encourage trying different stitch textures on the body (like alternating BLO or FLO rows) to create subtle ribbing or stripes beyond color changes.

Common Mistakes & How to Fix Them

βœ— Skipping the stitch marker when dividing the legs leads to incorrect stitch placement; place markers to identify the center space and leg starting points before dividing. βœ— Not changing yarn colors exactly according to the symbol pattern causes mismatched stripes and profiles; follow the color chart on page 1 and change colors at the indicated rounds. βœ— Overstuffing or understuffing the legs and head distorts the shape; stuff gradually, checking shape frequently and use small amounts to keep smooth curves. βœ— Failing to weave the tail through the front loops when closing the leg leaves a neat hole; weave the yarn tail through the front loop of each remaining stitch and pull tight to close. βœ— Sewing arms or ears without pinning first can result in asymmetry; pin or baste pieces in place and check alignment between rounds before permanent sewing. βœ— Incorrect eye placement will change the doll's expression; place safety eyes between Rnd 13 and 14 and confirm spacing with the face diagram before securing.

Minimals Cat Amigurumi Pattern

Make a cute, compact Minimals Cat amigurumi with clear step-by-step rounds, color changes, and assembly guidance. This pattern walks you through head, body, legs, ears, arms and snout with photo references. Perfect for gifting or keeping as a tiny handmade companion. Follow the symbol charts and detailed instructions for accurate color placement and shaping.

Intermediate 5-7 Hours

Materials Needed for Minimals Cat Amigurumi Pattern

β€” Main Fabric

  • 01
    Worsted weight yarn (recommended) - Soft beige yarn (head/body detail)
  • 02
    Worsted weight yarn - Navy yarn (body main, legs)
  • 03
    Worsted weight yarn - Green yarn (body stripes)
  • 04
    Worsted weight yarn - Lime yarn (feet accent)
  • 05
    Worsted weight yarn - Orange yarn (head patch)
  • 06
    Worsted weight yarn - Orange brown yarn (head main - used for rounds 1-19)
  • 07
    Worsted weight yarn - Red yarn (nose detail)
  • 08
    Worsted weight yarn - White yarn (snout and face details)
  • 09
    Worsted weight yarn - Brown yarn (optional accents)

β€” Tools Required

  • 01
    Crochet hook 5/0 (3mm)
  • 02
    Yarn needle (for weaving and sewing)
  • 03
    5mm black plastic safety eyes x2
  • 04
    Scissors
  • 05
    Polyester fiberfill stuffing
  • 06
    Glue (to glue the eyes on the face if preferred)
  • 07
    Stitch markers
  • 08
    Pins for assembly
  • 09
    Wooden pin (optional) to plug into back of feet to straighten doll

Progress Tracker

0% Complete

β€” Head / Body / Legs :

Info :

*Change the color of the yarn according to the SYMBOL PATTERNS on page 1. Changing the yarn color is not mentioned in the descriptive design below.

Info :

Use the Orange brown yarn to make MAGIC RING.

Round 1 :

scx6 in the yarn loop, tighten the loop [6 sts]

Round 2 :

(2-sc inc) x 6 [12]

Round 3 :

(scx1, 2-sc inc) x 6 [18]

Round 4 :

(scx2, 2-sc inc) x 6 [24]

Round 5 :

(scx3, 2-sc inc) x 6 [30]

Round 6 :

(scx4, 2-sc inc) x 6 [36]

Round 7 :

(scx5, 2-sc inc) x 6 [42]

Round 8 :

(scx6, 2-sc inc) x 6 [48]

Round 9~36 :

sc in all 48 st [48]

Infos :

DIVIDE THE LEGS. To make a leg, identify the center space between the legs by the 6 stitches, and each leg identifies the other by 18. (Use stitch markers to help.) Sc at the 31th st of the Rnd 36. This sc is the first st of the first leg (left leg). Continue working on the first leg (left leg).

Round 37~40 :

sc in all 18 st [18]

Round 41 :

(scx1, sc2tog) x 6 [12]

Round 42 :

(sc2tog) x 6 [6]

Info :

Fasten off, leaving a long tail. Stuff the leg. Using a yarn needle, weave the yarn tail through the front loop of each remaining st and pull tight to close.

Info :

SECOND LEG (Right leg): Rejoin the Navy yarn to 7th back unworked st of Rnd 36. This sc is the first st for the second leg (right Leg). Continue working the second leg (right leg) the same way as the first leg (left leg), from Rnd 37~42. Using a yarn needle, sew the 6 sts between the legs.

β€” Arms :

Info :

Use the Soft beige yarn to make MAGIC RING.

Round 1 :

scx5 in the yarn loop, tighten the loop [5 sts]

Round 2 :

(2-sc inc) x 5 [10]

Round 3~11 :

sc in all 10 st [10]

Info :

Fasten off, Leaving a long tail for sewing. Flatten the ARM, do not stuff.

β€” Snout :

Info :

Use the White yarn to make 4 chains.

Round 1 :

scx1 in second ch from hook, scx1 in the next chain, scx3 in the bottom chain, Working up the other side-scx1, scx2 in the next chain, slst [8 sts]

Round 2 :

ch 1, 2-sc inc, scx1, (2-sc inc) x 3, scx1, (2-sc inc) x 2, slst [14]

Round 3~4 :

ch 1, sc in all 14 st, slst [14]

Info :

Fasten off, Leaving a long tail for sewing. Fill in some stuffing to the snout. And then make a nose and mouth on the snout. Eyes Location: Between Rnd 13 and 14.

β€” Ears :

Info :

Use the Orange Brown (/Soft beige) yarn to make MAGIC RING.

Round 1 :

scx3 in the yarn loop, tighten the loop [3 sts]

Round 2 :

(2-sc inc) x 3 [6]

Round 3 :

(scx1, 2-sc inc) x 3 [9]

Round 4 :

(scx2, 2-sc inc) x 3 [12]

Infos :

Fasten off, Leaving a long tail for sewing. Flatten the EAR, do not stuff. Beard Location: Between Rnd 15 and 16 & Rnd 17 and 18. Cheek Location: Between Rnd 14 and 15. Arms Location: Between Rnd 20 and 21. Ears symbol pattern shown in diagrams.

Assembly Instructions

  • Sew the two legs to the body by first making the legs from Rnd 37~42, then using a yarn needle sew the 6 stitches between the legs to close and secure the split.
  • Attach the arms to the sides of the body between rounds 20 and 21; pin the arms in place so they sit slightly forward, then sew with a yarn needle using the long tail.
  • Position and sew the ears to the top of the head following the ear location guide: approximately between rounds 14–19, ensuring left and right symmetry before stitching.
  • Glue or secure the 5mm black safety eyes between Round 13 and Round 14 (use the face placement diagram for exact spacing), then embroider or attach the snout over the central face area.
  • Sew the snout centered on the face in the section indicated (snout stitching section), fill lightly with stuffing and secure the nose and mouth embroidery on top.
  • For stability and a straight standing position, plug a small wooden pin into the back of each foot as shown in the tip illustration, then hide and secure with yarn.

Important Notes

  • πŸ’‘Use stitch markers to keep track of rounds and the division point for the legs, especially at round 36 when you split the piece.
  • πŸ’‘Change yarn colors according to the symbol pattern on page 1 for accurate stripe placement and head patch alignment.
  • πŸ’‘Flatten arms and ears and do not stuff them; they are sewn flat onto the body and head for a neat finish.
  • πŸ’‘Stuff the head and legs gradually and evenly; overstuffing will distort shaping while under-stuffing will leave gaps.
  • πŸ’‘Weave in ends and pull closing tails through front loops to neatly close openings before final sewing.

This Minimals Cat is a compact, stylish little friend designed to brighten any shelf or gift package. It combines simple single crochet shaping with thoughtful color details to create a charming, modern toy. Perfect for gifting or collecting β€” make one today and add a tiny touch of handmade joy to your day! 🧢🎁

You ask,

we answer.

FAQs

What size will the finished piece be?

The finished amigurumi measures approximately 15 cm (5.9 inches) tall when using the recommended worsted yarn and a 3mm crochet hook.

Can I use different yarn weights for this pattern?

Yes, you can use different yarn weights, but this will affect the final size; if you switch to fingering weight, use a 3mm hook as suggested in the size note.

Do I need prior crochet experience for this pattern?

This pattern is rated intermediate, so basic knowledge of single crochet, increases, decreases, magic ring and simple color changes is recommended.

How long does this project typically take to complete?

Most crocheters complete this project in about 5-7 hours, depending on experience, speed, and how much time you spend on color changes and finishing.