🧢 Beautiful ✨ Detailed πŸ’ Adorable

Minimals Monkey Amigurumi Pattern

Minimals Monkey Amigurumi Pattern
4.4β˜… Rating
5-7 Hours Time Needed
4.0K Made This
βœ‚οΈ

Intermediate Level

Ideal for those with basic crochet experience, featuring slightly more advanced stitches and techniques to expand your skills.

⏱️

Weekend Treat

Takes 5-7 hours, making it an enjoyable project to finish over a couple of days.

🧸

Cute Companion

An adorable friend to cherish, handcrafted with love to bring comfort and joy for years to come.

About This Minimals Monkey Amigurumi Pattern

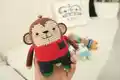
This pattern guides you through crocheting a small, stylized monkey from the Minimals collection. You will make the head, body, legs, arms, ears and a tiny pocket with clear round-by-round instructions and helpful assembly notes. Color changes are used to create the monkey's face, shirt and pants for a playful finished look.

Minimals Monkey Amigurumi Pattern crochet pattern - detailed view of completed project

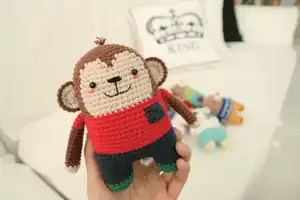
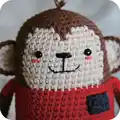
The finished doll measures approximately 15 cm (5.9 in) using the recommended hook and yarn, and photos show placement details for facial features and parts. Perfect as a handmade gift or a cute shelf companion.

Why You'll Love This Minimals Monkey Amigurumi Pattern

I absolutely love this pattern because it turns simple stitches into a delightful little character with lots of personality. The colorwork for the face and clothing gives you a big visual payoff for relatively little effort. I enjoy how the assembly details and photo pointers make placement of eyes and ears so straightforward. It is satisfying to see the doll take shape as you divide the legs and add the tiny pocket detail. This pattern strikes a great balance between simple amigurumi construction and charming surface details.

Minimals Monkey Amigurumi Pattern step 1 - construction progress Minimals Monkey Amigurumi Pattern step 2 - assembly progress Minimals Monkey Amigurumi Pattern step 3 - details and accessories Minimals Monkey Amigurumi Pattern step 4 - final assembly and finishing

Switch Things Up

I love how easy it is to customize this monkey by changing colors; try pastel shades for a softer look or bright primary colors for a playful version.

I sometimes swap the yarn weight and hook size to make tiny keychain versions or larger cuddly dolls; just adjust the hook to match your yarn.

I often embroider different facial expressions by changing the mouth shape or adding eyebrows for personality and mood.

For seasonal variations, I change the shirt color and add tiny accessories like a crocheted scarf, hat, or tiny felt patches for a unique outfit.

I like to replace the plastic eyes with safety eyes of different sizes or embroidered eyes for a fully child-safe toy.

To make the doll posable, I add thin wire into the arms before flattening and sewing so the arms can be adjusted slightly after assembly.

Experiment with textured yarn for the shirt or pants for a cozy, tactile finish that feels different to the touch.

Try surface crochet or embroidery on the shirt area to create logos, initials, or small patternsβ€”this makes a great gift personalization option.

Consider adding small stuffing weights in the feet (like poly pellets) to help the doll sit or stand sturdily without tipping over.

I always recommend practicing color changes on a swatch first so you can keep tension even and avoid visible gaps where colors meet.

Common Mistakes & How to Fix Them

βœ— Not marking the stitch that divides the legs can cause misplacement of the leg sections; place stitch markers at the center space and the 31st stitch of round 36 to identify leg starting points. βœ— Skipping color changes according to the symbol chart will make the face and clothing look incorrect; follow the SYMBOL PATTERNS carefully and change yarn colors exactly where the chart indicates. βœ— Overstuffing the head or legs creates a distorted shape that bulges through the stitches; stuff gradually and evenly, adding small amounts until you reach the desired firmness. βœ— Forgetting to leave a long tail when fastening off makes sewing parts together difficult; always leave a long tail for sewing after fastening off to make assembly easier. βœ— Not sewing the 6 stitches between the legs securely will make the legs floppy; use a yarn needle and firm whipstitches to join the 6 sts and secure the legs. βœ— Ignoring front loop closure instructions on the leg can leave a visible gap; weave the yarn tail through the front loop of each remaining stitch and pull tight to close neatly.

Minimals Monkey Amigurumi Pattern

Create a charming Minimals Monkey with this friendly crochet pattern designed for makers who enjoy small, detailed toys. You will work in rounds, change colors for the face, body and legs, and assemble a compact 15cm (5.9in) amigurumi. The pattern includes step-by-step rounds for head, body, legs, arms, ears and a little pocket so you can finish a delightful handmade companion.

Intermediate 5-7 Hours

Materials Needed for Minimals Monkey Amigurumi Pattern

β€” Main Fabric

  • 01
    Worsted weight yarn (recommended) - Brown yarn (main head/body color)
  • 02
    Worsted weight yarn - Black yarn (nose, small details)
  • 03
    Worsted weight yarn - Beige yarn (face and inner ear)
  • 04
    Worsted weight yarn - Green yarn (feet accent)
  • 05
    Worsted weight yarn - Red yarn (shirt)
  • 06
    Worsted weight yarn - Navy yarn (pants/pocket)
  • 07
    Worsted weight yarn - Orange yarn (optional accents)

β€” Tools Required

  • 01
    Crochet hook 5/0 (3mm)
  • 02
    Yarn needle for weaving and sewing parts
  • 03
    Scissors
  • 04
    Stitch markers
  • 05
    Fiberfill stuffing
  • 06
    Glue (to glue the eyes on the face, optional)
  • 07
    5mm Black plastic eyes x2
  • 08
    Wooden pins (optional) to straighten doll feet as shown

Progress Tracker

0% Complete

β€” Head / Body / Legs :

Info :

*Change the color of the yarn according to the SYMBOL PATTERNS. Changing the yarn color is not mentioned in the descriptive design.

Info :

Rnd Use the Brown yarn to make MAGIC RING.

Round 1 :

scx6 in the yarn loop, tighten the loop [6 sts]

Round 2 :

(2-sc inc) x 6 [12]

Round 3 :

(scx1, 2-sc inc) x 6 [18]

Round 4 :

(scx2, 2-sc inc) x 6 [24]

Round 5 :

(scx3, 2-sc inc) x 6 [30]

Round 6 :

(scx4, 2-sc inc) x 6 [36]

Round 7 :

(scx5, 2-sc inc) x 6 [42]

Round 8 :

(scx6, 2-sc inc) x 6 [48]

Round 9~36 :

sc in all 48 st [48]

Infos :

DIVIDE THE LEGS. To make a leg, identify the center space between the legs by the 6 stitches, and each leg identifies the other by 18.(Use stitch markers to help.) Sc at the 31th st of the Rnd 36. *1 This sc is the first st of the first leg (left leg). Continue working on the first leg (left leg).

Round 37~40 :

sc in all 18 st [18]

Round 41 :

(scx1, sc2tog) x 6 [12]

Round 42 :

(sc2tog) x 6 [6]

Info :

Fasten off, leaving a long tail. Stuff the leg. Using a yarn needle, weave the yarn tail through the front loop of each remaining st and pull tight to close.

Infos :

SECOND LEG. Rejoin the Navy yarn to 7th back unworked st of Rnd 36. *2 This sc is the first st for the second leg (right Leg). Continue working the second leg (right leg) the same way as the first leg (left leg), from Rnd 37~42. Using a yarn needle, sew the 6 sts between the legs.*3

β€” Arm x2 :

Info :

Rnd Use the Beige yarn to make MAGIC RING.

Round 1 :

scx5 in the yarn loop, tighten the loop [5 sts]

Round 2 :

(2-sc inc) x 5 [10]

Round 3~16 :

sc in all 10 st [10]

Info :

Fasten off, Leaving a long tail for sewing. Flatten the ARM, do not stuff.

β€” Pocket :

Info :

Rnd Use the Navy yarn to make 5 chains.

Round 1 :

hdcx1 in third ch from hook, hdcx2 [4 sts] *ch 2 = hdcx1

Round 2 :

ch 2, turn, hdcx3 [4]

Info :

Fasten off, Leaving a long tail for sewing.

β€” Ear x2 :

Info :

Rnd Use the Beige yarn to make MAGIC RING.

Round 1 :

scx6 in the yarn loop, tighten the loop [6 sts]

Round 2 :

ch 1, turn, sc, hdc, dcx2, hdc, sc [6]

Round 3 :

ch 1, turn, sc, (2-sc inc) x 4, sc [10]

Info :

Fasten off, and make another Beige ear, two Brown ears by the same way.

Round 4 :

Edging: Locate beige colored ear part on the brown ear, join the brown yarn into the bottom right corner of both ears and SC together. (Beige: the stitches only through backloop/ Brown: go through both loops). [10]

Info :

Fasten off, Leaving a long tail for sewing.(Fold the ears slightly.)

Info :

TIP: How to straighten a doll: Plug wooden pin on the back of the doll's feet.

Assembly Instructions

  • Sew the head/body seam and attach the head region already worked in rounds 1-19 to the body section by matching the round edges and sewing with a yarn needle using a whip stitch.
  • Attach arms on either side of the body between rounds 20 and 21, aligning the top of the flattened arm with the shoulder area, and sew securely with matching yarn.
  • Position and sew the ears to the head with the beige face part facing forward; fold the ears slightly and place them according to the location diagram (ears around the sides of the head), then sew through both layers.
  • Place and glue or sew the 5mm black plastic eyes between round 13 and 14, spaced evenly as shown in the illustration, then embroider the nose and mouth around round 14-15.
  • Attach the little pocket to the front of the shirt area between rounds 22 and 24 using the long tail left from fastening off and sew all around the edges.
  • Sew the 6 stitches between the legs (the center space) together using a yarn needle to secure the legs, then hide and weave in all tails inside the body.

Important Notes

  • πŸ’‘Use stitch markers to keep track of your rounds and to mark the center space and starting stitch for each leg during dividing and rejoining.
  • πŸ’‘Stuff firmly but not too tightly for a smooth shape; add fiberfill gradually while shaping the head and legs to avoid lumps.
  • πŸ’‘Leave long tails when fastening off so you have enough yarn to sew parts together cleanly and securely.
  • πŸ’‘Follow the SYMBOL PATTERNS for all color changes; color changes are not described step-by-step in the text but are essential for the face and clothing.
  • πŸ’‘Pin parts in place and check symmetry before sewing to ensure eyes, ears, arms and pocket are aligned correctly.

This Minimals Monkey pattern is perfect for creating a sweet, compact handmade friend that fits in the palm of your hand. 🧢 It mixes simple amigurumi construction with playful colorwork for the face, shirt and feet. Whether you gift it or keep it, this little monkey brings cozy charm and smiles. 🐡 Happy crocheting and enjoy every stitch!

You ask,

we answer.

FAQs

What size will the finished piece be?

The finished amigurumi measures approximately 15 cm (5.9 inches) when using the recommended worsted yarn and a 3mm (5/0) crochet hook; size may vary with different yarn weights.

Can I use different yarn weights for this pattern?

Yes, you can use different yarn weights but the final size will change; for a smaller doll try fingering weight on a 3mm hook, or for a chunkier doll use bulkier yarn with a larger hook.

Do I need prior crochet experience for this pattern?

This pattern is rated Intermediate because it uses working in rounds, increases, decreases, color changes and assembly steps; basic knowledge of these techniques is recommended.

How long does this project typically take to complete?

Most crocheters complete this project in 5-7 hours, though your time may vary depending on experience level and how much time you spend on color changes and assembly.

Where should I place the eyes and facial features?

Place the eyes between rounds 13 and 14, cheeks between rounds 14 and 15, and the nose and mouth centered on the face area as shown in the illustrations for accurate placement.