🧢 Beautiful ✨ Detailed πŸ’ Adorable

Mussel Crochet Amigurumi Pattern

Mussel Crochet Amigurumi Pattern
4.2β˜… Rating
2-3 Hours Time Needed
1.4K Made This
βœ‚οΈ

Beginner Friendly Level

Perfect for those just starting their crochet journey, with clear instructions and simple techniques

⏱️

Bite-Sized Project

Finishes in 2-4 hoursβ€”perfect for an afternoon of creative relaxation.

🧸

Cute Companion

An adorable friend to cherish, handcrafted with love to bring comfort and joy for years to come.

About This Mussel Crochet Amigurumi Pattern

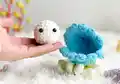
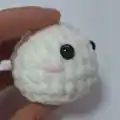
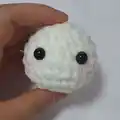
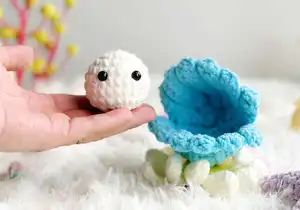
This pattern creates a tiny mussel with a removable pearl inside a two-piece seashell. You will crochet a small round pearl and two matching shell halves that join together to form a charming little pod. Techniques include magic ring, basic increases and decreases, working in the back loop only (BLO), and simple seaming.

Mussel Crochet Amigurumi Pattern crochet pattern - detailed view of completed project

Designed using super bulky yarn for a quick, satisfying make, this pattern is perfect for gifting or display. Full materials, abbreviations, and clear step-by-step rows are included to guide you through every stitch.

Why You'll Love This Mussel Crochet Amigurumi Pattern

I absolutely love this pattern because it transforms simple stitches into a playful little scene you can hold in your hand. I enjoy how quickly the super bulky yarn works up, so you get a finished piece in just a couple of hours. I also love that the pearl fits snugly inside the shell β€” it adds a delightful interactive element. This pattern is satisfying for both new crocheters learning shaping and experienced makers who want a cozy quick project.

Mussel Crochet Amigurumi Pattern step 1 - construction progress Mussel Crochet Amigurumi Pattern step 2 - assembly progress Mussel Crochet Amigurumi Pattern step 3 - details and accessories Mussel Crochet Amigurumi Pattern step 4 - final assembly and finishing

Switch Things Up

I love how easy it is to customize this mussel by simply changing yarn colors; try pastel shades for a softer look or bright colors for a playful vibe.

I sometimes use bulky cotton instead of chenille for a firmer shell that holds its shape better for display pieces.

To make a tiny keychain version, use a lighter weight yarn and a smaller hook to scale the pattern down dramatically.

I often embroider tiny eyelashes or eyebrows on the pearl for different expressions β€” a few stitches can change the personality completely.

Swap the safety eyes for embroidered eyes for a fully soft, baby-safe version that is great for little ones.

Try adding tiny crocheted accessories like a bow, starfish, or a little seaweed for extra charm and storytelling value.

If you want a posable display, I sometimes add a small felt base or a hidden magnet so the mussel can sit or attach to metal surfaces.

Use a sparkly or metallic yarn for the inner shell edge to give a shimmering pearlescent effect that looks lovely in photos.

I recommend experimenting with different stuffing levels: firmer for a solid feel, lighter for a squishier plush toy that fits in a pocket.

For gifting, attach a small loop or label and package in a tiny organza bag for a polished, handmade presentation.

Common Mistakes & How to Fix Them

βœ— Skipping stitch markers during rounds can make it hard to know the start of each row; place a stitch marker at the first stitch of every round to stay oriented. βœ— Not stuffing the pearl evenly will create lumps and an uneven shape; add small amounts of fiberfill gradually and shape as you go for a smooth finish. βœ— Forgetting to place safety eyes at the recommended position will result in a misplaced face; attach the eyes between rows 4 and 5 with five stitches between them as instructed.
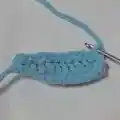
 βœ— Crocheting into the wrong loop when instructed to work BLO will change the texture; pay attention to the note to work all stitches in the back loop only from rows 2 to 11 on the shells. βœ— Pulling stitches too tight when joining the shell halves with SLST can distort the shell shape; use a relaxed tension and pin pieces together to check alignment before joining.

Mussel Crochet Amigurumi Pattern

Create an adorable mussel amigurumi with this friendly crochet pattern. You will make a tiny pearl and a cute two-piece seashell that closes around it. The pattern uses super bulky yarn for a soft, squishy finish and clear step-by-step instructions. Perfect for gift-making or adding a whimsical touch to your handmade collection.

Beginner Friendly 2-3 Hours

Materials Needed for Mussel Crochet Amigurumi Pattern

β€” Main Fabric

  • 01
    Super Bulky yarn (Category 6) - main color indicated (Purple color listed in materials)
  • 02
    White Super Bulky yarn - for the pearl (amount not specified)
  • 03
    Blue Super Bulky yarn - for the seashell (amount not specified)
  • 04
    Small amounts of pink yarn for embroidered mouth details (amount not specified)

β€” Tools Required

  • 01
    3.5mm (E) hook
  • 02
    Stitch marker
  • 03
    Sewing needle
  • 04
    Scissors
  • 05
    Plastic safety eyes 8mm (2 pieces)
  • 06
    Hot gun glue
  • 07
    Fiberfill (polyester stuffing)

Progress Tracker

0% Complete

β€” PEARL :

Round 1 :

6SC in a MR (6)

Round 2 :

6INC (12)

Round 3 :

(SC, INC) 6 times (18)

Round 4 :

(2SC, INC) 6 times (24)

Round 5-7 :

24SC (24)

Round 8 :

(2SC, DEC) 6 times (18)

Info :

*Stuffing*

Round 9 :

(SC, DEC) 6 times (12)

Round 10 :

6DEC (6)

Info :

Cut the yarn. Attach the eyes between rows 4 and 5, with 5 stitches between them. Embroider pink for the mouth.

β€” SEASHELL ( MAKE 2) :

Infos :

Begin with Blue yarn. From rows 2 to 11, crochet all stitches in the BLO. On even rows, start crocheting into the second stitch from the hook. On odd rows, start crocheting into the third stitch from the hook.

Round 1 :

13Ch, turn: 7DC, HDC, SC, 2Slst, turn (11)

Round 2 :

Ch, 11Slst, turn (11)

Round 3 :

3Ch, 8DC, HDC, SC, 2Slst, turn (12)

Round 4 :

Ch, 12Slst, turn (12)

Round 5 :

3Ch, 9DC, HDC, SC, 2Slst, turn (13)

Round 6 :

Ch, 13Slst, turn (13)

Round 7 :

2Ch, 9DC, HDC, SC, 2Slst, turn (13)

Round 8 :

Ch, 12Slst, turn (12)

Round 9 :

2Ch, 8DC, HDC, SC, 2Slst, turn (12)

Round 10 :

Ch, 11Slst, turn (11)

Round 11 :

2Ch, 7DC, HDC, SC, 2Slst (11)

Round 12 :

Thread the needle through the loops in pairs as shown in the image, with a total of 3 pairs. When you have all 4 loops on the needle, pass the thread through all 4 loops to create one stitch.

Info :

After completing the two seashell pieces, fold them in half and place the wrong sides together. Use SLST to join the two pieces together.

Info :

Starting from the single stitch in row 12, count backward to row 11, adding 7 stitches. Begin joining from this point. Make 15 SLST. 7Slst (row 11), Slst (row 12), 7Slst (row 1). Cut the yarn and finish product.

Assembly Instructions

  • Attach the plastic safety eyes to the pearl between rows 4 and 5, spacing them with 5 stitches between for correct placement.
  • Embroider a small pink mouth on the pearl after placing the eyes, securing the thread and weaving in ends neatly.
  • Fold each seashell piece in half with wrong sides together and use slip stitch (SLST) to join the two halves along the edge.
  • Starting from the single stitch in row 12 of the joined shell, count backward to row 11 and begin joining, making 15 SLST total following the sequence 7SLST (row 11), SLST (row 12), 7SLST (row 1).
  • Place the finished pearl inside the joined shell and ensure the shell closes neatly around it; adjust stuffing or placement if needed for a snug fit.

Important Notes

  • πŸ’‘Use stitch markers to mark the start of each round, especially when working in spirals or during increases and decreases.
  • πŸ’‘Work rows 2 to 11 of the seashell in the back loop only (BLO) to create the textured ribbed shape shown in the photos.
  • πŸ’‘Attach safety eyes before excess stuffing and closing the pearl to make placement easier and safer.

Thank you for making this tiny mussel β€” I hope it brings a smile to your day and a little ocean charm to your home. This cuddly pocket-sized amigurumi is perfect as a quick handmade gift or a sweet desk companion. Have fun customizing colors and sharing your finished friends with others. 🧢🐚

You ask,

we answer.

FAQs

What size will the finished piece be?

The finished mussel measures approximately a few inches across when using super bulky (category 6) yarn and a 3.5mm hook; exact size will vary with yarn and tension.

Can I use different yarn weights for this pattern?

Yes, you can use different yarn weights but the size and texture will change; choose an appropriate hook for your yarn and be prepared for a smaller or larger finished mussel.

Do I need prior crochet experience for this pattern?

This pattern is beginner friendly, but familiarity with basic stitches like SC, HDC, DC, INC, DEC, and working in the back loop only (BLO) will be helpful.

How long does this project typically take to complete?

Most crocheters finish this project in 2-3 hours using the recommended super bulky yarn and 3.5mm hook, though time may vary with experience and customization.