🧢 Beautiful ✨ Detailed πŸ’ Adorable

Nemo Mussel Amigurumi Pattern

Nemo Mussel Amigurumi Pattern
4.4β˜… Rating
2-4 Hours Time Needed
1.5K Made This
βœ‚οΈ

Intermediate Level

Ideal for those with basic crochet experience, featuring slightly more advanced stitches and techniques to expand your skills.

⏱️

Bite-Sized Project

Finishes in 2-4 hoursβ€”perfect for an afternoon of creative relaxation.

🎁

Tiny Treasure

Small, sweet, and gift-worthy creations that fit perfectly in the palm of your hand with detailed charm.

About This Nemo Mussel Amigurumi Pattern

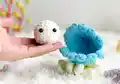
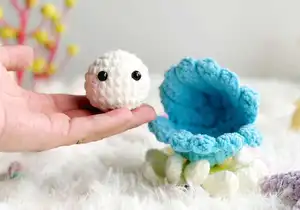
This enchanting pattern guides you through creating a delightful amigurumi mussel and its precious pearl companion. You will practice working in the round for the pearl and in the back loops only to create the beautifully ribbed seashell. The contrast between the smooth, round pearl and the wavy, textured shell creates a wonderful tactile experience. It makes for a fantastic quick gift or a sweet addition to any desk or display shelf!

Nemo Mussel Amigurumi Pattern crochet pattern - detailed view of completed project

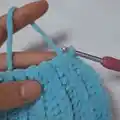
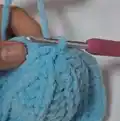
The pattern includes detailed step-by-step instructions on shaping the shell and achieving that perfect ribbed look using slip stitches and double crochets. You will love seeing this magical little marine scene come together in your hands.

Why You'll Love This Nemo Mussel Amigurumi Pattern

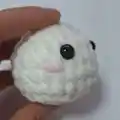
I absolutely love this pattern because it takes simple shapes and turns them into something so expressive and sweet. The way the ribbed seashell curves naturally just by using different stitch heights and back loops is like magic to me. It is incredibly satisfying to stitch up the little pearl and watch its personality emerge the moment you add those safety eyes and pink cheeks. I find it to be the perfect stash-buster project, allowing you to play with different color combinations for the shell, from realistic browns to bright fantasy blues. Whether you make it as a pocket pal or a unique piece of home decor, it brings a little bit of beachy joy wherever it goes!

Nemo Mussel Amigurumi Pattern step 1 - construction progress Nemo Mussel Amigurumi Pattern step 2 - assembly progress Nemo Mussel Amigurumi Pattern step 3 - details and accessories Nemo Mussel Amigurumi Pattern step 4 - final assembly and finishing

Switch Things Up

I love how versatile this little mussel pattern is for customization! You can easily adjust the colors to create your own unique seashell - try soft pastel pinks, lavenders, and corals for a magical, tropical look, or rich earthy browns and tans for a realistic beach find.

Want to make the pearl extra special? Try using a metallic, sparkly, or iridescent white yarn to give it that authentic, shimmering glow. You could even use glow-in-the-dark yarn for a magical surprise when the lights go out in a kid's room!

If you prefer a larger, more huggable version, simply swap the super bulky yarn for jumbo velvet or chenille yarn and use a massive hook. It works up into an incredible throw pillow or oversized plushie that makes a fantastic statement piece.

I often add my own creative touches like a tiny crocheted starfish or sea turtle attached to the outside of the shell, or embroidering little barnacles for added texture. These personal additions make each piece truly one-of-a-kind and special.

Don't be afraid to experiment with the pearl's facial expressions too! Adding tiny felt cheeks, sleepy embroidered eyes, or a quirky little smile can completely change the personality of your creation. The possibilities are endless, and that is what makes this pattern so much fun!

Common Mistakes & How to Fix Them

βœ— Skipping stitch markers at the start of rounds can lead to misaligned shapes; place a marker at the start of every round to stay on track. βœ— Crocheting the shell rows too tightly will make it difficult to work into the slip stitches on the return passes; maintain a relaxed, even tension. βœ— Not stuffing the pearl evenly causes lumpy sides and distorts the face; stuff gradually while shaping, adding small amounts of fiberfill at a time. βœ— Forgetting to work in the back loops only (BLO) for the shell will result in a flat piece; always check your hook placement to ensure that beautiful ribbed texture.

Nemo Mussel Amigurumi Pattern

Create your very own adorable Nemo Mussel with this charming and unique crochet pattern! This little amigurumi project features a cute, expressive pearl resting comfortably inside a beautifully textured seashell. It's a fun and rewarding make that is perfect for ocean lovers, beach enthusiasts, or anyone looking to add a touch of marine magic to their collection. Grab your yarn and let's craft this delightful undersea treasure together!

Intermediate 2-4 Hours

Materials Needed for Nemo Mussel Amigurumi Pattern

β€” Main Fabric

  • 01
    Super Bulky / Category 6 yarn in White (for Pearl)
  • 02
    Super Bulky / Category 6 yarn in Blue (for Seashell)
  • 03
    Super Bulky / Category 6 yarn in Purple (alternative color option)
  • 04
    Small amount of Pink yarn or thread for embroidering the mouth

β€” Tools Required

  • 01
    Crochet hook size 3.5mm (E)
  • 02
    Stitch marker
  • 03
    Sewing needle
  • 04
    Scissors
  • 05
    Plastic safety eyes 8mm
  • 06
    Hot glue gun
  • 07
    Fiberfill stuffing

Progress Tracker

0% Complete

β€” Pearl :

Info :

Begin with White yarn

Row 1 :

6 SC in a MR (6)

Row 2 :

6 INC (12)

Row 3 :

(SC, INC) 6 times (18)

Row 4 :

(2 SC, INC) 6 times (24)

Row 5-7 :

24 SC (24)

Row 8 :

(2 SC, DEC) 6 times (18)

Info :

Stuffing

Row 9 :

(SC, DEC) 6 times (12)

Row 10 :

6 DEC (6)

Infos :

Cut the yarn. Attach the eyes between rows 4 and 5, with 5 stitches between them. Embroider pink for the mouth.

β€” Seashell (Make 2) :

Infos :

Begin with Blue yarn. From rows 2 to 11, crochet all stitches in the BLO. On even rows, start crocheting into the second stitch from the hook. On odd rows, start crocheting into the third stitch from the hook.

Row 1 :

13 Ch, turn: 7 DC, HDC, SC, 2 Slst, turn (11)

Row 2 :

Ch, 11 Slst, turn (11)

Row 3 :

3 Ch, 8 DC, HDC, SC, 2 Slst, turn (12)

Row 4 :

Ch, 12 Slst, turn (12)

Row 5 :

3 Ch, 9 DC, HDC, SC, 2 Slst, turn (13)

Row 6 :

Ch, 13 Slst, turn (13)

Row 7 :

2 Ch, 9 DC, HDC, SC, 2 Slst, turn (13)

Row 8 :

Ch, 12 Slst, turn (12)

Row 9 :

2 Ch, 8 DC, HDC, SC, 2 Slst, turn (12)

Row 10 :

Ch, 11 Slst, turn (11)

Row 11 :

2 Ch, 7 DC, HDC, SC, 2 Slst (11)

Row 12 :

Thread the needle through the loops in pairs as shown in the image, with a total of 3 pairs. When you have all 4 loops on the needle, pass the thread through all 4 loops to create one stitch.

β€” Assembly :

Step 1 :

After completing the two seashell pieces, fold them in half and place the wrong sides together.

Step 2 :

Use SLST to join the two pieces together.

Step 3 :

Starting from the single stitch in row 12, count backward to row 11, adding 7 stitches. Begin joining from this point.

Step 4 :

Make 15 SLST to join the shells together: 7 Slst (row 11), Slst (row 12), 7 Slst (row 1).

Step 5 :

Cut the yarn, weave in ends, and finish product.

Assembly Instructions

  • After completing the two seashell pieces, fold them in half and place the wrong sides together to prepare for joining.
  • Starting from the single stitch in row 12 of the seashell, count backward to row 11 and add 7 stitches to find your exact starting point for joining.
  • Use slip stitches to join the two seashell halves together, working a total of 15 slip stitches firmly along the back hinge edge.
  • Distribute the 15 joining slip stitches exactly as follows: 7 slip stitches along row 11, 1 slip stitch in row 12, and 7 slip stitches along row 1.
  • Once the shell halves are securely joined, cut the yarn, weave in the loose ends, and gently nestle the finished, stuffed pearl inside the open shell.

Important Notes

  • πŸ’‘Pay close attention to the row instructions for the seashell, as starting in the second or third chain from the hook varies depending on whether it is an even or odd row.
  • πŸ’‘Remember to work in the back loops only (BLO) for rows 2 through 11 of the seashell to create its distinct, beautiful ribbed texture.
  • πŸ’‘Stuff the pearl firmly but carefully so it maintains a perfectly round shape without stretching the stitches and showing the fiberfill.
  • πŸ’‘Use stitch markers to keep track of your rounds on the pearl, ensuring your stitch counts remain accurate throughout the increasing and decreasing sections.

This sweet little Nemo Mussel is such a delightful make that works up quickly and brings a splash of the ocean right into your home! The clever, textured construction of the shell and the charming, round face of the pearl make it a truly unique amigurumi piece. It is the perfect handmade gift for sea lovers of all ages. 🌊 Dive into this pattern and enjoy every stitch! 🐚✨

You ask,

we answer.

FAQs

Can I use a different yarn weight for this pattern?

Yes, you can use worsted or chunky yarn instead of super bulky, just be sure to adjust your hook size accordingly. Keep in mind this will significantly change the final size of your mussel.

Is this pattern suitable for absolute beginners?

This is rated as an intermediate pattern because the seashell requires working in back loops only (BLO) and turning chains with varying start points, which might be slightly tricky for absolute beginners.

How do I get the ribbed look on the outside of the shell?

The ribbed texture is achieved by crocheting in the back loops only (BLO) on rows 2 through 11. Be sure you are inserting your hook only under the back loop of the V-shape on top of the stitch.

Are the pearl and shell sewn together at the end?

The pattern does not explicitly attach them, allowing the pearl to be a separate piece that sits perfectly nestled inside the joined seashell halves. You can glue or sew it if you prefer it permanent!