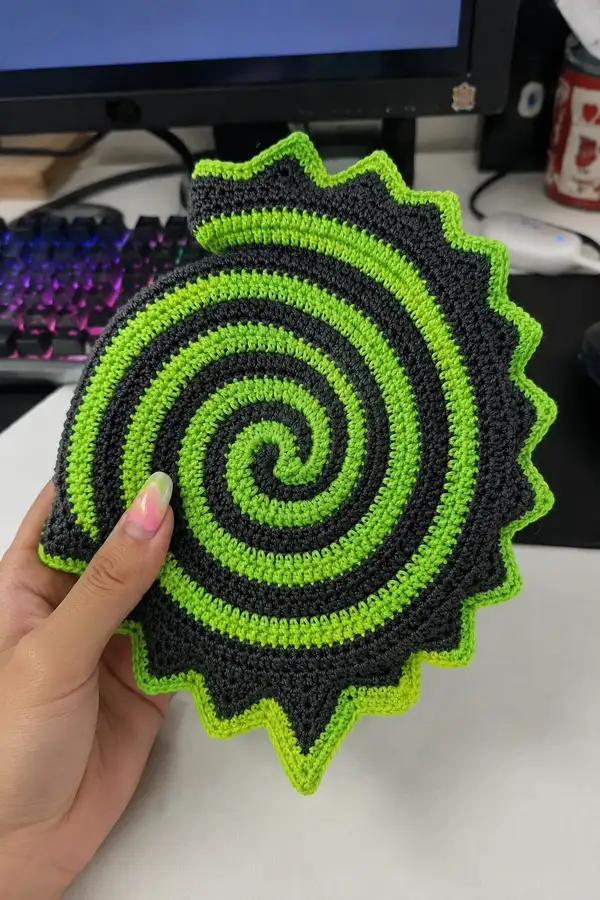
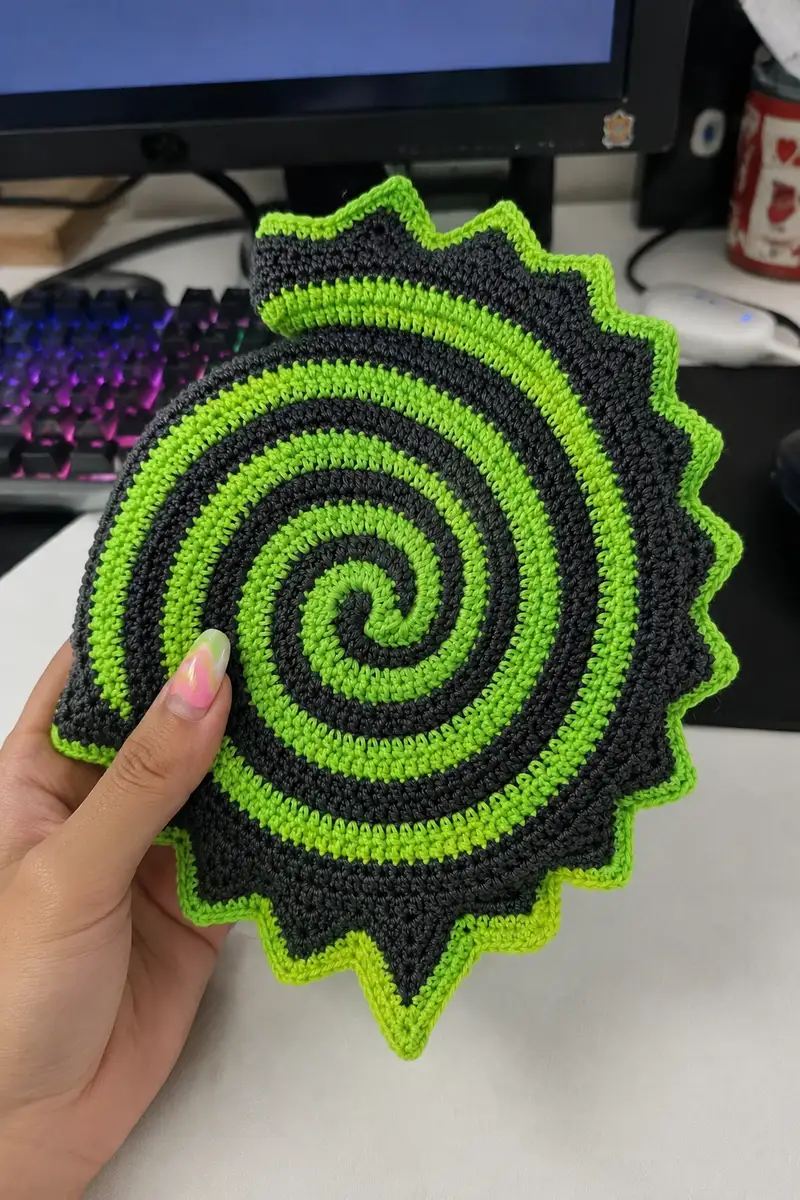
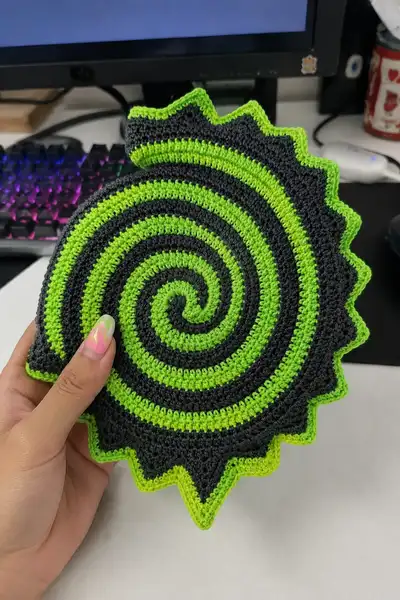
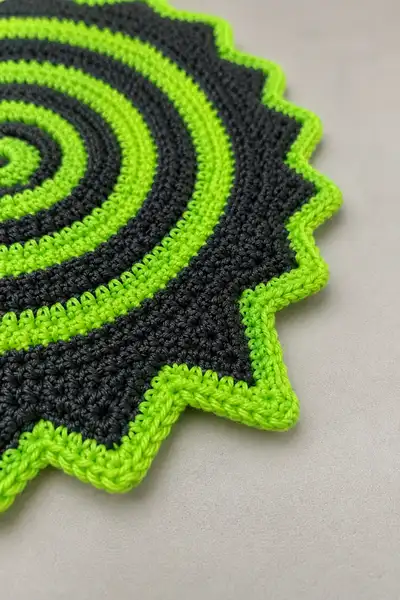
A striking spiral mat worked in neon green and dark grey with a bolt-shaped zigzag ruffled edge. This flat decorative piece features crisp, even single crochet rounds with alternating color stripes and a sculpted pointy border, finished with a clean neon outline. Perfect as a coaster, trivet, desk accent, or wall-hanging, the glossy yarn gives a polished look and the structured edge creates dramatic contrast.
Progress Tracker
0% Complete
— Overview :
Info :
This spiral mat is worked in continuous rounds (no joining, spiral method) to preserve a continuous spiral look. I recommend alternating colors every round to recreate the vivid spiral stripes shown in the photos; if you prefer thicker stripes, alternate every 2 rounds. Maintain tight, even tension so the fabric remains flat and the jagged edge is crisp. The pattern below gives a precise stitch-count plan with increases phased to keep the piece flat and expand the diameter gently. The zigzag border is produced by carefully arranged dec/inc pairs across a fixed number of repeats to form 12 'bolt' points around the edge.
— Center Spiral & Foundational Rounds :
Round 1 :
Using Neon Green: 6 sc in magic ring (6)
Info :
Place a removable stitch marker in the first stitch of round 1 to mark the start of your spiral. Work in continuous spiral; do not join rounds. Each round description lists the total stitches produced in that round (final stitch count).
Round 2 :
Change to Dark Grey. 6 inc (12)
Round 3 :
Change to Neon Green. (1 sc, 1 inc) x 6 (18)
Info :
Alternate color each round to build the spiral stripe effect as shown. Carry unused color lightly across the back if you want fewer ends to weave in later; avoid carrying too tightly to prevent puckering.
Round 4 :
Change to Dark Grey. (2 sc, 1 inc) x 6 (24)
Round 5 :
Change to Neon Green. (3 sc, 1 inc) x 6 (30)
Round 6 :
Change to Dark Grey. (4 sc, 1 inc) x 6 (36)
Info :
Check your tension here — the center should lie flat with a neat spiral. If it is cupping upward, reduce the number of increases in subsequent rounds; if ruffling, consider spacing increases less frequently. This pattern uses conservative increases that keep the spiral flat.
Round 7 :
Change to Neon Green. (5 sc, 1 inc) x 6 (42)
Round 8 :
Change to Dark Grey. (6 sc, 1 inc) x 6 (48)
Round 9 :
Change to Neon Green. (7 sc, 1 inc) x 6 (54)
Round 10 :
Change to Dark Grey. (8 sc, 1 inc) x 6 (60)
Info :
By round 10 the spiral is clearly visible. If you prefer broader stripes, from now on change color every 2 rounds instead of every round (adjust the Info notes accordingly). Keep notes of your color rhythm to recreate later for the border.
Round 11 :
Change to Neon Green. (9 sc, 1 inc) x 6 (66)
Round 12 :
Change to Dark Grey. (10 sc, 1 inc) x 6 (72)
Round 13 :
Change to Neon Green. (11 sc, 1 inc) x 6 (78)
Round 14 :
Change to Dark Grey. (12 sc, 1 inc) x 6 (84)
Info :
At this stage we are using 6-increase rounds which add 6 stitches per round. The stitch count progression is predictable and keeps the spiral expanding smoothly. If your fabric begins to ripple, pause increases and work even rounds until the shape stabilizes.
Round 15 :
Change to Neon Green. (13 sc, 1 inc) x 6 (90)
Round 16 :
Change to Dark Grey. (14 sc, 1 inc) x 6 (96)
Round 17 :
Change to Neon Green. (15 sc, 1 inc) x 6 (102)
Round 18 :
Change to Dark Grey. (16 sc, 1 inc) x 6 (108)
Round 19 :
Change to Neon Green. (17 sc, 1 inc) x 6 (114)
Round 20 :
Change to Dark Grey. (18 sc, 1 inc) x 6 (120)
— Mid-Spiral Expansion (even rounds and phased increases) :
Round 21-30 :
Alternate colors each round. 1 sc in each st (120)
Info :
Work ten even rounds to build height and stripe contrast. Keep alternating Neon Green and Dark Grey each round. If you prefer wider stripes, change colors every 2 rounds here instead. These rounds maintain 120 stitches and add concentric rings of texture.
Round 31 :
Change to Neon Green. Increase 12 stitches across the round using (9 sc, 1 inc) x 12 (132)
Info :
We are increasing by 12 stitches to expand diameter in larger steps now. The repeat (9 sc, 1 inc) x 12 works because 10 stitches per repeat x 12 repeats = 120 consumed; producing 132 output stitches. Make sure you distribute the increases evenly so the circle remains round.
Round 32-40 :
Alternate colors each round. 1 sc in each st (132)
Info :
Work nine even rounds at 132 sts to create many visible stripe rings. Check for flatness: lay the mat on a flat surface periodically and adjust by adding or skipping increases if needed before we add the next expansion round.
Round 41 :
Change to Dark Grey. Increase 12 stitches using (10 sc, 1 inc) x 12 (144)
Round 42-50 :
Alternate colors each round. 1 sc in each st (144)
Info :
Every ten rounds we are increasing by 12 to gently expand the diameter while preserving crisp stripes. This gives the spiral many concentric rings, like the photographed piece.
Round 51 :
Change to Neon Green. Increase 12 using (11 sc, 1 inc) x 12 (156)
Round 52-60 :
Alternate colors each round. 1 sc in each st (156)
Round 61 :
Change to Dark Grey. Increase 12 using (12 sc, 1 inc) x 12 (168)
Round 62-70 :
Alternate colors each round. 1 sc in each st (168)
Round 71 :
Change to Neon Green. Increase 12 using (13 sc, 1 inc) x 12 (180)
Round 72-80 :
Alternate colors each round. 1 sc in each st (180)
Round 81 :
Change to Dark Grey. Increase 12 using (14 sc, 1 inc) x 12 (192)
Info :
At the end of round 81 you have 192 stitches and the mat is approaching the photographed diameter. We will now prepare to sculpt the zigzag bolt border across 12 repeats (12 points). The following shaping rounds preserve the overall stitch count while moving fabric in and out to create peaks and valleys.
— Zigzag Bolt Border Shaping (12 points) :
Round 82 :
Change to Neon Green. 1 sc in each st (192)
Info :
Switch to Neon Green for the round before shaping so the neon outline will sit on top of the peaks. Mark the stitch at the start of this round and also mark every 16th stitch to indicate the twelve repeat boundaries (192/12 = 16). These markers will help you locate point centers in subsequent shaping rounds.
Round 83 :
Change to Dark Grey. Work 12 repeats of the following across the round: (sc 6, sc2tog, sc 2, inc, sc 5) x 12 (192)
Info :
This round sculpts each repeat by placing one sc2tog (dec) and one inc in every 16-stitch repeat — the dec pulls a small valley inward and the inc pushes a bulge outward, creating subtle shaping while preserving the total stitch count. Use the markers placed in Round 82 to align repeats precisely. The produced stitch count remains 192 after each repeat (6+1+2+2+5=16 produced stitches per repeat).
Round 84 :
Change to Neon Green. 1 sc in each st BLO (192)
Info :
Working in the BLO emphasizes a ridge that outlines the points on the next round. This helps the peaks look crisp and sculpted. Keep stitches even and don’t pull too tightly on the BLO passes.
Round 85 :
Change to Dark Grey. Work 12 repeats: (sc 4, inc, sc 4, sc2tog, sc 3) x 12 (192)
Info :
Another sculpting round: the inc near the start of each repeat helps create the outward-facing peak while the sc2tog creates the inward valley. The relative placement of those stitches determines the sharpness of the point. If you want sharper points, move the inc and sc2tog one stitch closer together in each repeat.
Round 86 :
Change to Neon Green. 1 sc in each st (192)
Round 87 :
Change to Dark Grey. Work 12 repeats: (sc 3, sc2tog, sc 2, inc, sc 8) x 12 (192)
Info :
This round continues to push fabric into pronounced peaks and valleys. After this round the points should be clearly visible but still soft; we will firm them and add the neon outline in subsequent rounds. Use stitch markers and compare the work to the photo to match point height.
Round 88 :
Change to Neon Green. 1 sc in each st BLO (192)
Round 89 :
Change to Dark Grey. Work 12 repeats: (sc 2, inc, sc 3, sc2tog, sc 8) x 12 (192)
Info :
This round finalizes the valleys with sc2tog placed to sharpen the dent between points and inc placed near the point base to help push the tip outward. If a point is too blunt, work the inc one stitch closer to the tip in your local repeat next round.
Round 90 :
Change to Neon Green. 1 sc in each st (192)
Info :
At this stage the zigzag peaks should be fully formed but not yet highlighted. Count the number of visible peaks — you should have 12. If you have more or fewer, look back at your repeat placement and correct any misplaced increases or decreases by tunneling out to the prior marked rounds and adjusting. Precision here yields symmetrical bolt points.
— Neon Outline & Final Sculpting :
Round 91 :
Change to Neon Green. Working around the outer edge, place the neon outline stitch at the tip of each peak: *sl st to the tip center stitch marker, ch 1, inc (2 sc in same stitch), sc 2 in next stitches across the side to fill until you reach the next valley* repeat for 12 tips. If working continuous rounds in spiral, simply work 1 sc in each st but emphasize the tip stitches by working an extra sc at each tip location to make neon thicker (192)
Info :
Because the tips are narrow, the neon outline is best achieved by either a targeted slip-stitch outline into tip centers or by working a bright round focusing on tip placement. In continuous spiral mode you can work 1 sc each st but add +1 sc at each tip stitch so the neon outline sits proud. Keep count to ensure you still have 192 stitches at the end of the round.
Round 92 :
Change to Dark Grey. 1 sc in each st (192)
Round 93 :
Change to Neon Green. Work 12 repeats: at the tip area do (sc 2, picot*, sc 2) and along the valley do 1 sc each; full repeat: (sc 5, sc2tog, sc 2, sc 6, sc2tog) x 12 (192)
Info :
*Picot: ch 2, sl st into 3rd chain from hook (or into same stitch) to form a small raised point. The picot is optional if you prefer a flatter edge. The above repeat keeps total stitch counts consistent because each sc2tog is balanced by a prior inc in earlier rounds; here we reintroduce small raised loops at each tip for texture.
Round 94-100 :
Alternate colors each round with 1 sc in each st (192)
Info :
Work seven even rounds to solidify the border. Alternate between Neon Green and Dark Grey for visual layering. These rounds reinforce the points and tidy the transitions so the zigzag looks deliberate rather than accidental. If you see small gaps at valleys, use a hooking needle to pull a small amount of extra yarn through to fill them; then catch and secure on the back.
Round 101 :
Change to Neon Green. Surface accent: 1 sc in each st FLO (192)
Info :
Working in the FLO creates a neat ridge that separates the neon outline visually from the dark grey background. This helps the neon appear as a crisp outline around the points.
Round 102-108 :
Alternate colors each round. 1 sc in each st (192)
Round 109 :
Change to Neon Green. Final decorative border: Work small picot clusters across each tip: (sc 2, picot, sc 2, sl st into next 2 stitches) around peaks and 1 sc in valley stitches; pattern adjusted using markers to place clusters at 12 tip points. Maintain total count of 192 by working sl st in some valley stitches to reduce net stitch output if needed (192)
Info :
This round is aesthetic. If you find the net stitch count changing because of sl st or picot choices, rework the round so that the total produced stitches equals 192. For example, replace a sc in a valley with a sl st to keep counts stable if picots add stitches in tip areas.
Round 110-116 :
Alternate colors each round. 1 sc in each st (192)
Round 117 :
Change to Dark Grey. Clean-up round: 1 sc in each st FLO (192)
Round 118 :
Change to Neon Green. Reverse single crochet (crab stitch) around the outermost edge to create a firm neon rim: work reverse sc in each stitch (192)
Info :
The reverse single crochet (crab stitch) worked in the final neon color adds a polished, slightly corded rim that enhances the sharpness of the bolt points and matches the photographed outline. Work this with a slightly smaller hook (3.0mm) if you want an even tighter rim.
Round 119 :
Optional repeat of neon reverse sc if you want a thicker rim: 1 reverse single crochet in each st (192)
Round 120 :
Fasten off. Weave in all ends securely on the wrong side with a yarn needle. Optionally block lightly to flatten peaks and set shape.
Info :
Fasten off leaving a 20–30 cm tail to weave through the rim on the back side for secure finishing. Use small, neat stitches with the yarn needle to hide tails. Light blocking (steam for acrylic-friendly yarn or wet block cotton) will help the zigzag edge settle flat and crisp.
— Notes on Customization and Scaling :
Info :
To make the mat larger: maintain the expansion rhythm (increase by 12 every ~10 rounds) until you reach the desired diameter, keeping the number of final repeats (12 points) constant. To make more or fewer points: change the number of edge repeats (for 16 points divide the stitch count by 16 instead of 12) and adjust the shaping rounds to match that repeat size. If you want thicker stripes, change color every 2 rounds instead of every round.
Assembly Instructions
- This piece is a single flat item and requires no sewing of separate parts; finalize by weaving in ends on the back side using a yarn needle, stitching tails through the reverse single crochet rim to anchor them securely.
- If you wish to hang the mat on a wall, fold and sew a small loop at the back: using Neon Green yarn and a 3.0mm hook, ch 10, sl st back to base at one valley behind a peak at round 80 area. Secure by stitching both ends into the back of the rim.
- To make a reversible mat, duplicate the entire pattern in opposite color ordering and sew the two mats together (wrong sides facing) using mattress stitch around the rim leaving a small gap to stuff lightly, then close; this creates a plush coaster.
- If placing on hot surfaces, consider inserting a thin heat-resistant backing fabric before closing when sewing a reversible version.
- Block the piece flat by pinning it to a blocking mat with gentle tension; steam or wet-block according to yarn fiber to set the peaks and valleys.
- Secure any residual loose stitches by threading tails through several stitches on the back and trimming close to the work; glue can be applied sparingly to secure stubborn ends for items that will be frequently handled.
Important Notes
- 💡Use stitch markers at each repeat boundary (e.g., every 16th stitch) when shaping the zigzag border to keep point placement accurate.
- 💡Work in a continuous spiral for the central spiral effect; do not join rounds with sl st, except where specifically advised for decorative edging.
- 💡Alternate color method: change color before the last pull-through of the last sc of the previous round to create a very neat color break.
- 💡When making picots on the rim, count produced stitches and use sl st in valley stitches to keep the total stitch count consistent.
- 💡If the outer edge starts to ripple, remove one increase round and work several even rounds to flatten before resuming increases.
- 💡Weave in ends on the inside/back of the mat, taking care to hide them behind the reverse sc rim for a tidy finish.
- 💡For especially crisp points, work the final rim with a smaller hook and tighter tension (one hook size smaller).
- 💡If using acrylic yarn, test a small blocking method first; many acrylics respond to steam but not full soaking and re-shaping.
This neon spiral zigzag mat is an exciting blend of geometry and color — every round builds hypnotic rings and the bolt-shaped border gives it dramatic flair. Working through the spiral is meditative and the final neon rim is a reward that really pops. Whether used as a coaster, trivet, or desk accent, it makes a bold handmade statement. 🧶⚡️ Enjoy finishing it and showing off your sharp, handmade style!