๐Ÿงถ Beautiful โœจ Detailed ๐Ÿ’ Adorable

Neon the Horse Amigurumi Pattern

Neon the Horse Amigurumi Pattern
4.9โ˜… Rating
5-7 Hours Time Needed
2.8K Made This
โœ‚๏ธ

Intermediate Level

Ideal for those with basic crochet experience, featuring slightly more advanced stitches and techniques to expand your skills.

โฑ๏ธ

Weekend Treat

Takes 5-7 hours, making it an enjoyable project to finish over a couple of days.

๐Ÿฐ

Whimsical Buddy

Playful characters full of personality, designed to spark imagination and become cherished playtime favorites.

About This Neon the Horse Amigurumi Pattern

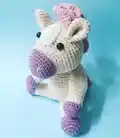
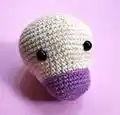
This enchanting pattern guides you through creating Neon the Horse, an adorable amigurumi with a colorful mane, cute snout, and contrasting hooves. You'll work with multiple pastel colors and practice color changes, shaping, and working in the back loops to give her the perfect texture. The final result is a beautiful 5.5-inch seated horse perfect for gifting!

Neon the Horse Amigurumi Pattern crochet pattern - detailed view of completed project

With clear, step-by-step instructions and assembly details, you will have a wonderful time bringing Neon to life. Enjoy personalizing her mane and tail with your favorite glittery or pastel yarns.

Why You'll Love This Neon the Horse Amigurumi Pattern

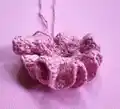
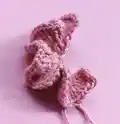
I absolutely love this pattern because it perfectly captures the innocent, dreamy personality of a young horse. The contrast between her pastel purple hooves and soft beige body gives her such a distinct, charming look. Crocheting the curly mane and tail using double crochets is so incredibly satisfying, watching the ringlets form right before your eyes! Plus, the adorable beige patch on her forehead adds that extra touch of character that makes each Neon truly unique. You will be so proud of the beautiful, magical companion you create.

Neon the Horse Amigurumi Pattern step 1 - construction progress Neon the Horse Amigurumi Pattern step 2 - assembly progress Neon the Horse Amigurumi Pattern step 3 - details and accessories Neon the Horse Amigurumi Pattern step 4 - final assembly and finishing

Switch Things Up

I love how easily you can customize Neon to match any personality or color scheme! While the pastel purple, apricot, and pink are absolutely dreamy, you can completely switch things up to make her unique.

Try working her in traditional horse colors like deep browns, warm chestnuts, or elegant blacks for a more realistic barnyard friend. A crisp white body with a rainbow mane would make the absolute perfect magical unicorn!

You can also experiment with yarn weights to change her final size. Using a chunky blanket chenille yarn with a larger 5.0mm hook will give you a massive, squishable pillow-sized horse that is perfect for cuddling!

If you're making this for a baby, consider embroidering the eyes with black yarn instead of using plastic safety eyes, ensuring it's completely safe and soft for tiny hands.

For extra flair, try adding tiny crocheted accessories! A little saddle, a delicate flower crown secured over her ears, or even a miniature scarf would look amazing. The creative possibilities are truly endless!

Common Mistakes & How to Fix Them

โœ— Working the back loops only (BLO) rounds too loosely can cause gaps; maintain firm tension when stitching to keep the stuffing hidden. โœ— Misaligning the patch during assembly can make the face look crooked; always use sewing pins to secure it centrally before attaching permanently. โœ— Understuffing the neck area often results in a wobbly head; be sure to pack stuffing firmly into the neck opening before sewing the head to the body. โœ— Losing count during the mane's double crochet increases will result in uneven curls; use a stitch marker at the start of each row and count frequently.

Neon the Horse Amigurumi Pattern

Meet Neon the Horse, a unique and girly companion who spends her time daydreaming of pretty things like fairy floss and rainbows! She can't wait to be old enough to go galloping off into the sunset with her friends. While she looks great in traditional horse colors, she absolutely loves to stand out in soft pastels too. Crochet your very own magical friend today!

Intermediate 5-7 Hours

Materials Needed for Neon the Horse Amigurumi Pattern

โ€” Main Fabric

  • 01
    4ply yarn/fingering BEIGE - less than 50g (e.g., Hobbii Cotton Kings 8/4 color 02)
  • 02
    4ply yarn/fingering APRICOT - less than 50g (e.g., Hobbii Rainbow Cotton 8/4 color 89)
  • 03
    4ply yarn/fingering PURPLE - less than 50g (e.g., Hobbii Rainbow Cotton 8/4 color 39)
  • 04
    4ply yarn/fingering PINK - less than 50g (e.g., Hobbii Rainbow Glitter Gold color 044)

โ€” Tools Required

  • 01
    Crochet hook size 2.0mm / B-1 (US)
  • 02
    Safety eyes 8mm
  • 03
    Scissors
  • 04
    Tapestry needle
  • 05
    Polyester toy stuffing
  • 06
    Stitch marker

Progress Tracker

0% Complete

โ€” Ears (APRICOT, make 2) :

Round 1 :

6 sc in MR (6)

Round 2 :

inc x 6 (12)

Round 3 :

(sc, inc) x 6 (18)

Round 4-9 :

sc x 18 (18)

Info :

Fasten off, fold ears in half and half again (you should have 4 edges together) and sew across the bottom. Leave a tail for sewing.

โ€” Head (PURPLE) :

Round 1 :

6 sc in MR (6)

Round 2 :

inc x 6 (12)

Round 3 :

(sc, inc) x 6 (18)

Round 4 :

(sc x 2, inc) x 6 (24)

Round 5 :

(sc x 3, inc) x 6 (30)

Round 6-9 :

sc x 30 (30)

Info :

Change to APRICOT.

Round 10 :

in BLO: sc x 30 (30)

Round 11 :

sc x 30 (30)

Round 12 :

(sc x 4, inc) x 6 (36)

Round 13 :

(sc x 5, inc) x 6 (42)

Round 14 :

(sc x 6, inc) x 6 (48)

Round 15 :

(sc x 7, inc) x 6 (54)

Round 16-20 :

sc x 54 (54)

Round 21 :

(sc x 7, dec) x 6 (48)

Round 22 :

sc x 48 (48)

Round 23 :

(sc x 6, dec) x 6 (42)

Round 24 :

(sc x 5, dec) x 6 (36)

Round 25 :

(sc x 4, dec) x 6 (30)

Info :

If using safety eyes, insert between rounds 15 and 16, 11 stitches apart.

Round 26 :

(sc x 3, dec) x 6 (24)

Info :

Stuff the head and continue stuffing until fastened off.

Round 27 :

(sc x 2, dec) x 6 (18)

Round 28 :

(sc, dec) x 6 (12)

Round 29 :

dec x 6 (6)

Info :

Fasten off and weave tail through final round, pull to close.

โ€” Arms (PURPLE, make 2) :

Round 1 :

6 sc in MR (6)

Round 2 :

inc x 6 (12)

Round 3 :

(sc, inc) x 6 (18)

Round 4 :

sc x 18 (18)

Round 5 :

in BLO: sc x 18 (18)

Round 6 :

(sc x 7, dec) x 2 (16)

Info :

Change to BEIGE.

Round 7 :

(sc x 6, dec) x 2 (14)

Round 8 :

sc x 14 (14)

Info :

Change to APRICOT.

Round 9-18 :

sc x 14 (14)

Info :

Fasten off, stuff rounds 1-8 and sc across top. Leave a tail for sewing.

โ€” Legs (PURPLE, make 2) :

Round 1 :

8 sc in MR (8)

Round 2 :

inc x 8 (16)

Round 3 :

(sc, inc) x 8 (24)

Round 4-5 :

sc x 24 (24)

Round 6 :

in BLO: (sc x 6, dec) x 3 (21)

Round 7 :

(sc x 5, dec) x 3 (18)

Info :

Change to BEIGE.

Round 8-9 :

sc x 18 (18)

Info :

Change to APRICOT.

Round 10-18 :

sc x 18 (18)

Info :

Fasten off, stuff and sc across the top to close. Leave a tail for sewing.

โ€” Body (APRICOT) :

Round 1 :

6 sc in MR (6)

Round 2 :

inc x 6 (12)

Round 3 :

(sc, inc) x 6 (18)

Round 4 :

(sc x 2, inc) x 6 (24)

Round 5 :

(sc x 3, inc) x 6 (30)

Round 6 :

(sc x 4, inc) x 6 (36)

Round 7 :

(sc x 5, inc) x 6 (42)

Round 8-15 :

sc around (42)

Round 16 :

(sc x 5, dec) x 6 (36)

Round 17-20 :

sc x 36 (36)

Round 21 :

(sc x 4, dec) x 6 (30)

Round 22 :

sc x 30 (30)

Round 23 :

(sc x 3, dec) x 6 (24)

Info :

Stuff and continue stuffing until fastened off.

Round 24 :

(sc x 2, dec) x 6 (18)

Round 25 :

(sc, dec) x 6 (12)

Info :

Fasten off, weave tail through final round and pull to close. Leave a tail for sewing.

โ€” Mane (PINK) :

Info :

Leave a long tail at the beginning for sewing. You will work in rows and turn at the end of each row. Chains do not count as a stitch.

Row 1 :

ch 16, sc in 2nd ch from hook, sc x 14 (15)

Row 2 :

ch 2 and 3dc in same stitch, 3dc x 14 (45)

Row 3 :

ch 2 and 3dc in same stitch, 3dc x 44 (135)

Info :

Fasten off and leave a tail for sewing.

โ€” Tail (PINK) :

Info :

Leave a long tail at the beginning for sewing. You will work in rows and turn at the end of each row. Chains do not count as a stitch.

Row 1 :

ch 9, sc in 2nd ch from hook, sc x 7 (8)

Row 2 :

ch 2 and 3dc in same stitch, 3dc x 7 (24)

Row 3 :

ch 2 and 3dc in same stitch, 3dc x 24 (72)

Info :

Fasten off and leave a tail for sewing.

โ€” Patch (BEIGE) :

Row 1 :

ch 6, sc in 2nd chain from hook, sc x 3, 3sc in the final chain, turn and work on the other side: sc x 3, inc (12)

Row 2 :

inc, sc x 3, inc, sc, inc, sc x 3, inc, sc (16)

Row 3 :

sc, inc, sc x 4, inc, sc, inc, sc x 5, inc, sc (20)

Info :

Fasten off and leave a tail for sewing.

Assembly Instructions

  • EYES: Using APRICOT, sew over a stitch on the inner part of each eye as shown in the pattern photos and pull a little to create an indent, tying off yarn tails to hide inside the head.
  • PATCH: Position and sew to the center of the head over rounds 12-19.
  • HEAD: Sew to the body, going around the neck joint twice to make it secure and stable.
  • EARS: Sew to either side of the head over rounds 18-22, approximately 3 stitches away from the patch.
  • LEGS: Sew to rounds 5-7 of the body pointing outwards, leaving about 3 stitches apart between them.
  • ARMS: Sew to the body over rounds 17-22 on a diagonal angle so the arms point slightly forward and naturally rest on the legs.
  • MANE & TAIL: Sew the mane down the back of the head starting approximately 1 round after the patch. Sew the tail to the back of the body over rounds 6-11.
  • NOSTRILS: Using APRICOT, make 2 vertical lines over rounds 3-5 of the snout, approximately 5 stitches apart.

Important Notes

  • ๐Ÿ’กA yarn with no stretch is best for amigurumi; cotton or cotton blends are recommended to achieve the right texture.
  • ๐Ÿ’กGenerally, the hook you use for amigurumi will be smaller than for other crochet styles as you want the stitches tight to conceal stuffing.
  • ๐Ÿ’กRemember that amigurumi is stitched in the round unless the instructions explicitly say otherwise.
  • ๐Ÿ’กIf you are giving this toy to a young child, consider embroidering the eyes instead of using safety eyes to ensure there are no loose fittings.
  • ๐Ÿ’กStuff parts firmly and evenly as you continue shaping them until they are fastened off to maintain the correct proportions.

Neon the Horse is an absolutely magical project that will bring a touch of pastel joy to your amigurumi collection! The combination of her cute little face patch and incredibly curly mane makes her a truly special and personalized companion. Whether you're making her as a sweet gift or keeping her for yourself, she's guaranteed to be a colorful favorite. ๐Ÿฆ„ Enjoy every magical stitch! โœจ

You ask,

we answer.

FAQs

How tall is the finished Neon the Horse?

When using the recommended 4ply/fingering weight yarn and a 2.0mm hook, Neon stands approximately 15cm (5.5 inches) tall when seated.

Can I use different yarn for the mane and tail?

Absolutely! The pattern uses a glittery gold/pink yarn, but any 4ply yarn will work beautifully. You can even mix and match colors for a rainbow mane!

Is this pattern suitable for beginners?

This pattern is rated as Intermediate because it requires color changes, working in the back loops only, and some specific shaping techniques.

Are the legs and arms crocheted into the body?

No, all limbs, the mane, tail, ears, and facial patch are crocheted separately and securely sewn onto the head and body during assembly.